Have thought about doing similar - Spark sized tube adaptor to sit over the top. Crap being blown everywhere doesn't really bother me, cos the engine bay clean sorts that....Alan 480 wrote: ↑Mon Jan 18, 2021 5:40 pmfor cleaning the area around the plugs I made up an adaptor for the hoover with a section of 6mm air line, mahooosive sook so when scratch about with a 'pointy thing' it wheeches the debris out and away from the plugs, I could have used the air-line but then the cr@p is blown all over the place....
Rescue Car: R3
Moderators: jifflemon, coyote1980, Rachel
Re: Rescue Car: R3
Re: Rescue Car: R3
yes if you are planning to steam clean it the cr@p won't matterjifflemon wrote: ↑Tue Jan 19, 2021 8:42 amHave thought about doing similar - Spark sized tube adaptor to sit over the top. Crap being blown everywhere doesn't really bother me, cos the engine bay clean sorts that....Alan 480 wrote: ↑Mon Jan 18, 2021 5:40 pmfor cleaning the area around the plugs I made up an adaptor for the hoover with a section of 6mm air line, mahooosive sook so when scratch about with a 'pointy thing' it wheeches the debris out and away from the plugs, I could have used the air-line but then the cr@p is blown all over the place....
I should have also said can be used with long thin screwdriver (and LOTS of care) with the plugs removed to clean up the seat of plugs against the cylinder head..
Alan
480 ES 2litre 'Celebration' ? , C30 1.8ES, SS1
480 ES 2litre 'Celebration' ? , C30 1.8ES, SS1
Re: Rescue Car: R3
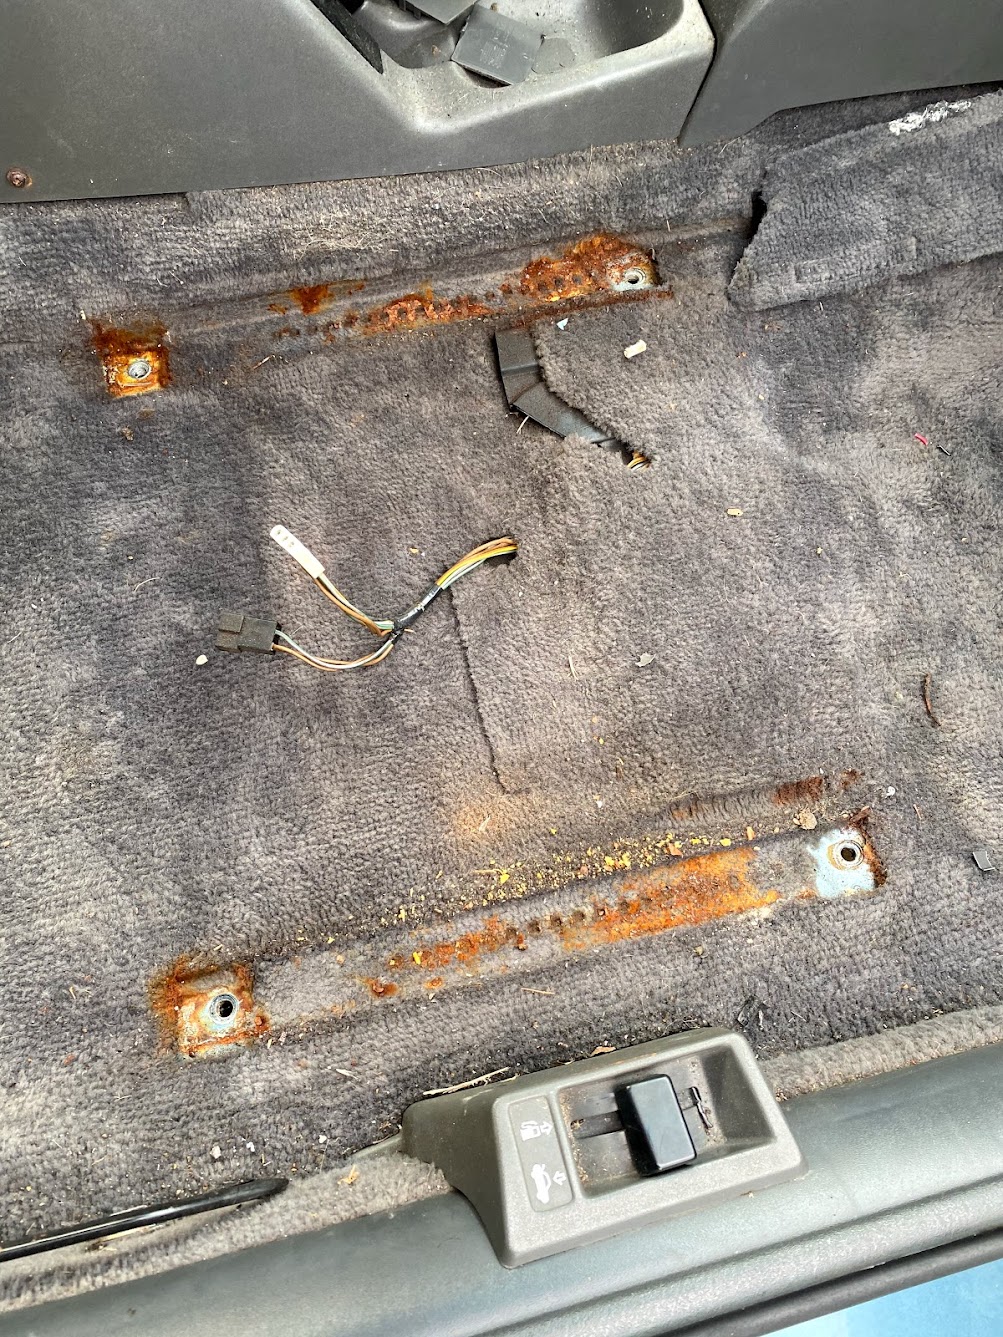
So.... More cleaning. 
First up, the boot carpet was removed, along with the rear plastics.
This revealed a few things:
A surprising solid rear floor


and a rather large spider living in the rear wheel cover.
Screamed and threw it into next doors garden. Contemplated burning it to play it safe, as I've plenty of spare ones......
Then took the rear seats indoors; The lower parts had already been removed; Although perhaps "removed" is quite the right choice of word.

Lower rear seats had a little get together with two of my friends


and then the rather damp carpet was given the same treatment...

There's two reasons for using Pet carpet cleaning solution; The first and most obvious is that I've got a dog and its what I use on my carpets! However, the second is that cleaners designed for dealing with pet odour have a active enzymes to kill bacteria and nutralise the odours.
The upper seat backs were removed and given the works - This is just from the two upper seat backs....

The boot carpet wasn't vac extracted - It was that filthy that I just scrubbed then power showered, then repeated until only clean water coming out of it. It drip dried in there for several days which made showering fun! The things I do for these bloody cars.....
With the rear looking clear, it was time to clean some more....
the before

and the after
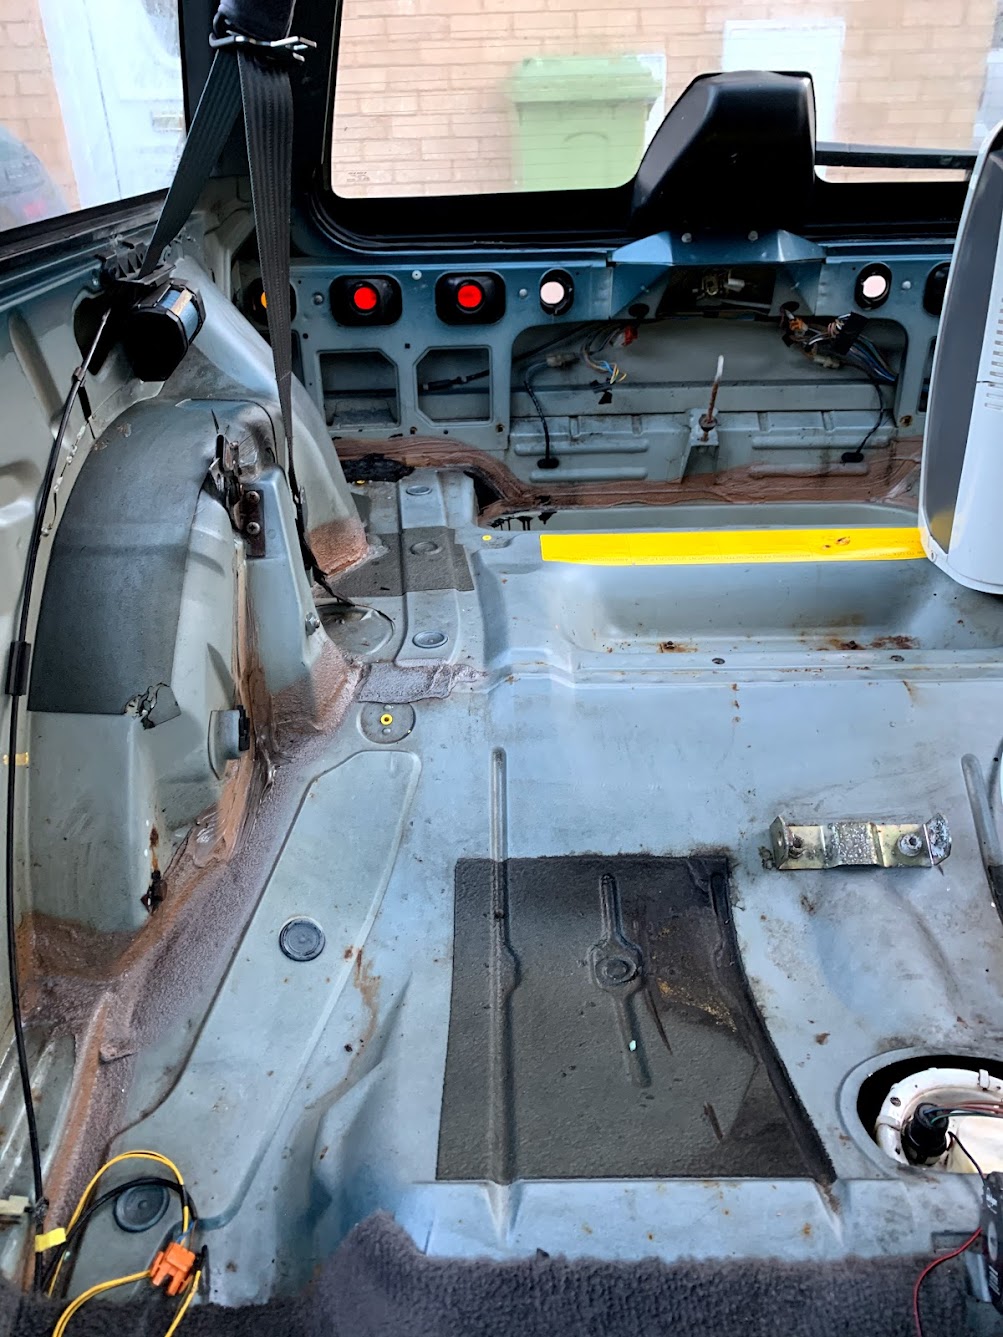
it may not look that different in the photos, but the cobwebs have gone and the floor has been vac'd and scrubbed with degreaser. All goes to getting rid of the musty smell!
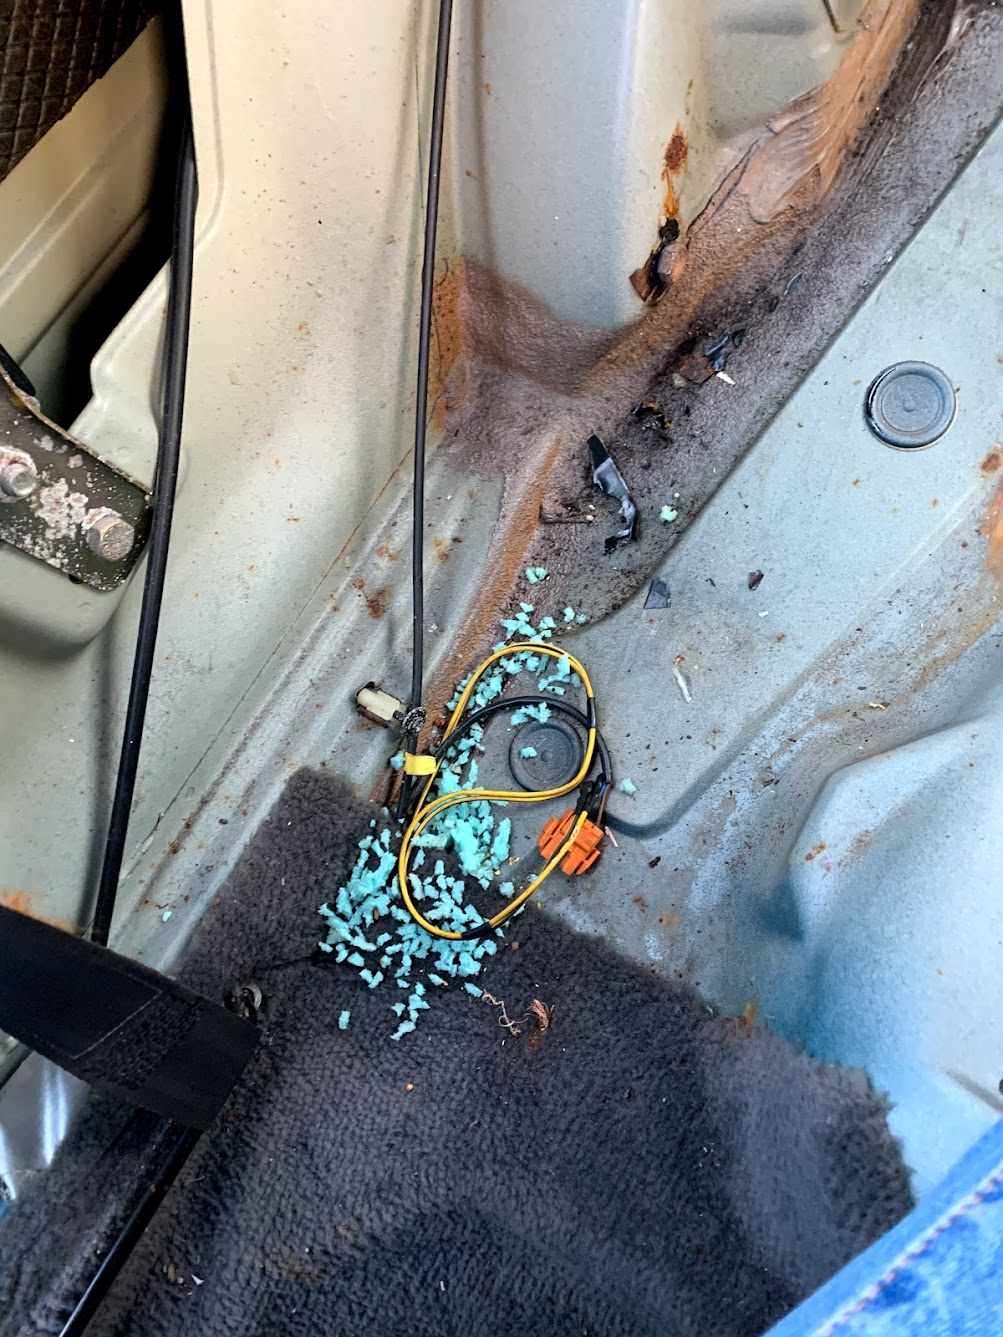
Finally, see the picture with the blue stuff on the carpet? Well, imagine sticking your head (or camera phone) into the arch (where you can see the sound deadening and the release cable) and looking back towards the wheel arch....

That's what you see....
and what you don't see, is any rust!
First up, the boot carpet was removed, along with the rear plastics.
This revealed a few things:
A surprising solid rear floor
and a rather large spider living in the rear wheel cover.
Screamed and threw it into next doors garden. Contemplated burning it to play it safe, as I've plenty of spare ones......
Then took the rear seats indoors; The lower parts had already been removed; Although perhaps "removed" is quite the right choice of word.
Lower rear seats had a little get together with two of my friends
and then the rather damp carpet was given the same treatment...
There's two reasons for using Pet carpet cleaning solution; The first and most obvious is that I've got a dog and its what I use on my carpets! However, the second is that cleaners designed for dealing with pet odour have a active enzymes to kill bacteria and nutralise the odours.
The upper seat backs were removed and given the works - This is just from the two upper seat backs....
The boot carpet wasn't vac extracted - It was that filthy that I just scrubbed then power showered, then repeated until only clean water coming out of it. It drip dried in there for several days which made showering fun! The things I do for these bloody cars.....
With the rear looking clear, it was time to clean some more....
the before
and the after
it may not look that different in the photos, but the cobwebs have gone and the floor has been vac'd and scrubbed with degreaser. All goes to getting rid of the musty smell!
Finally, see the picture with the blue stuff on the carpet? Well, imagine sticking your head (or camera phone) into the arch (where you can see the sound deadening and the release cable) and looking back towards the wheel arch....
That's what you see....
and what you don't see, is any rust!
Re: Rescue Car: R3
Is it ok that I am finding this thorough clean really captivating? It's like watching a forensic investigation. I'd better get to bed before I think of anything dire, my car hasn't had this level of taking apart, while I know it is solid, I just want to believe...
Current Jobs to do (23/1/22):
Fix Central Locking
Fix drivers side speaker
Annoying Scratching Squeak
Water leaks
Complete Front O/S rebuild
Fix Central Locking
Fix drivers side speaker
Annoying Scratching Squeak
Water leaks
Complete Front O/S rebuild
Re: Rescue Car: R3
Been getting tired of seeing stuff like this
So, with winter hopefully gone, this weekend saw the weather get in the dizzying heights of "being able to work outside for more than 5 minutes without my fingers turning blue"
First things first, fill the sink with boiling water.....

The blue container screws onto the cavity wax injector, and the milk bottle contains a .9l of dynax-s50 and .1l of white spirit to help thin and make it flow easier, because its still not THAT warm out...
Half an hour of high pressure fun later and the rear arches, Sill and door cavities are looking like this

Lets just say there's a good coating in there.....
So, next step was to get the front seats out, which of course meant dealing with the seat bolts.....
For anyone who has never dealt with seatbolts, three things you need to know.
1) They're a Torx 50 headed M10 bolt, lock-tighted in place at the factory
2) They've probably been sat in damp water soaked carpet at some point in their life.
3) Access to them, particularly at the front, is not the easiest.
Meet "the easy one"

I however, was not worried. Because I have spent money on what is possibly, my absolute favourite tool. Say hello to my little friend..
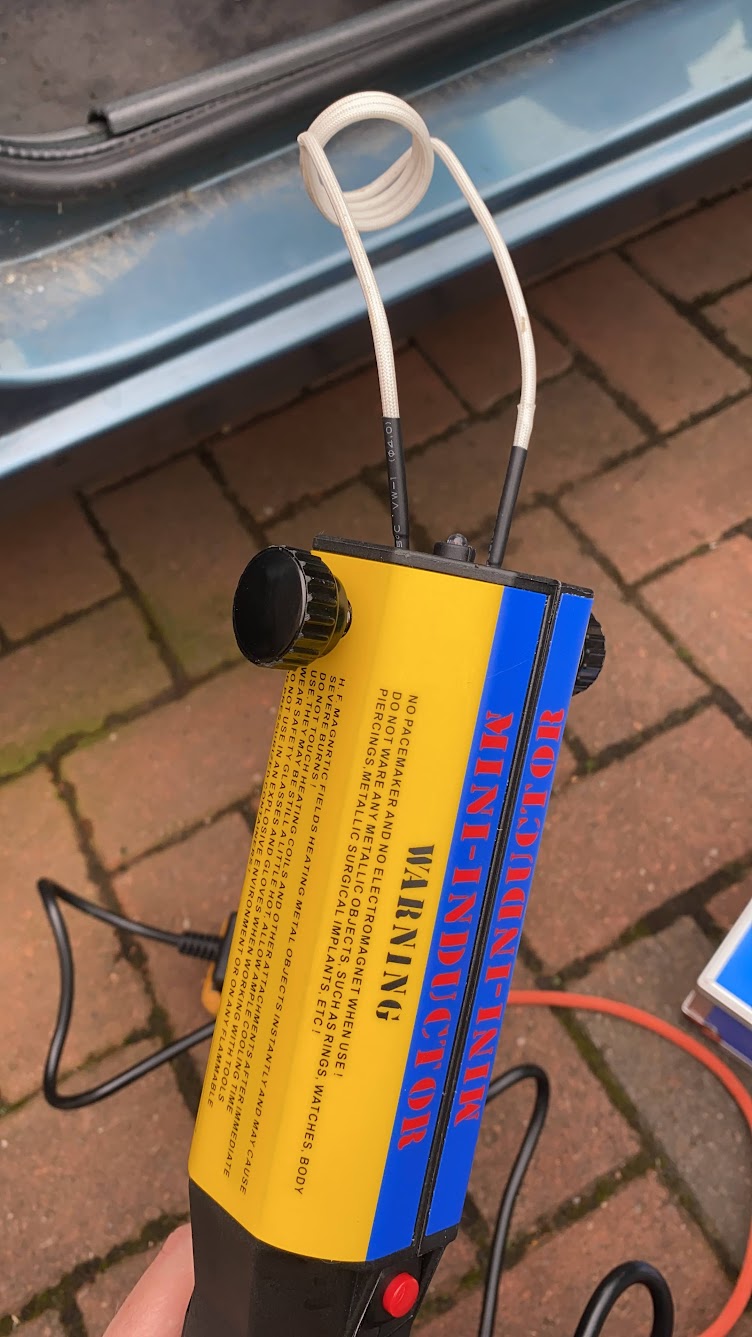
An inductor gun does all the work of a traditional "hot spanner" without any of the worries about setting the car, yourself or your surroundings on fire. Wrap that little coil around the exposed bit of bolt under the car, hit the button and 12 seconds later, the bolt is cherry red and comes undone with absolute ease. Never in my life have I been so happy.... The instructions warn that 2 minutes is the maximum amount of time the tool should be used on a single bolt; Honestly, I think after 1 minute any bolt would be liquid!
And here's a bolt, cooled down, showing no damage at all

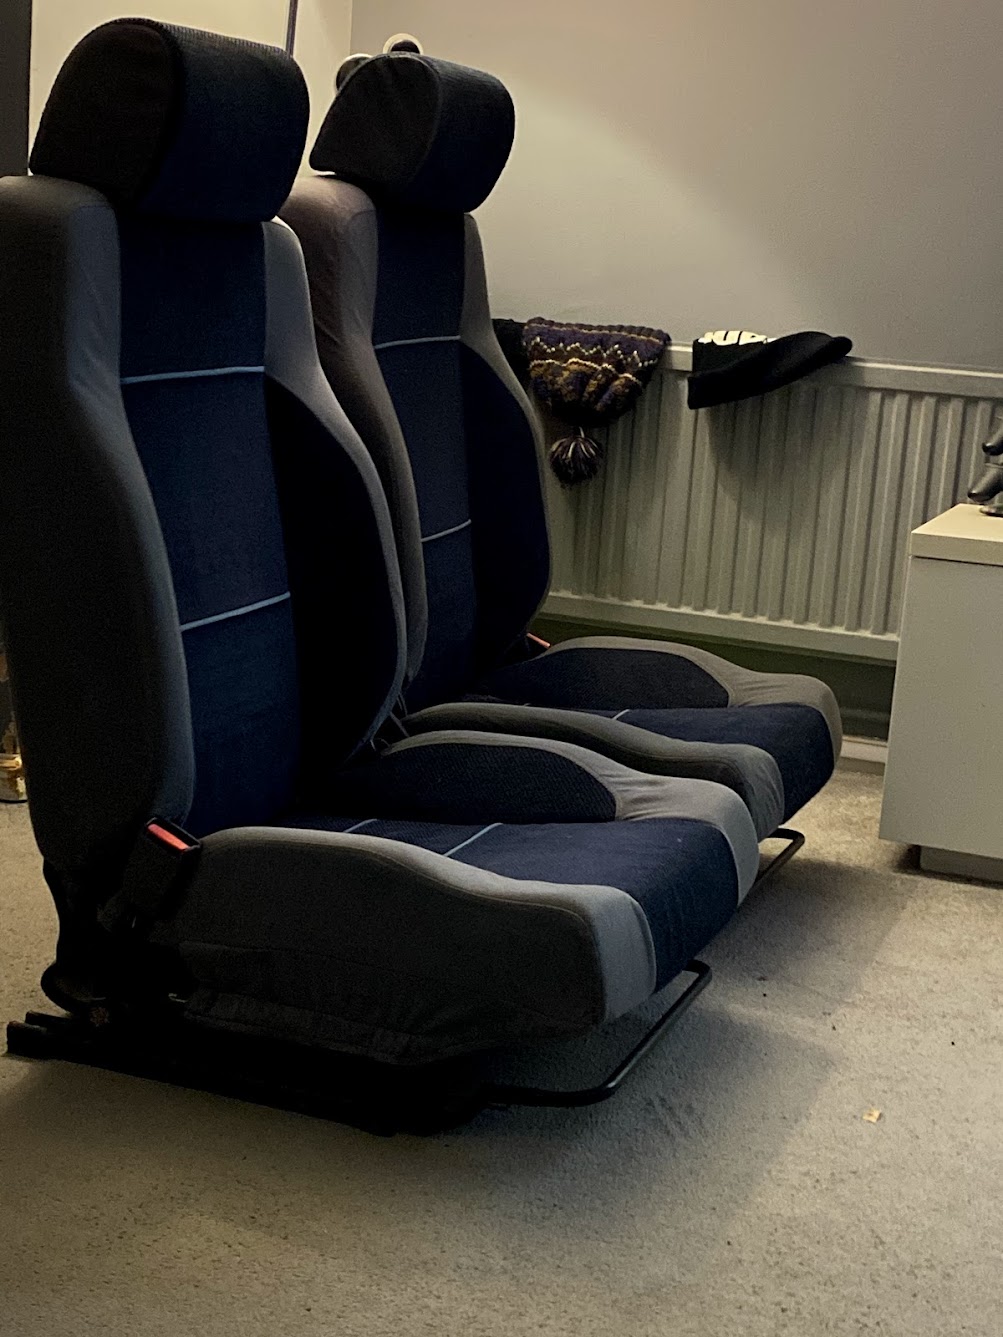
And thus my living room gained a new pair of seats
Of course, removing the front seats left us with some more challenges....
But this is not our first rodeo.....
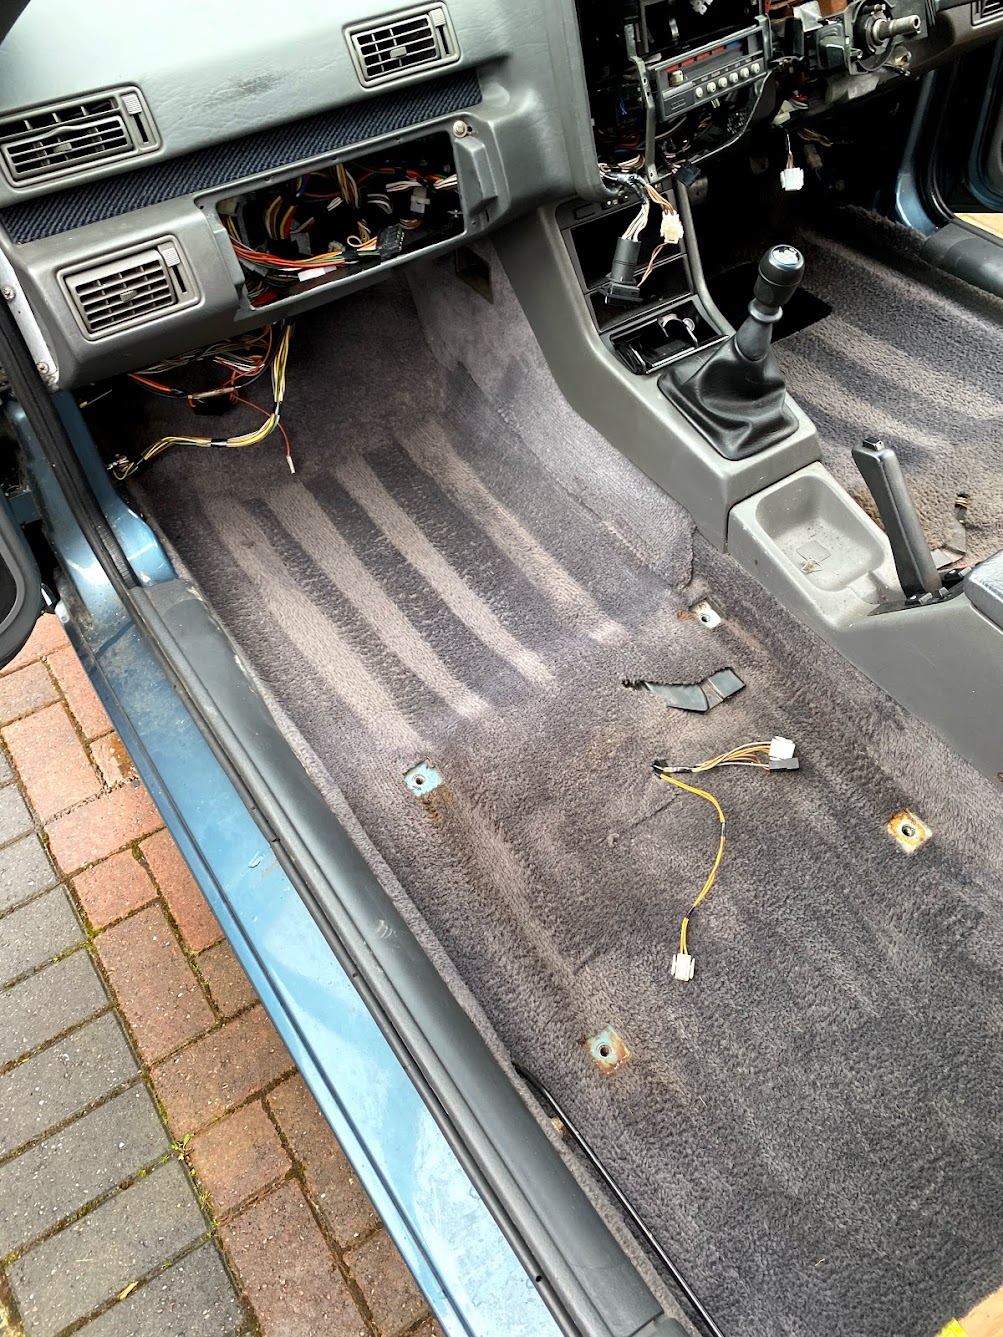
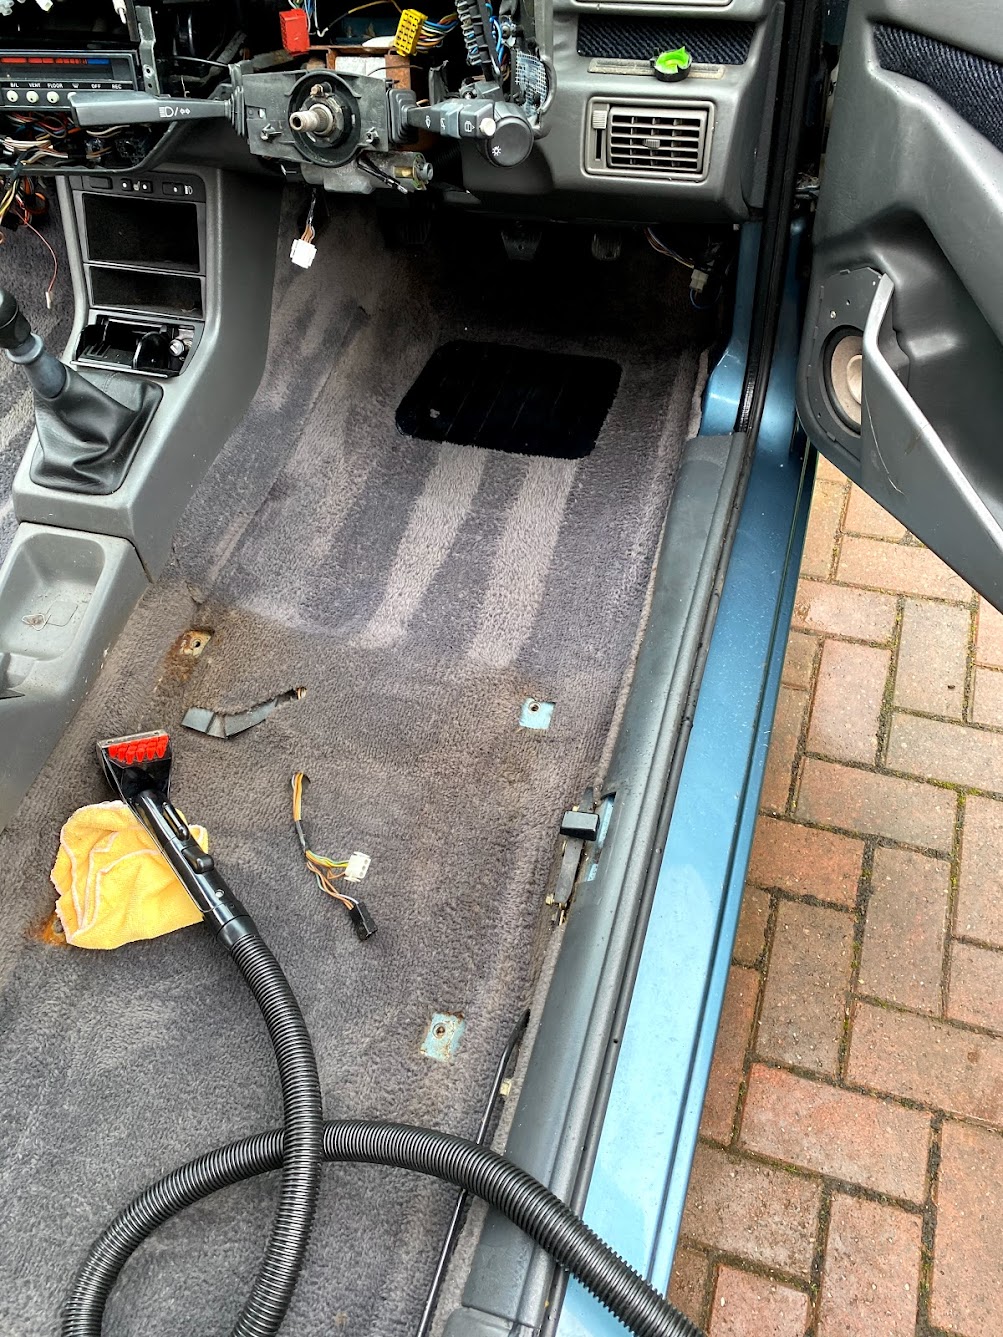
Drying the carpets would be great if the heater worked.... which it didn't.
A quick bit of troubleshooting led me here, tucked up in the corner near the CEM, viewed through the removed glovebox.
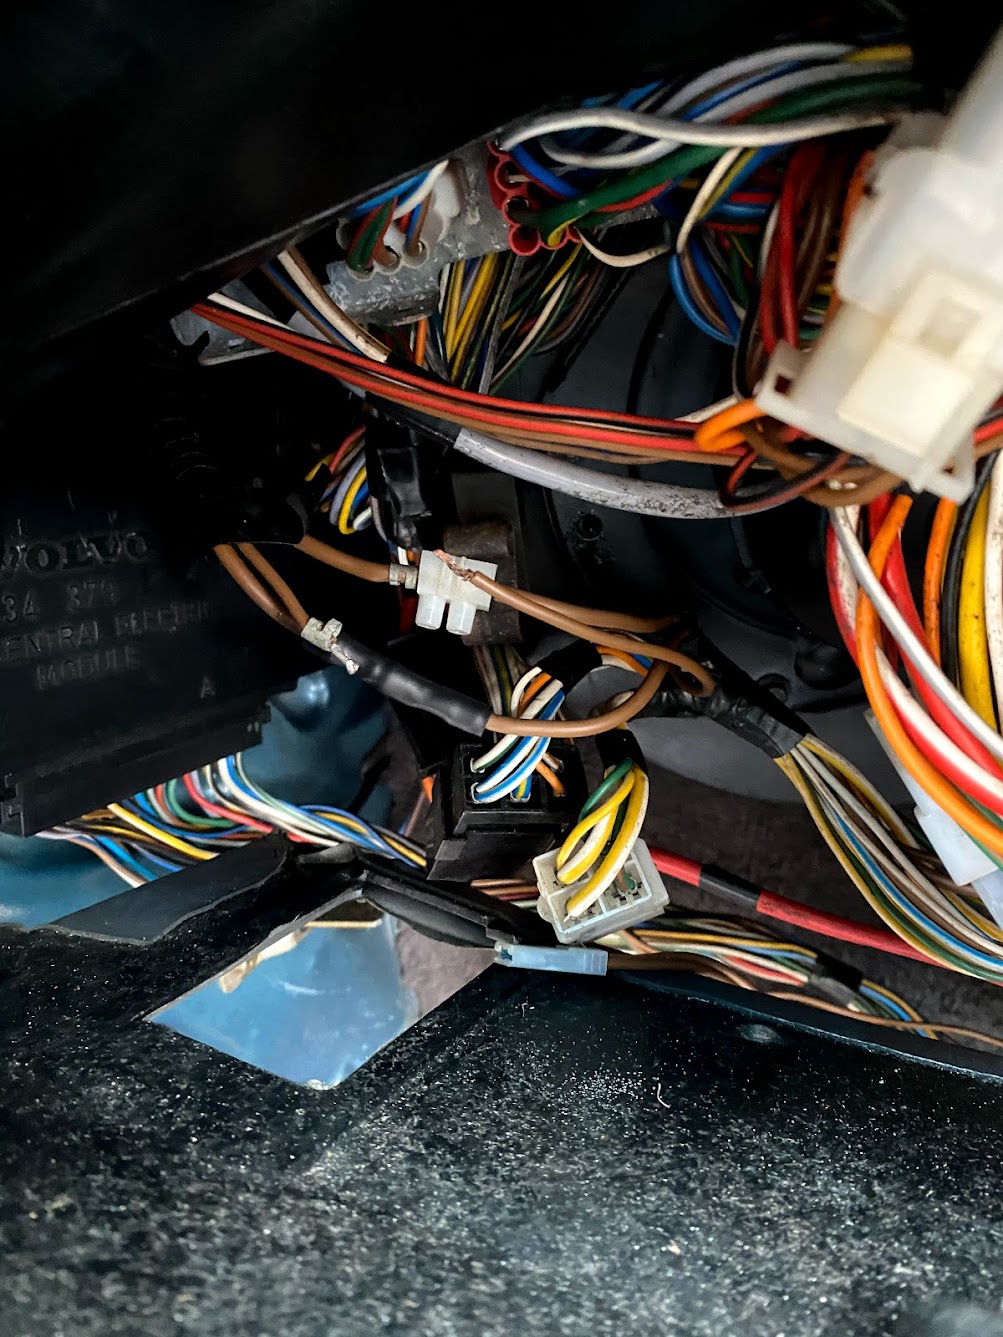
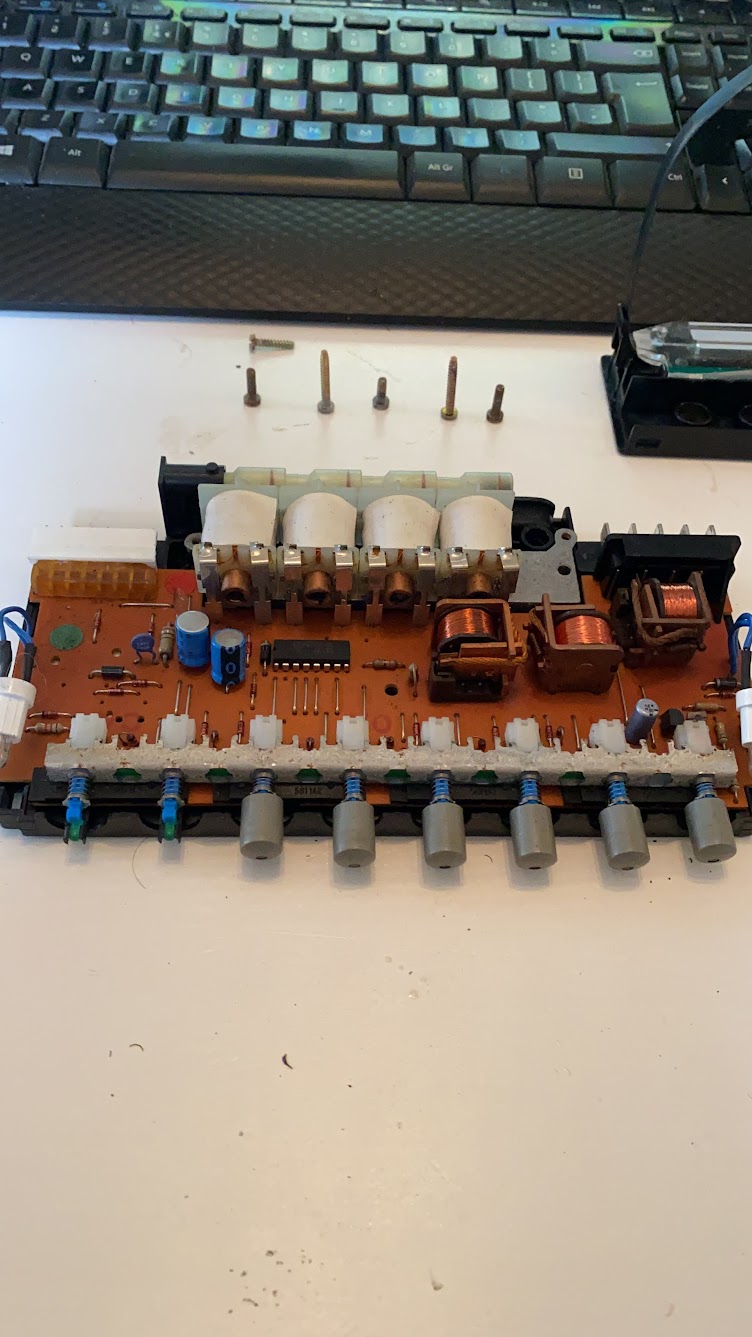
after re-making the three earths, we had a working fan, but no means of changing direction, which means....

So, with winter hopefully gone, this weekend saw the weather get in the dizzying heights of "being able to work outside for more than 5 minutes without my fingers turning blue"
First things first, fill the sink with boiling water.....
The blue container screws onto the cavity wax injector, and the milk bottle contains a .9l of dynax-s50 and .1l of white spirit to help thin and make it flow easier, because its still not THAT warm out...
Half an hour of high pressure fun later and the rear arches, Sill and door cavities are looking like this
Lets just say there's a good coating in there.....
So, next step was to get the front seats out, which of course meant dealing with the seat bolts.....
For anyone who has never dealt with seatbolts, three things you need to know.
1) They're a Torx 50 headed M10 bolt, lock-tighted in place at the factory
2) They've probably been sat in damp water soaked carpet at some point in their life.
3) Access to them, particularly at the front, is not the easiest.
Meet "the easy one"
I however, was not worried. Because I have spent money on what is possibly, my absolute favourite tool. Say hello to my little friend..
An inductor gun does all the work of a traditional "hot spanner" without any of the worries about setting the car, yourself or your surroundings on fire. Wrap that little coil around the exposed bit of bolt under the car, hit the button and 12 seconds later, the bolt is cherry red and comes undone with absolute ease. Never in my life have I been so happy....
And here's a bolt, cooled down, showing no damage at all
And thus my living room gained a new pair of seats
Of course, removing the front seats left us with some more challenges....
But this is not our first rodeo.....
Drying the carpets would be great if the heater worked.... which it didn't.
A quick bit of troubleshooting led me here, tucked up in the corner near the CEM, viewed through the removed glovebox.
after re-making the three earths, we had a working fan, but no means of changing direction, which means....
Re: Rescue Car: R3
Wow I can feel the glee coming through the screen of my phone reading about that bolt heater!
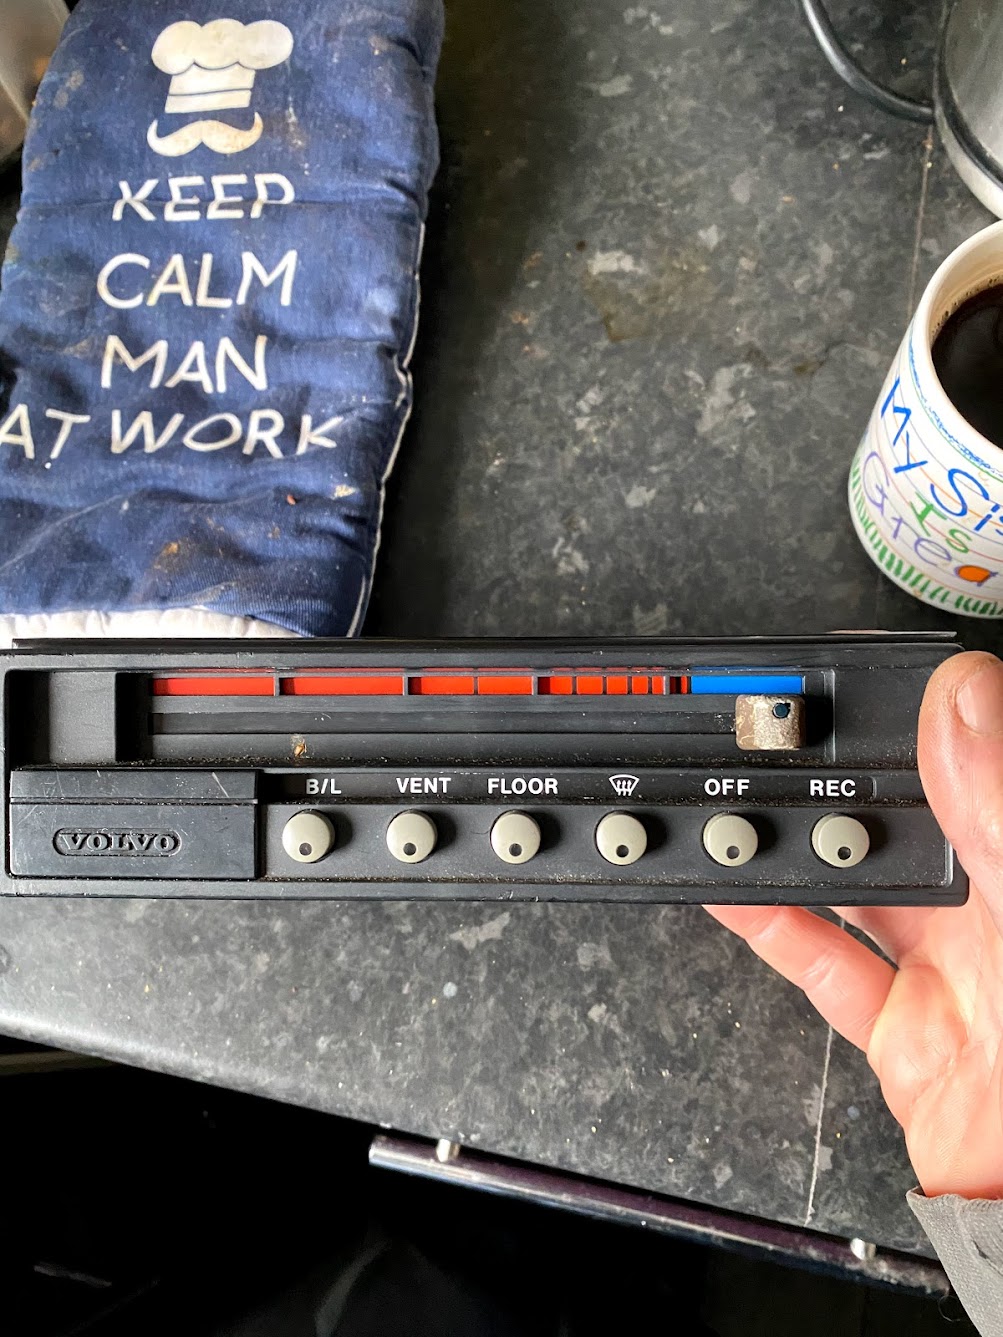
That vent control panel is different to mine, either this is one of the last of that style or mine is one of the first of the simplified style (no buttons)
That vent control panel is different to mine, either this is one of the last of that style or mine is one of the first of the simplified style (no buttons)
Current Jobs to do (23/1/22):
Fix Central Locking
Fix drivers side speaker
Annoying Scratching Squeak
Water leaks
Complete Front O/S rebuild
Fix Central Locking
Fix drivers side speaker
Annoying Scratching Squeak
Water leaks
Complete Front O/S rebuild
-
Jay-Kay-Em

- 480 Rookie
- Posts: 438
- Joined: Tue Nov 27, 2012 10:42 pm
- Location: Huntingdon
- Contact:
Re: Rescue Car: R3
Car seats in the house and fed up with the cold working conditions.... snap!
Just skimming the old photos and its good to see other cars with trim panels removed. In particular, the wiring harnesses secured with whatever tape the factory could find, and the mounting method of the red "bulb-monitoring" box at the nearside rear quarter. I looked at mine and laughed saying no way that's factory... .errrr yep it is!
One day, maybe one day, i'll have a 480 with stripy carpets. We can but dream
Jay-Kay-Em
-------------------------------------
Click here for My 480 Turbo Diary
Click here for My Cars
-------------------------------------
Click here for My 480 Turbo Diary
Click here for My Cars
Re: Rescue Car: R3
an inductor gun does all the work of a traditional "hot spanner" without any of the worries about setting the car, yourself or your surroundings on fire. Wrap that little coil around the exposed bit of bolt under the car, hit the button and 12 seconds later, the bolt is cherry red and comes undone with absolute ease. Never in my life have I been so happy.... The instructions warn that 2 minutes is the maximum amount of time the tool should be used on a single bolt; Honestly, I think after 1 minute any bolt would be liquid!
Jeff
and are these within the reach of your average penny pinching (adopted) Aberdonian?
JKM
I have stripes on the carpet too, but sadly of the orange/rust colour
serious amount of graft going into these 'rescue vehicles'
Jeff
and are these within the reach of your average penny pinching (adopted) Aberdonian?
JKM
I have stripes on the carpet too, but sadly of the orange/rust colour
serious amount of graft going into these 'rescue vehicles'
Alan
480 ES 2litre 'Celebration' ? , C30 1.8ES, SS1
480 ES 2litre 'Celebration' ? , C30 1.8ES, SS1
Re: Rescue Car: R3
Am contemplating selling some Duct tape on eBay as "genuine Volvo 480 mounting tape"Jay-Kay-Em wrote: ↑Tue Feb 23, 2021 4:45 pmJust skimming the old photos and its good to see other cars with trim panels removed. In particular, the wiring harnesses secured with whatever tape the factory could find, and the mounting method of the red "bulb-monitoring" box at the nearside rear quarter. I looked at mine and laughed saying no way that's factory... .errrr yep it is!
Re: Rescue Car: R3
Another weekend, and some more tinker time on R3.
I'm sure we've all seen on of these before.

Well, no more! Be gone!

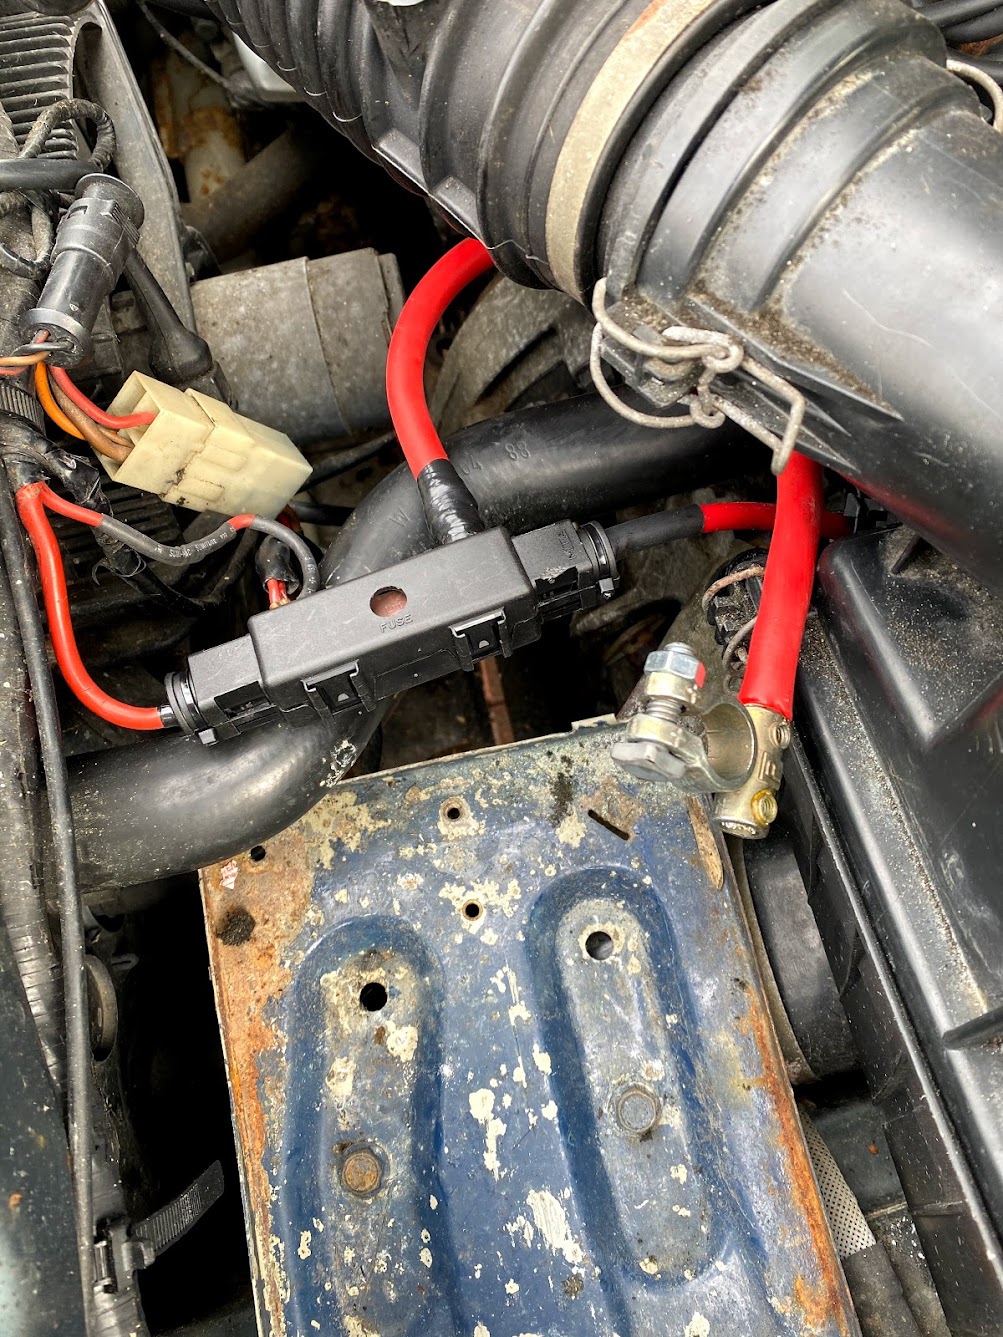
And remember that battery positive wiring?
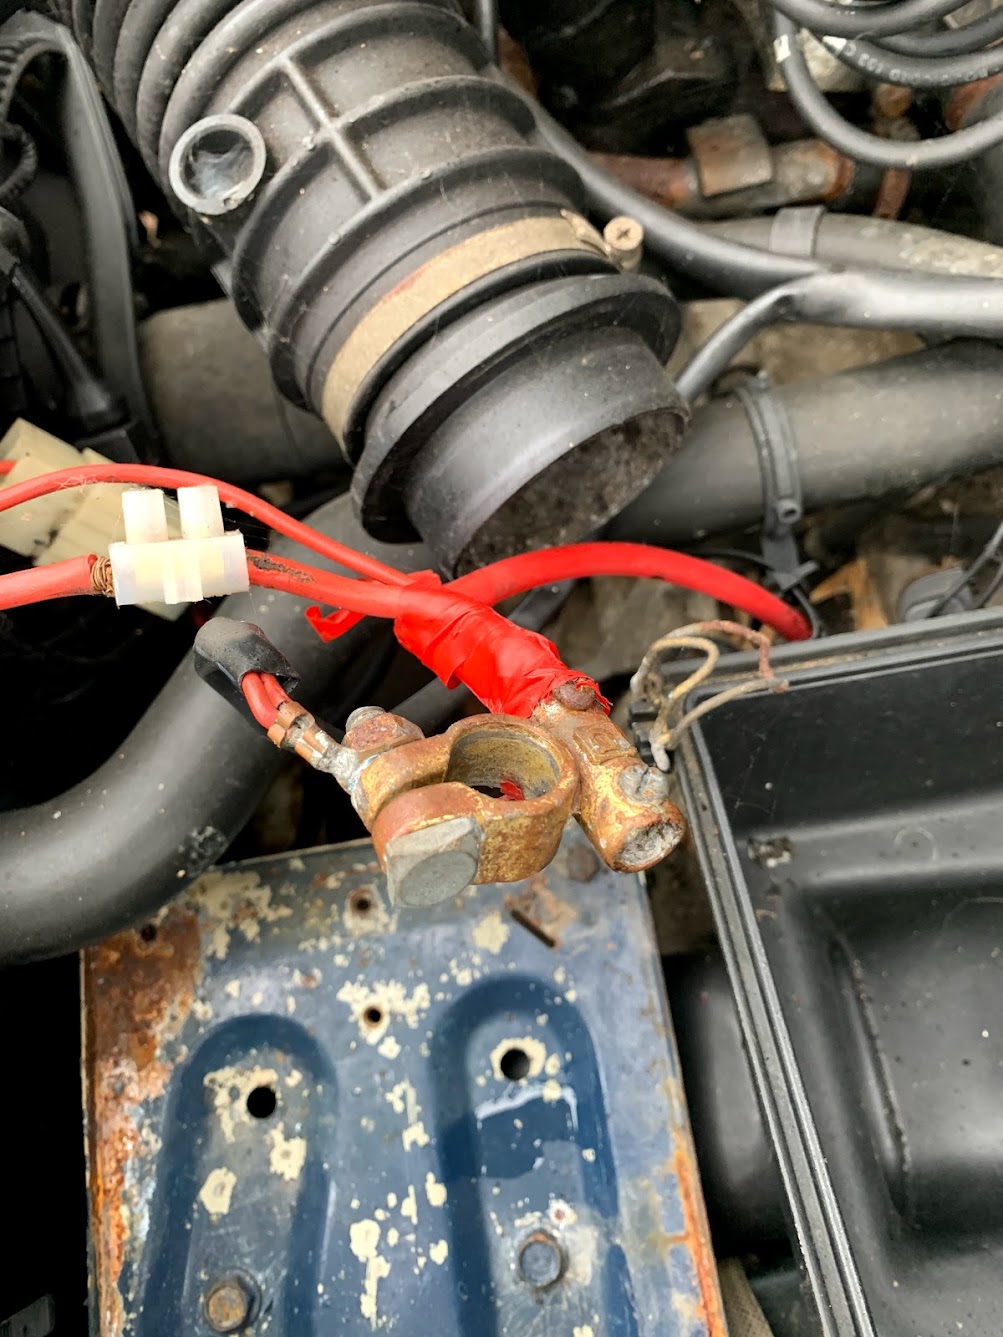
Well, also now gone! (and megafuse in place)
and we had a failed pop up. Can you guess which side? The nice simple passenger side one? Noooooo, of course not!
So nose cone removal at least gave me a chance to do some cleaning...
like the "tidemark" on the front bumper
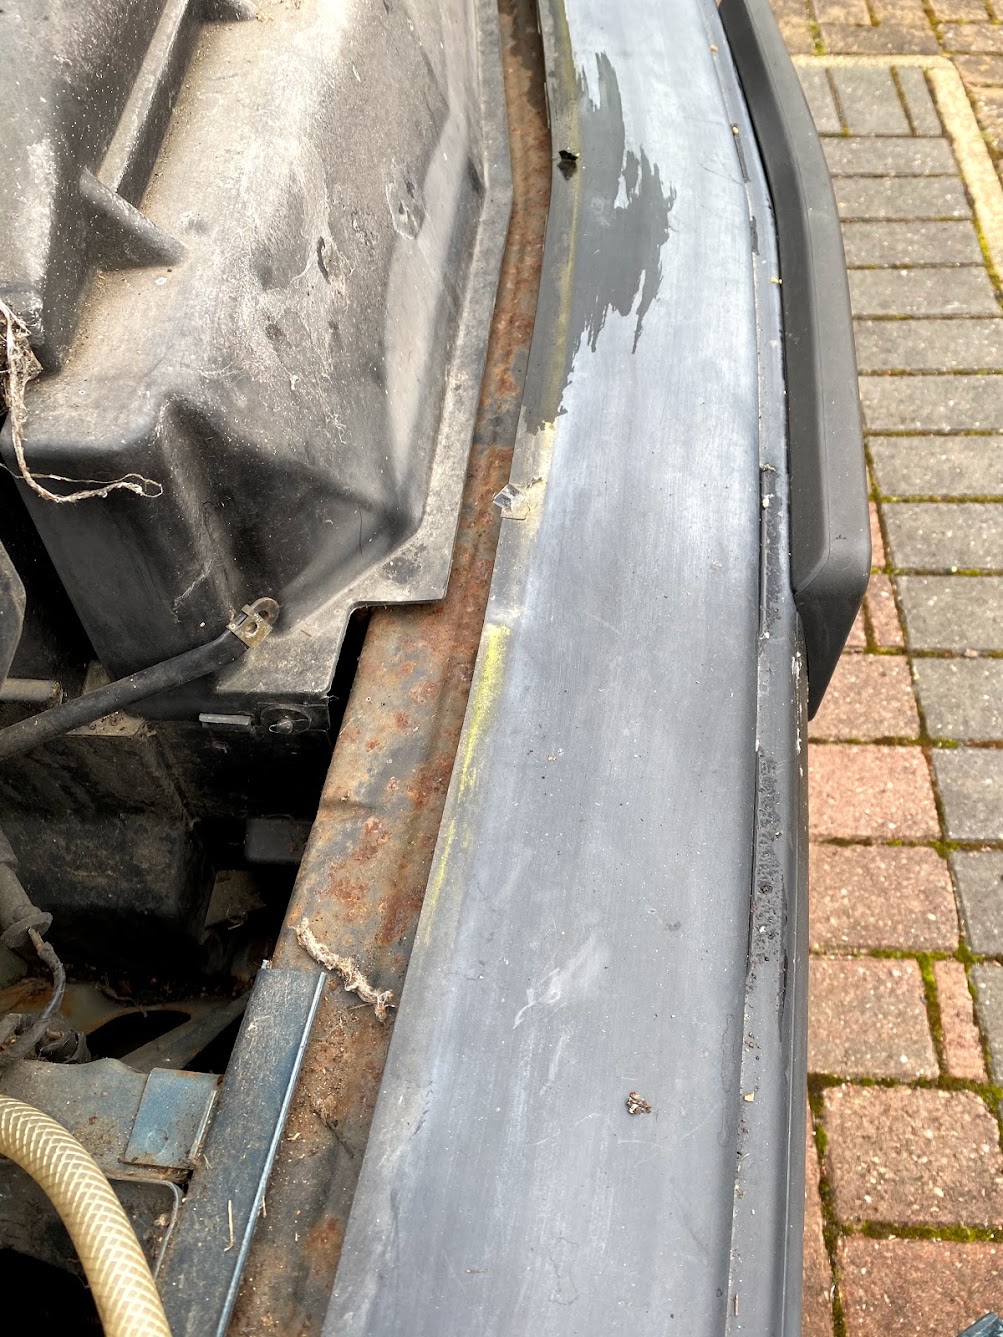
Or the cobwebs in the bumper corners

as well as swapping out the dead motor (gear failure I suspect, knob just about turns, spindle doesn't)

I'm sure we've all seen on of these before.
Well, no more! Be gone!
And remember that battery positive wiring?
Well, also now gone! (and megafuse in place)
and we had a failed pop up. Can you guess which side? The nice simple passenger side one? Noooooo, of course not!
So nose cone removal at least gave me a chance to do some cleaning...
like the "tidemark" on the front bumper
Or the cobwebs in the bumper corners
as well as swapping out the dead motor (gear failure I suspect, knob just about turns, spindle doesn't)
Re: Rescue Car: R3
Looking good Jeff, this is shaping up to be a real star!
I hope we will be able to meet it at a meetup foreseeably...
I hope we will be able to meet it at a meetup foreseeably...
Current Jobs to do (23/1/22):
Fix Central Locking
Fix drivers side speaker
Annoying Scratching Squeak
Water leaks
Complete Front O/S rebuild
Fix Central Locking
Fix drivers side speaker
Annoying Scratching Squeak
Water leaks
Complete Front O/S rebuild
Re: Rescue Car: R3
The most fascinating part of doing these rescues is discovering just how much stuff Volvo removed from the cars... it’s truly fascinating! I get economies of scale, but the early cars, for all their foibles, are somehow “more complete”.
I sense a a new post in the not so distant future....
I sense a a new post in the not so distant future....
Re: Rescue Car: R3
It's odd, there can only be months separating my car and R3, and the latter has a different heater control. I have suggested PetrolBlog takes a look at the R carsjifflemon wrote: ↑Sat Mar 06, 2021 10:39 pmThe most fascinating part of doing these rescues is discovering just how much stuff Volvo removed from the cars... it’s truly fascinating! I get economies of scale, but the early cars, for all their foibles, are somehow “more complete”.
I sense a a new post in the not so distant future....
Current Jobs to do (23/1/22):
Fix Central Locking
Fix drivers side speaker
Annoying Scratching Squeak
Water leaks
Complete Front O/S rebuild
Fix Central Locking
Fix drivers side speaker
Annoying Scratching Squeak
Water leaks
Complete Front O/S rebuild
Re: Rescue Car: R3
And in case anyone was wondering how long I could keep staring at the filthy expansion tank, the answer is:


I think a radiator flush out will be called for too....
I think a radiator flush out will be called for too....
Re: Rescue Car: R3
So, another weekend of R3 work...
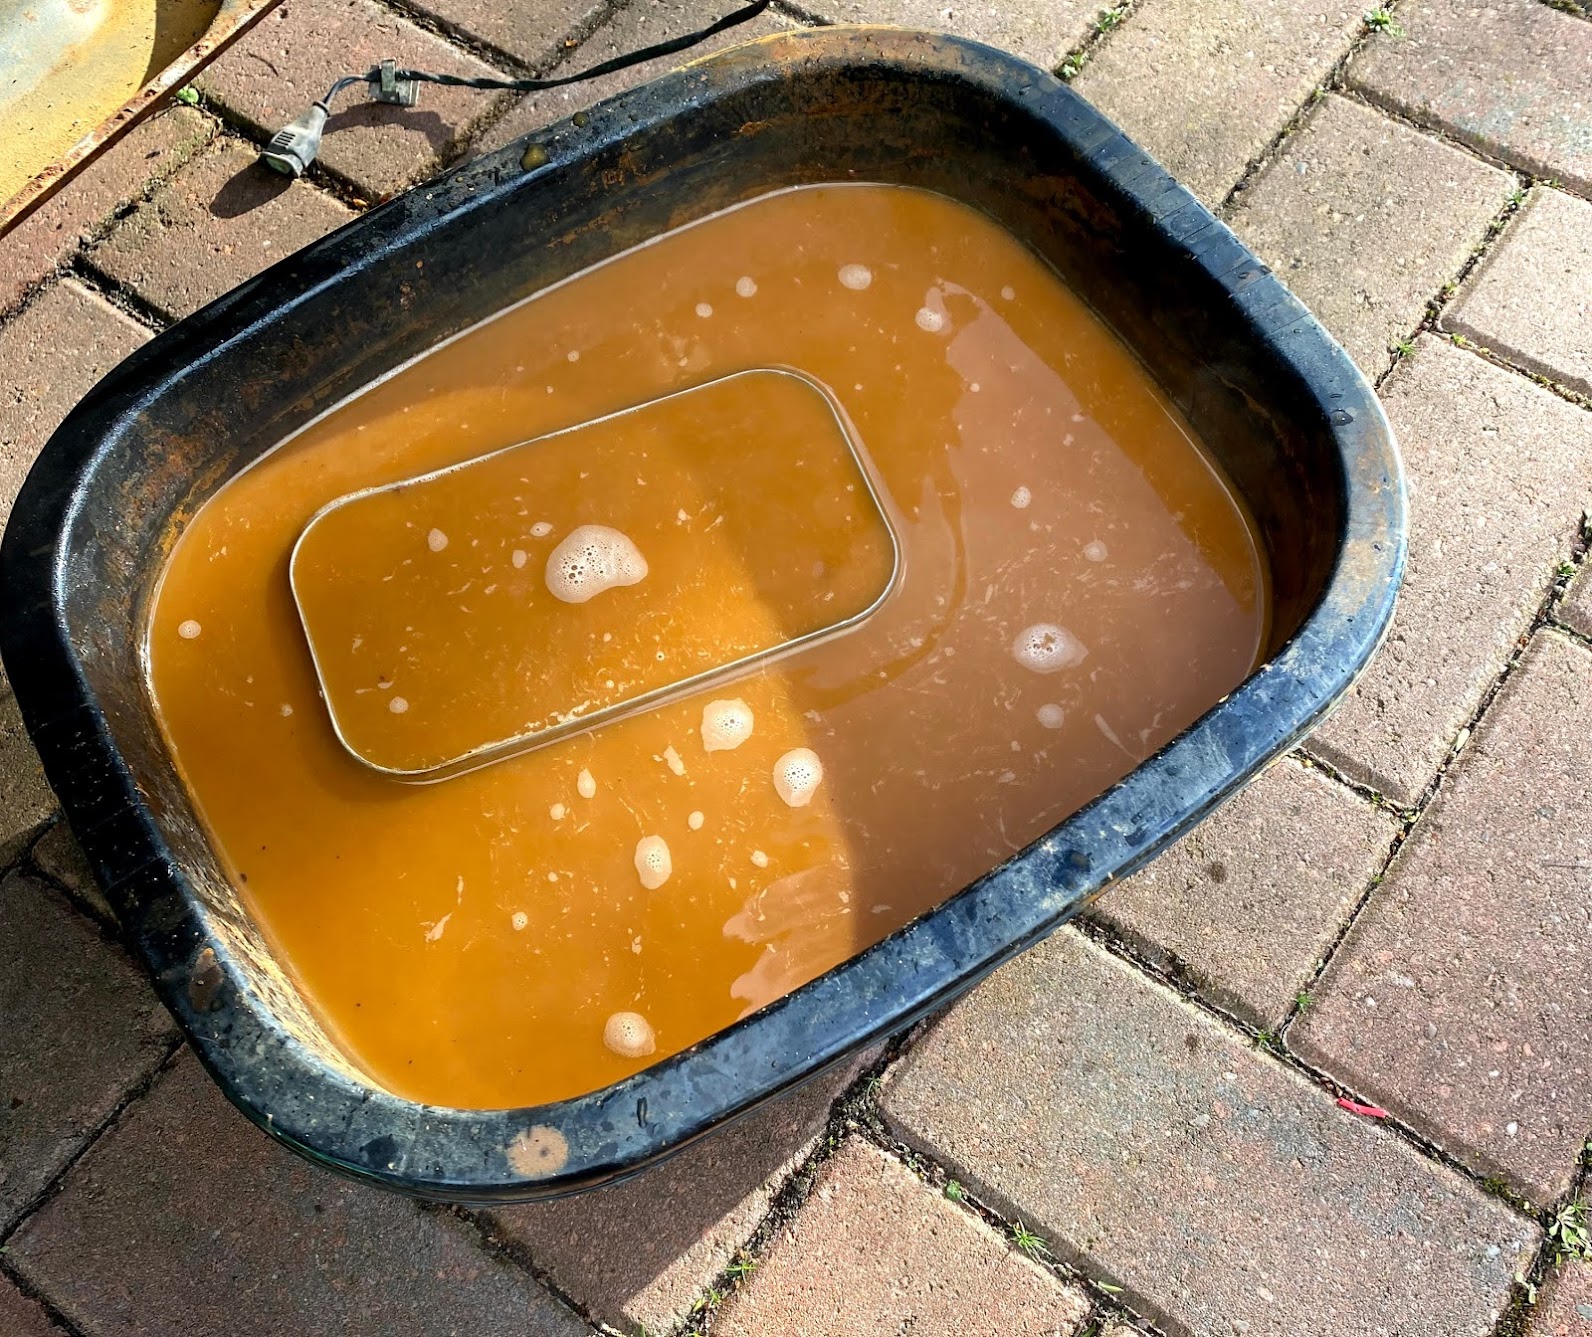
the rad flushing was started. I say started because one flush is not going to be enough to satisfy me; Not when this was the first dump...
The rad has been off and flushed separately until clean, so there's still a lot in the pipework. I'll replace the water pump when I do the cambelt. Speaking of pipework, I replaced the heater hose. Save some weight too as I only needed two to fit the replacement...

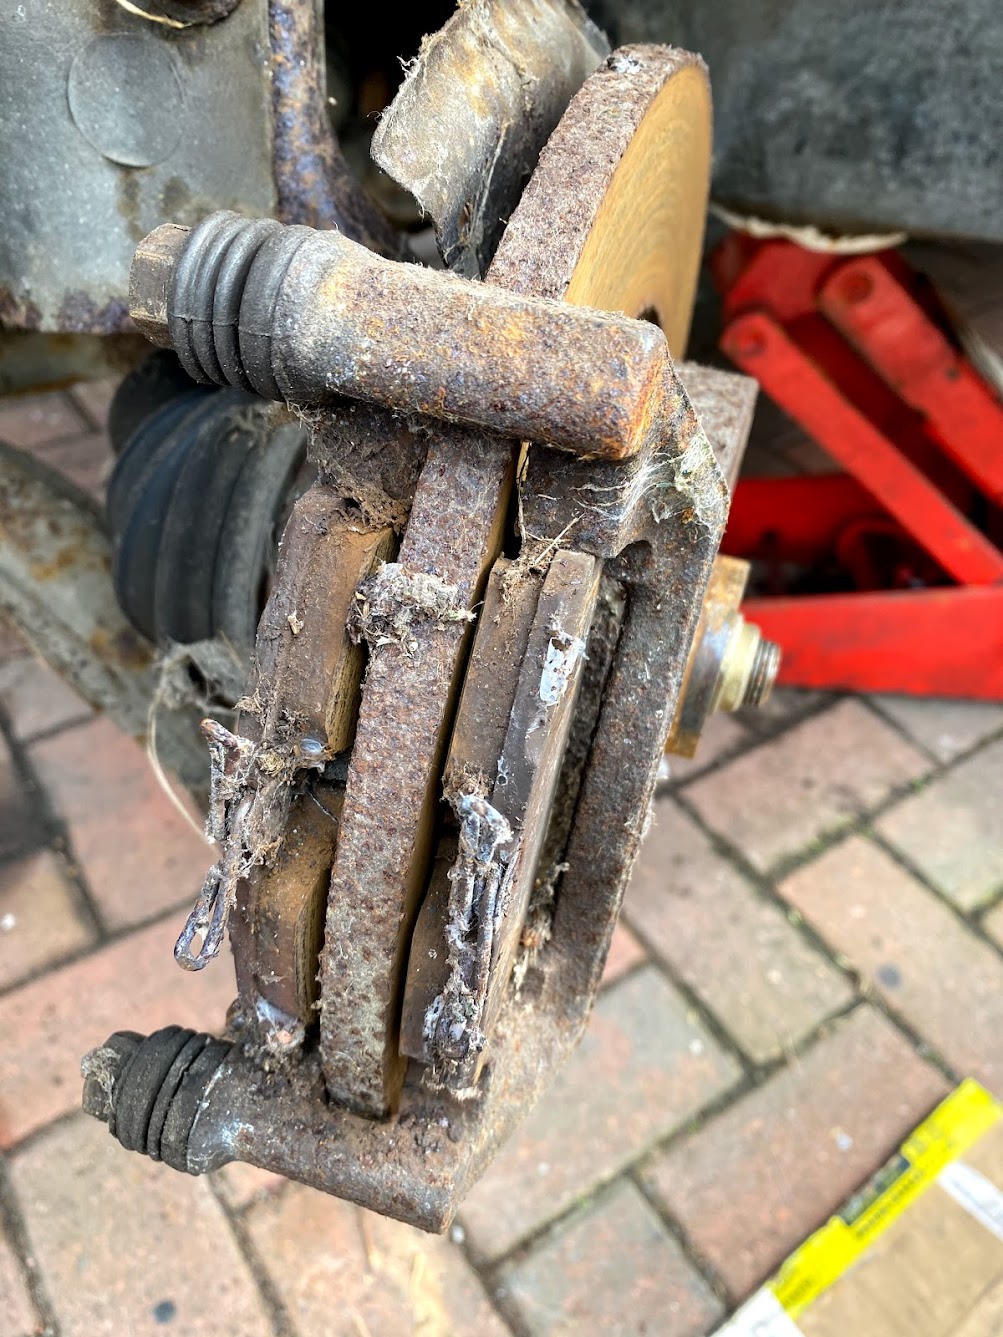
Next on the list was to free off the brakes. To give you some idea, the car sits on my sloped driveway, and without being in gear or having the handbrake on, doesn't move... even with a shove!
the rear was a little "photo light" as I was rushing but it went from this:

to this

And yes, that's the other side!
Trailing arms and disc shields were wirebrushed and Vactan'd. Brakes were pulled apart, pads unseized from the carriers, sliders lubed, de-rusted and all put back together, along with some new rear shocks. I'll get some more shots of true finished results when I flush the brake fluid and clean the wheels.
Then to the front.

Lush eh?
That soon became

now that doesn't look healthy......

So break out the toys

and inspect....
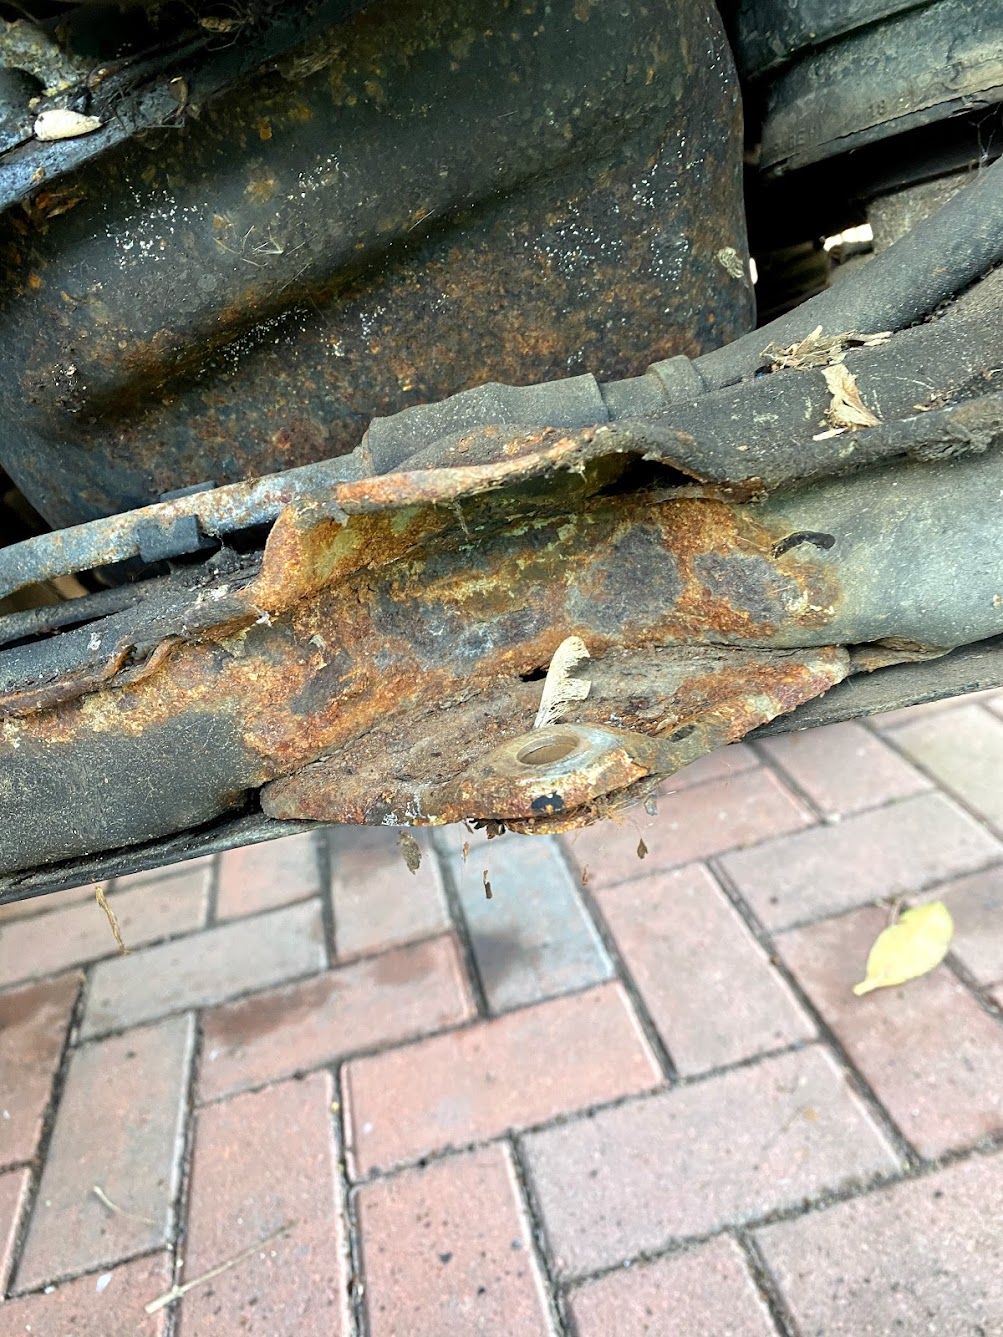


Now it looks horrendous. But, that's just an advisory item. "subframe has surface corrosion". I'm sure like me, you've seen many a 480 with an just such an advisory. Well, let's do something about it!
But first, a brief advert....
Do you not have enough danger in your life?
Do you dream of being showered in rust and needle sharp metal spikes?
Would you love pulling those metal spikes from yourself and clothing for weeks to come?
If so, you should try all new evil spinning wheel of death!

If you've never used a knot wheel on a grinder, I genuinely cannot stress the importance of safety gear. Glasses and thick gloves are a bare minimum; consider a full face mask, hat and several layers of clothing. Seriously. They're evil things! But oh do they do good....

All cleaned metal was Vactan'd before getting a coating of stone chip.
then it was the same story as the rears; Clean everything, lube everything, reassemble with a new wishbone.

And then to the other side....


etc etc and boom:

the subframe now looks much happier


Although I've still got to do a full brake fluid flush, as well as torque down those wishbones bolts.
And you have NO IDEA how hard it was to leave these like this.... (for now)

the rad flushing was started. I say started because one flush is not going to be enough to satisfy me; Not when this was the first dump...
The rad has been off and flushed separately until clean, so there's still a lot in the pipework. I'll replace the water pump when I do the cambelt. Speaking of pipework, I replaced the heater hose. Save some weight too as I only needed two to fit the replacement...
Next on the list was to free off the brakes. To give you some idea, the car sits on my sloped driveway, and without being in gear or having the handbrake on, doesn't move... even with a shove!
the rear was a little "photo light" as I was rushing but it went from this:
to this
And yes, that's the other side!
Trailing arms and disc shields were wirebrushed and Vactan'd. Brakes were pulled apart, pads unseized from the carriers, sliders lubed, de-rusted and all put back together, along with some new rear shocks. I'll get some more shots of true finished results when I flush the brake fluid and clean the wheels.
Then to the front.
Lush eh?
That soon became
now that doesn't look healthy......
So break out the toys
and inspect....
Now it looks horrendous. But, that's just an advisory item. "subframe has surface corrosion". I'm sure like me, you've seen many a 480 with an just such an advisory. Well, let's do something about it!
But first, a brief advert....
Do you not have enough danger in your life?
Do you dream of being showered in rust and needle sharp metal spikes?
Would you love pulling those metal spikes from yourself and clothing for weeks to come?
If so, you should try all new evil spinning wheel of death!
If you've never used a knot wheel on a grinder, I genuinely cannot stress the importance of safety gear. Glasses and thick gloves are a bare minimum; consider a full face mask, hat and several layers of clothing. Seriously. They're evil things! But oh do they do good....
All cleaned metal was Vactan'd before getting a coating of stone chip.
then it was the same story as the rears; Clean everything, lube everything, reassemble with a new wishbone.
And then to the other side....
etc etc and boom:
the subframe now looks much happier
Although I've still got to do a full brake fluid flush, as well as torque down those wishbones bolts.
And you have NO IDEA how hard it was to leave these like this.... (for now)
Re: Rescue Car: R3
So....
Its been something of a voyage of discovery. Grab yourselves a beverage, some snacks and pull up a pew.....
R3 came without a clutch cable. Ok, technically not true, the clutch cable was one of the many parts stuffed in the boot, but it came without the clutch cable connected, and we kinda need it connected to settle the front suspension down before torqueing to final figures.
I dug the cable out - It'd been repaired with one of those RAC/AA emergency repair cables. Meh! Lets grab a new one.
Yes, clutch cables are unobtainium. Most of the ones listed are actually for LHD vehicles.
So, grab a second hand one from the bay, spend an evening upside down in the footwell and voila?
Not quite....
Because with the cable slackened all the way off (with just enough thread for the locknut)
the pedal was like this:

And thus, down the rabbit hole we went....
Now, R3 is an early car. 6 months earlier than R1, so I went and had a look at R1. The pedal box is completely different. Less than 6 months between the cars, but the differences are incredible!
Various people were text and begged to go upside in their footwells (and I'm indebted to each of you!)
So, the early cars look like this:

Whilst the later cars, like this:

It'll become a clearer in a moment....
Sadly, I couldn't just grab the later pedal box from 312, as it's an auto (yes, I did check it!), so instead I spent 6 glorious hours upside down in the footwell of a 440 in lakes, removing the complete pedal box assembly.
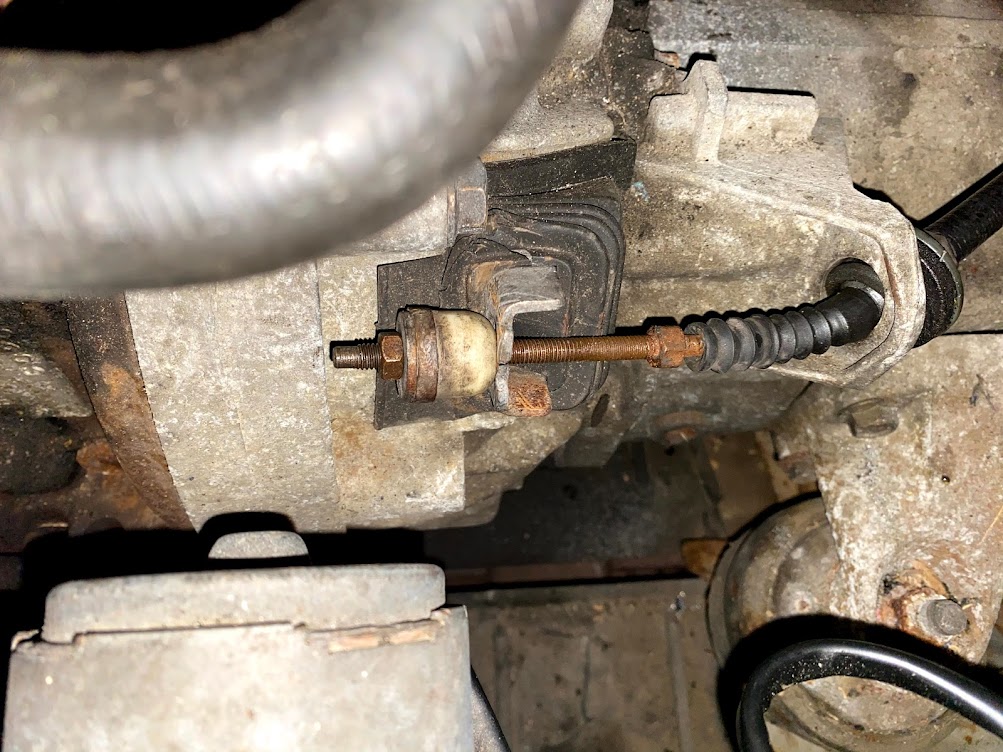
You see, on the early cars, the clutch cable sits against the bulkhead. On the later cars, it doesn't. It passes THROUGH the bulkhead and sits on this huge spacer, which sits on a reinforced pedal mount.


So, the later assembly looks something like this:

and the earlier one like this:

So, as you can see - the amount of "throw" on the cable is significantly different.
Now.... Just to fit it all.
step 1: Lube up!

I know the cables are lined, but a bit of extra lube is a god send.
What then followed, was 4 hours of cursing and swearing removing the old pedal box, followed by about the same to fit the new! It sounds simple enough. Remove the cross bar that holds the clutch and brake pedal in place, undo the 4 nuts on the servo, a couple of bolts and that's it. Except that the servo was probably fitted AFTER the pedal box, meaning you need to remove it (and the master cylinder/brake pipes) to make removal of the pedal box "easy".
I shall spare you the details, but it's done. I was ruined for the rest of the week, but we now have a working clutch - Which was actually a worry; imagine doing all that and discovering the actual clutch was knackered?
So this weekend, we did light duties - No, not actual rear light duties - just gentler things....
For example, this horrible thing has finally been removed.

So we have a normal tailpipe now!

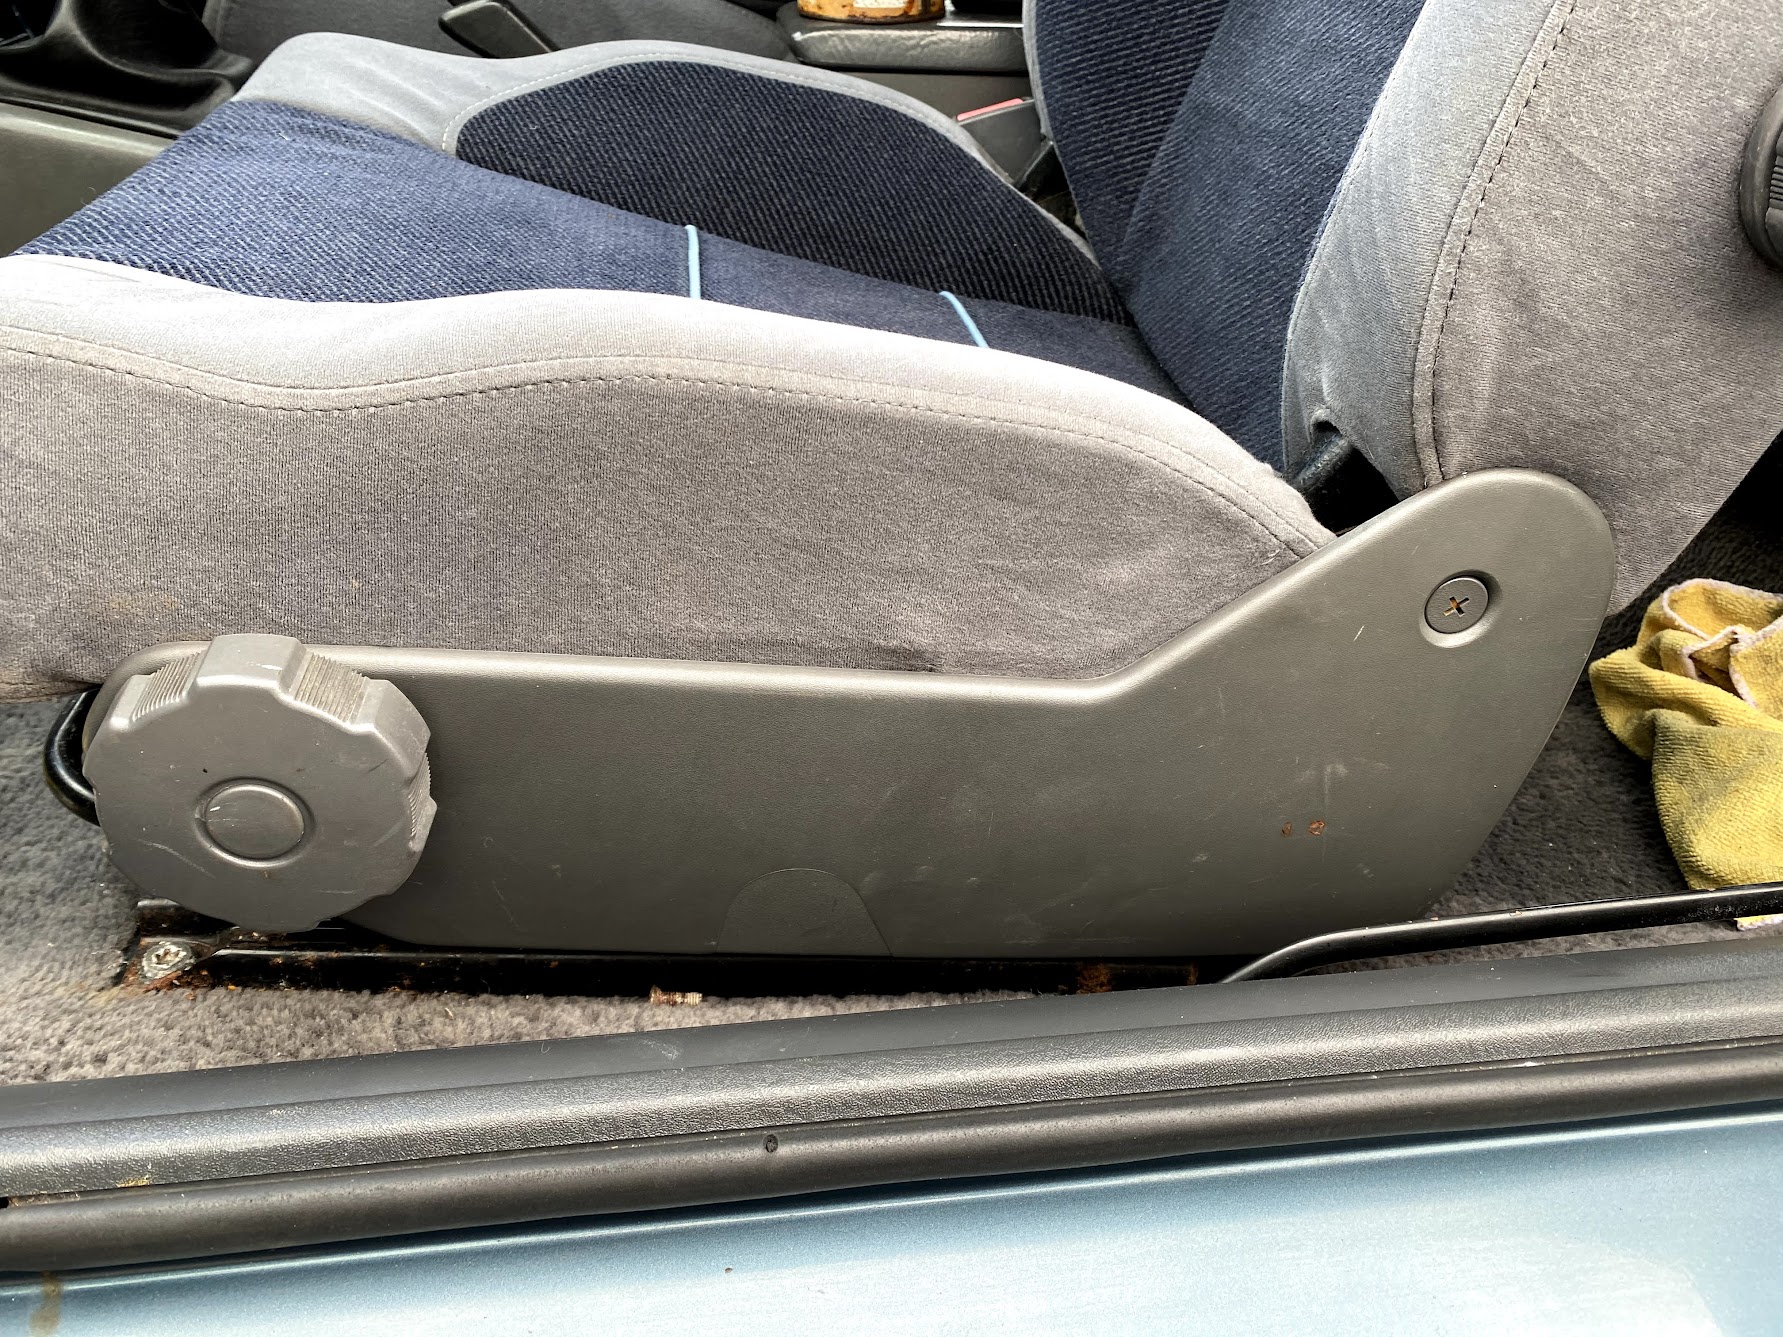
Also popped the front seats back in

then noticed the side plastic was cracked. Luckily I had one in stock, so whipped it off and discovered this!


Yes, I googled the address - It's a key cutting shop that's still there! Anyway, replacement panel on!
The list of jobs before MOT is getting shorter and shorter now.....
Its been something of a voyage of discovery. Grab yourselves a beverage, some snacks and pull up a pew.....
R3 came without a clutch cable. Ok, technically not true, the clutch cable was one of the many parts stuffed in the boot, but it came without the clutch cable connected, and we kinda need it connected to settle the front suspension down before torqueing to final figures.
I dug the cable out - It'd been repaired with one of those RAC/AA emergency repair cables. Meh! Lets grab a new one.
Yes, clutch cables are unobtainium. Most of the ones listed are actually for LHD vehicles.
So, grab a second hand one from the bay, spend an evening upside down in the footwell and voila?
Not quite....
Because with the cable slackened all the way off (with just enough thread for the locknut)
the pedal was like this:
And thus, down the rabbit hole we went....
Now, R3 is an early car. 6 months earlier than R1, so I went and had a look at R1. The pedal box is completely different. Less than 6 months between the cars, but the differences are incredible!
Various people were text and begged to go upside in their footwells (and I'm indebted to each of you!)
So, the early cars look like this:
Whilst the later cars, like this:
It'll become a clearer in a moment....
Sadly, I couldn't just grab the later pedal box from 312, as it's an auto (yes, I did check it!), so instead I spent 6 glorious hours upside down in the footwell of a 440 in lakes, removing the complete pedal box assembly.
You see, on the early cars, the clutch cable sits against the bulkhead. On the later cars, it doesn't. It passes THROUGH the bulkhead and sits on this huge spacer, which sits on a reinforced pedal mount.
So, the later assembly looks something like this:
and the earlier one like this:
So, as you can see - the amount of "throw" on the cable is significantly different.
Now.... Just to fit it all.
step 1: Lube up!
I know the cables are lined, but a bit of extra lube is a god send.
What then followed, was 4 hours of cursing and swearing removing the old pedal box, followed by about the same to fit the new! It sounds simple enough. Remove the cross bar that holds the clutch and brake pedal in place, undo the 4 nuts on the servo, a couple of bolts and that's it. Except that the servo was probably fitted AFTER the pedal box, meaning you need to remove it (and the master cylinder/brake pipes) to make removal of the pedal box "easy".
I shall spare you the details, but it's done. I was ruined for the rest of the week, but we now have a working clutch - Which was actually a worry; imagine doing all that and discovering the actual clutch was knackered?
So this weekend, we did light duties - No, not actual rear light duties - just gentler things....
For example, this horrible thing has finally been removed.
So we have a normal tailpipe now!
Also popped the front seats back in
then noticed the side plastic was cracked. Luckily I had one in stock, so whipped it off and discovered this!
Yes, I googled the address - It's a key cutting shop that's still there! Anyway, replacement panel on!
The list of jobs before MOT is getting shorter and shorter now.....
-
dragonflyjewels

- 480 Is my middle name
- Posts: 1589
- Joined: Sat Dec 18, 2010 10:38 am
- Location: Norfolk
Re: Rescue Car: R3
Another mammoth WELL DONE due !! Hot bath to start recovery ?
I wonder if that key was hidden there as a spare, or just lost down the side of the seat....
I wonder if that key was hidden there as a spare, or just lost down the side of the seat....
Sylvia
Snazzy - 1993 Paris Blue ES red dipstick 2.0i bought 2001
Lethal Lily - 1991 White Turbo
Paris the Unicorn - 1991 Paris Edition
hubby has
Sven - 1994 Racing Green GT
Evil Eva - 1992 Paris Blue Turbo
no previous 480s - can't bear to sell any
Snazzy - 1993 Paris Blue ES red dipstick 2.0i bought 2001
Lethal Lily - 1991 White Turbo
Paris the Unicorn - 1991 Paris Edition
hubby has
Sven - 1994 Racing Green GT
Evil Eva - 1992 Paris Blue Turbo
no previous 480s - can't bear to sell any
Re: Rescue Car: R3
lost down the side I'd say - it'd hooked itself on the framework, so I bet they probably spent a good while looking for it!
I'd had the seat out, cleaned it and hadn't found it!
I'd had the seat out, cleaned it and hadn't found it!
-
JohnO
- 480 Newbie
- Posts: 46
- Joined: Tue Mar 23, 2004 12:59 pm
- Location: Lanarkshire, Scotland
- Contact:
Re: Rescue Car: R3
What a saga, but love watching the car being resurrected.
What are the purpose of the rescue cars?
What are the purpose of the rescue cars?
JohnO
Central Scotland
M ybw Celebration 51/480 just adopted from fellow member
F ggg Black 480 es 1989 - garaged for 20 years, rotten arches
Central Scotland
M ybw Celebration 51/480 just adopted from fellow member
F ggg Black 480 es 1989 - garaged for 20 years, rotten arches
-
dragonflyjewels
- 480 Is my middle name
- Posts: 1589
- Joined: Sat Dec 18, 2010 10:38 am
- Location: Norfolk
Re: Rescue Car: R3
The original idea was was to have a pool car to lend out to members will without their own 480 on the road so they could use them for meets. We have moved on to rescuing as many sound 480s as possible - once back on the road they are looking for new homes in safe hands. The aim is to sell them for enough money to cover all costs plus put a bit extra in the fund.
Many thanks for your donation, we had just run out of cash so it was very welcome. R1 and R3 have both proved quite mammoth rescues - both with great bodywork but much more challenging mechanical issues than first thought. R2 has already been re-homed, with just enough work done by Jeff to get it road worthy and the rest left to the new owner who wanted the project.
R4 is waiting in my carport for transfer to Jeff when he has space. It's a precious turbo, although left hand drive, and needs a bit of bodywork so we are hoping to raise enough from R1 and R3 to cover that.
We have several members in Scotland, you may have seen on here that I organise meetings and in a normal year theres one north of the border. You will be very welcome to join us, it's great to have new wedgie fans on board - this has to be one if the friendliest car clubs ever!
Sylvia
Snazzy - 1993 Paris Blue ES red dipstick 2.0i bought 2001
Lethal Lily - 1991 White Turbo
Paris the Unicorn - 1991 Paris Edition
hubby has
Sven - 1994 Racing Green GT
Evil Eva - 1992 Paris Blue Turbo
no previous 480s - can't bear to sell any
Snazzy - 1993 Paris Blue ES red dipstick 2.0i bought 2001
Lethal Lily - 1991 White Turbo
Paris the Unicorn - 1991 Paris Edition
hubby has
Sven - 1994 Racing Green GT
Evil Eva - 1992 Paris Blue Turbo
no previous 480s - can't bear to sell any