480 pictures of parts you tend not to see.
Moderators: jifflemon, coyote1980, Rachel
-
glasgowjim

- 480 Is my middle name
- Posts: 4830
- Joined: Sun Oct 01, 2006 5:28 pm
- Location: GLASGOW SCOTLAND
480 pictures of parts you tend not to see.
Quite often the discouraging part of starting a job on a 480 for the first time is not being able to see what it looks like clearly. So when I have been stripping a car down I have taken a few photographs of different parts on the car. It is not a how to but hopefully make things easier when you come to do any maintenance for the first time.
Last edited by glasgowjim on Sun Dec 27, 2009 10:43 pm, edited 1 time in total.
-
glasgowjim
- 480 Is my middle name
- Posts: 4830
- Joined: Sun Oct 01, 2006 5:28 pm
- Location: GLASGOW SCOTLAND


-
bbf

- 480 Is my middle name
- Posts: 994
- Joined: Tue Dec 23, 2003 10:21 am
- Location: Na soncni strani Alp (SLO)
- Contact:
Wow! Good idea! I know from my experiences, that it's much easier to get yourself to work when you know what to expect there. gives you more courage!
I have some pics. Could have more but lack of time/will to take photo during process.. Will document more in the future.
here are from my doors renewal:

this is how it looks under right mudguard (the car is without aircon. 480s with pushbutton aircon controls have white 4ballsmergedtogether outher space alien larva lookalike canister for vacuum near door hinges.)

This is right door latch mechanism. About the sticks:
Left: to outer door handle
Right: to locking mech - note the central lock motor at bottom
behind right - not installed - in pic you can see it's plastic eye: to inner handle
the blue part is open/closed switch

Door stopper - this one gives noise if not greased. and will produce play if worn out. but if the door craks when opening/closing, than the nailed pin on the other side of stopper is worn out.
The oval hole under it si for cabling.

Keylock at it's full renewed glitter! Two switces are seen - lock and unlock. There's the eye at the right side of white plastic - goes to latch mechanism.
I have some pics. Could have more but lack of time/will to take photo during process.. Will document more in the future.
here are from my doors renewal:
this is how it looks under right mudguard (the car is without aircon. 480s with pushbutton aircon controls have white 4ballsmergedtogether outher space alien larva lookalike canister for vacuum near door hinges.)
This is right door latch mechanism. About the sticks:
Left: to outer door handle
Right: to locking mech - note the central lock motor at bottom
behind right - not installed - in pic you can see it's plastic eye: to inner handle
the blue part is open/closed switch
Door stopper - this one gives noise if not greased. and will produce play if worn out. but if the door craks when opening/closing, than the nailed pin on the other side of stopper is worn out.
The oval hole under it si for cabling.
Keylock at it's full renewed glitter! Two switces are seen - lock and unlock. There's the eye at the right side of white plastic - goes to latch mechanism.
'98 S40 T4, replacement vehicle, hardcore power
'86 480 ES, RIP :(
'91 480 Turbo, RIP :(
'93 480 2.0, RIP :(
'90 480 Turbo, hailed roof, fighting wounds, 260.000km, daily bolide :)
'81 345 GL cvt, waiting for a new life, 200.000km :)
'82 244 GL 2.4D 250.000km restoration project
[url]http://img13.photobucket.com/albums/v37/bbfbbf/[/url]
'86 480 ES, RIP :(
'91 480 Turbo, RIP :(
'93 480 2.0, RIP :(
'90 480 Turbo, hailed roof, fighting wounds, 260.000km, daily bolide :)
'81 345 GL cvt, waiting for a new life, 200.000km :)
'82 244 GL 2.4D 250.000km restoration project
[url]http://img13.photobucket.com/albums/v37/bbfbbf/[/url]
-
glasgowjim
- 480 Is my middle name
- Posts: 4830
- Joined: Sun Oct 01, 2006 5:28 pm
- Location: GLASGOW SCOTLAND


-
glasgowjim
- 480 Is my middle name
- Posts: 4830
- Joined: Sun Oct 01, 2006 5:28 pm
- Location: GLASGOW SCOTLAND
Re: 480 pictures of parts you tend not to see.
timing belt


-
glasgowjim
- 480 Is my middle name
- Posts: 4830
- Joined: Sun Oct 01, 2006 5:28 pm
- Location: GLASGOW SCOTLAND
Re: 480 pictures of parts you tend not to see.
Removing your dashboard/fascia the complete thing !!!!
the fascia is held on by two bolts at either end of the dash under the plastic plate at the door PLUS there are ALSO 4 small bolts here


you can see the far left one still has a piece of plastic in it
the black plastic heater casing you see is held on by the 2 bolts PLUS 2 more nuts accessed from the engine compartment.

from the engine compartment one NUT is located on the bulkhead heat shield the other NUT above the twin heater pipes.
the fascia is held on by two bolts at either end of the dash under the plastic plate at the door PLUS there are ALSO 4 small bolts here
you can see the far left one still has a piece of plastic in it
the black plastic heater casing you see is held on by the 2 bolts PLUS 2 more nuts accessed from the engine compartment.
from the engine compartment one NUT is located on the bulkhead heat shield the other NUT above the twin heater pipes.
-
glasgowjim
- 480 Is my middle name
- Posts: 4830
- Joined: Sun Oct 01, 2006 5:28 pm
- Location: GLASGOW SCOTLAND
Re: 480 pictures of parts you tend not to see.
aerial and red lampcontroller unit.

-
glasgowjim
- 480 Is my middle name
- Posts: 4830
- Joined: Sun Oct 01, 2006 5:28 pm
- Location: GLASGOW SCOTLAND
speedo sensor
speed sensor.


remove clip with a 6mm allen key

remove clip with a 6mm allen key

Re: 480 pictures of parts you tend not to see.
The keyhole light - found it behind the door panel...

and put it back where it belongs, on top of the lock:

and it works as it was intended to!
and put it back where it belongs, on top of the lock:
and it works as it was intended to!
To be continued...
Peter
-----------------------------
1986 Volvo 480es red 217
1987 Volvo 480es blue 219 (sold)
1993 Volvo 480 turbo automatic red 235 (project)
Peter
-----------------------------
1986 Volvo 480es red 217
1987 Volvo 480es blue 219 (sold)
1993 Volvo 480 turbo automatic red 235 (project)
-
glasgowjim
- 480 Is my middle name
- Posts: 4830
- Joined: Sun Oct 01, 2006 5:28 pm
- Location: GLASGOW SCOTLAND
Re: 480 pictures of parts you tend not to see.
Side trim...


Re: 480 pictures of parts you tend not to see.
great thread idea, certainly makes life easier when taking bits off, Thanks!
Got all my dash bulbs working/changed today, have to go at the door locks tomorrow
Got all my dash bulbs working/changed today, have to go at the door locks tomorrow
Re: 480 pictures of parts you tend not to see.
See for the speed sensor, is it located on the same place for a 2.0ltr auto?
I want to put mines back in after getting it fixed ( I hope) as it's had exposed wiring and has been patched up with some insulating tape -fingers crossed it sorts it.
I want to put mines back in after getting it fixed ( I hope) as it's had exposed wiring and has been patched up with some insulating tape -fingers crossed it sorts it.
-
dragonflyjewels

- 480 Is my middle name
- Posts: 1588
- Joined: Sat Dec 18, 2010 10:38 am
- Location: Norfolk
Re: 480 pictures of parts you tend not to see.
o no, Glasgow Jim's photos have disappeared ! Can anyone help with a pic of the location of the speedo sensor on the gearbox ? cheers
Sylvia
Snazzy - 1993 Paris Blue ES red dipstick 2.0i bought 2001
Lethal Lily - 1991 White Turbo
Paris the Unicorn - 1991 Paris Edition
hubby has
Sven - 1994 Racing Green GT
Evil Eva - 1992 Paris Blue Turbo
no previous 480s - can't bear to sell any
Snazzy - 1993 Paris Blue ES red dipstick 2.0i bought 2001
Lethal Lily - 1991 White Turbo
Paris the Unicorn - 1991 Paris Edition
hubby has
Sven - 1994 Racing Green GT
Evil Eva - 1992 Paris Blue Turbo
no previous 480s - can't bear to sell any
-
Ade
- Can tell where the 480 was built
- Posts: 337
- Joined: Tue Feb 28, 2012 3:25 pm
- Location: Northants
Re: 480 pictures of parts you tend not to see.
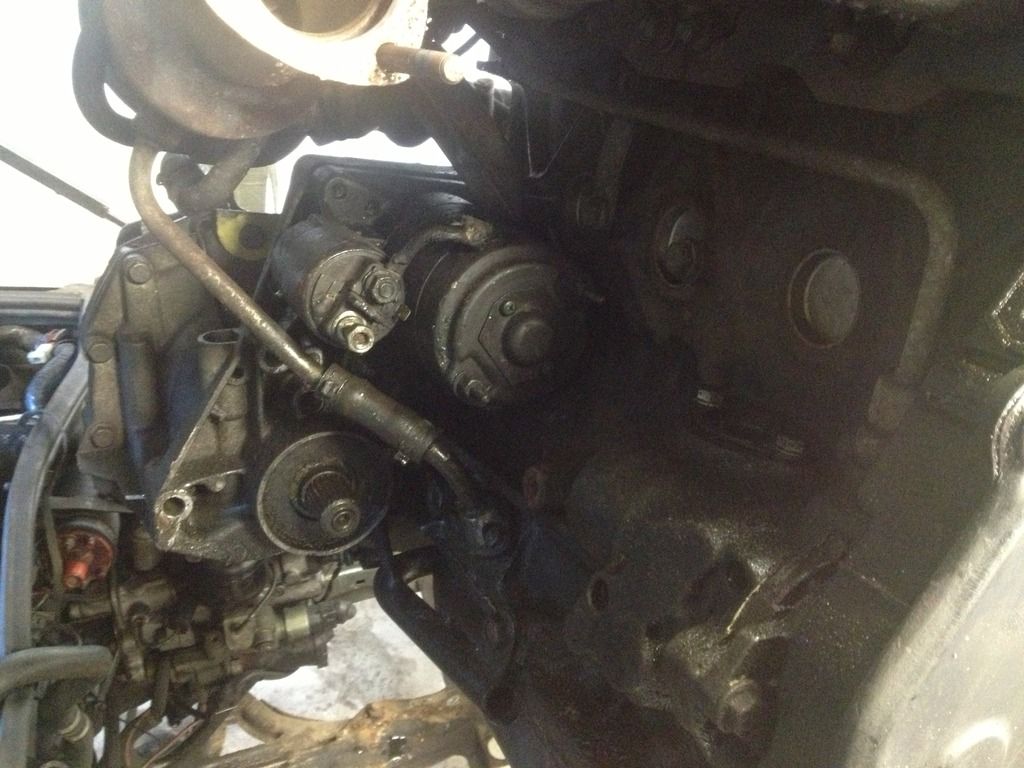
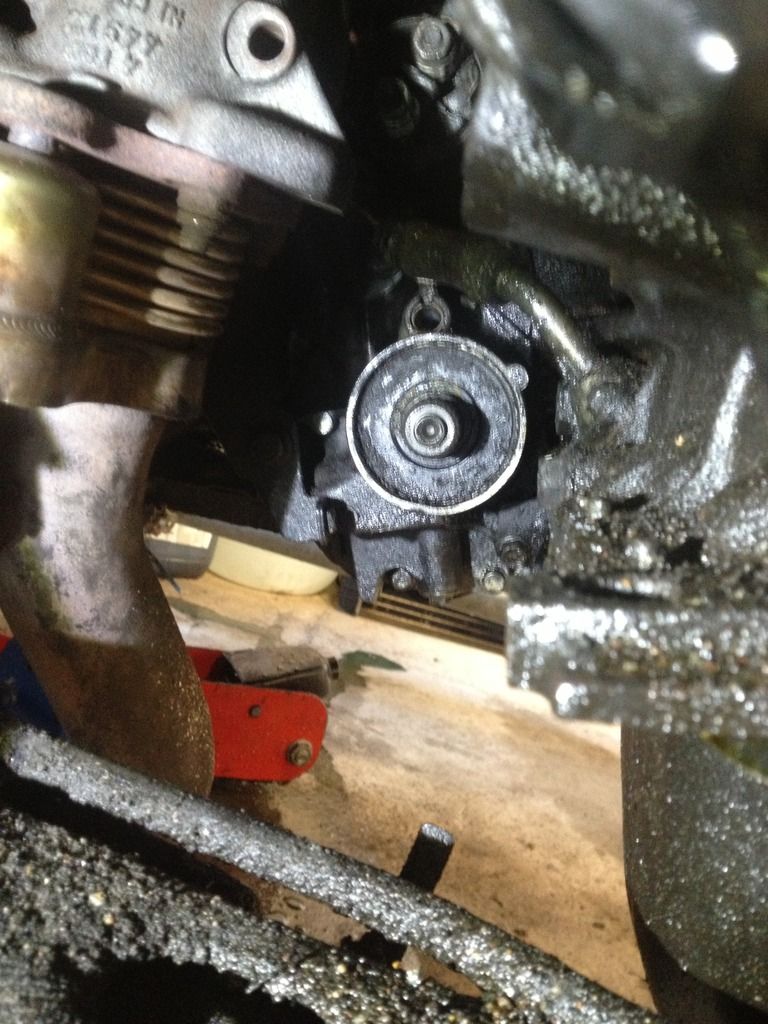
The sensor goes in the hole above the output shaft and is secured by a little bracket that is held in by an M8 cap screw into a hole directly above it (6mm A/F). If you can zoom in you might just see part of the tapped hole peeking out above the turbo oil return pipe in the first picture. A pig of a thing to try and do without at least removing the driveshaft.
O.C. 480 D.
Re: 480 pictures of parts you tend not to see.
Am I the only one praying that its a temporary glitch?dragonflyjewels wrote:o no, Glasgow Jim's photos have disappeared ! Can anyone help with a pic of the location of the speedo sensor on the gearbox ? cheers
-
dragonflyjewels
- 480 Is my middle name
- Posts: 1588
- Joined: Sat Dec 18, 2010 10:38 am
- Location: Norfolk
Re: 480 pictures of parts you tend not to see.
I think we are all praying............. so much information.............
Thanks to Ade for the pictures and info, hopefully our Brinkie refurbed speedo will be working soon !
Thanks to Ade for the pictures and info, hopefully our Brinkie refurbed speedo will be working soon !
Sylvia
Snazzy - 1993 Paris Blue ES red dipstick 2.0i bought 2001
Lethal Lily - 1991 White Turbo
Paris the Unicorn - 1991 Paris Edition
hubby has
Sven - 1994 Racing Green GT
Evil Eva - 1992 Paris Blue Turbo
no previous 480s - can't bear to sell any
Snazzy - 1993 Paris Blue ES red dipstick 2.0i bought 2001
Lethal Lily - 1991 White Turbo
Paris the Unicorn - 1991 Paris Edition
hubby has
Sven - 1994 Racing Green GT
Evil Eva - 1992 Paris Blue Turbo
no previous 480s - can't bear to sell any
-
glasgowjim
- 480 Is my middle name
- Posts: 4830
- Joined: Sun Oct 01, 2006 5:28 pm
- Location: GLASGOW SCOTLAND
Re: 480 pictures of parts you tend not to see.
if you go to google images and type in glasgowjim photobucket you will get all my photos + a few from other people as well.
but still mno joy from photobucket support !
but still mno joy from photobucket support !

