In case you performed a procedure on your 480 which you would like to share with other 480 drivers: please post a 'manual' here. The threads on this forum aren't open for debate, if you read a manual and it can do with an improvement: please persuade the writer by PM to alter a certain part. If you feel the manual is incomplete then make a brief addition in a reply to the thread. Just don't start debates in this forum.
Moderators: jifflemon, coyote1980, Rachel
-
stu chacks
- Friend of Club 480 Europe
- Posts: 1796
- Joined: Sun Oct 03, 2004 7:30 pm
Post
by stu chacks » Mon Mar 27, 2006 3:16 pm
Here's a step by step photoguide on swapping your rear discs and/or pads. This is meant as a guide only, and I take no responsibilty for injury or damage caused. Work carried out at owners risk! E&OE
Tools you'll need are:
New pads
News discs (and disc retaining screws - Volvo Part No. 3121650*2)
Jack & Axle stands
Allen Key set
Screwdriver set
Hammer
WD40/Grease
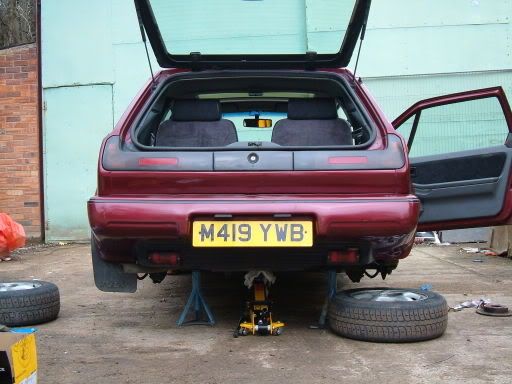
Start by slackening off the rear wheel nuts, jacking the car up and supporting it securely on axlestands. I used the rear suspension beam as shown: (ps - if anyone has a spare mudflap I'm missing plse PM me!)
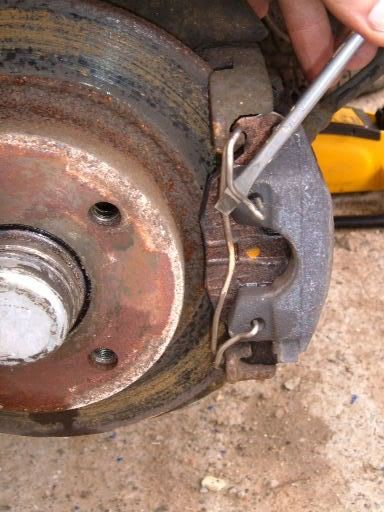
Once supported securely, remove the rear wheels. 1st job is to take off the brakepad retaining springs, this can be done easily with a flathead screwdriver as shown:
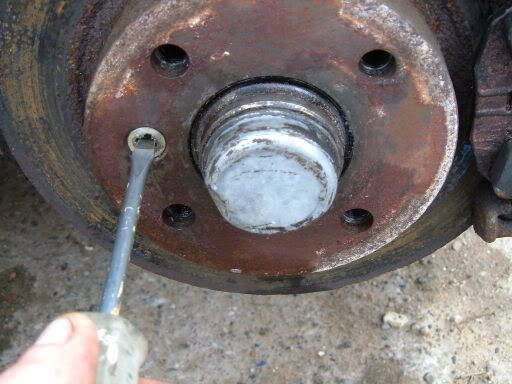
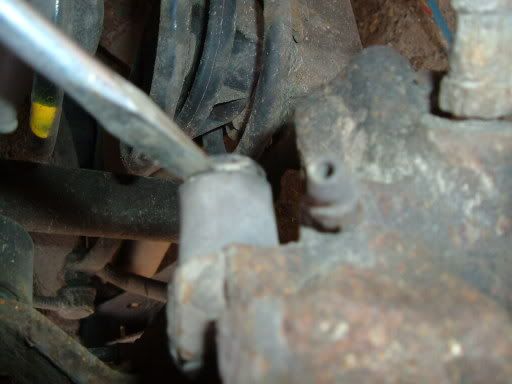
If you are swapping the discs (this is advised if they are badly corroded, worn. This can normally been told if you hear a light grinding noise while braking.) apply the handbrake and remove the disc retaining screw as shown. This is where the WD40 can come in handy! As Shown:
If the screw is very difficult to remove, ie the screwdriver keeps slipping, use a pair of stilsons or molegrips as shown:

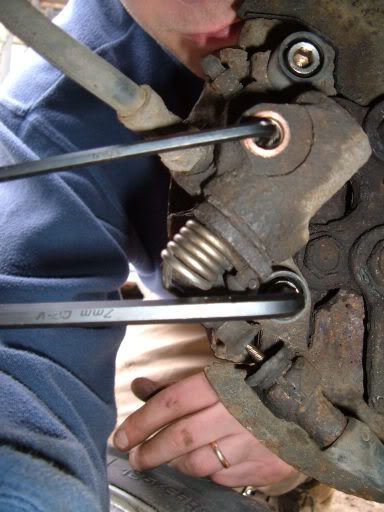
Now release the handbrake and work around the back of the brake caliper (the brakepad holder). Firstly using a flathead screwdriver remove the 2 plastic dustcovers for the caliper retaining bolts as shown:
Then using an allenkey remove the metal dustcover for the caliperself adjuster. Once again WD40 and a slight tap with the hammer can work wonders here. Once these are all removed you will see you have access to 2*large caliper allenbolts (see top and bottom of below) and 1 small adjuster allenbolt (see middle of below) as shown:
Now push one of the removed wheels under the caliper ready to support it on when removed. Unscrew the 2 large allenkey bolts until loose, then unscrew the middle smaller adjuster allenbolt just enough for you to be able to push back the pads clear of the disc. DO NOT OVER SLACKEN IT THOUGH! Once this is done the caliper including the pads can be pulled away from the disc and rested on the wheel as shown:
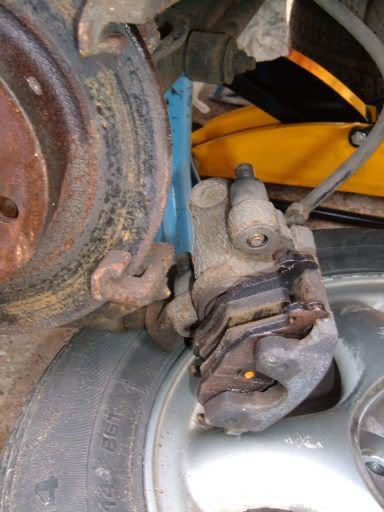
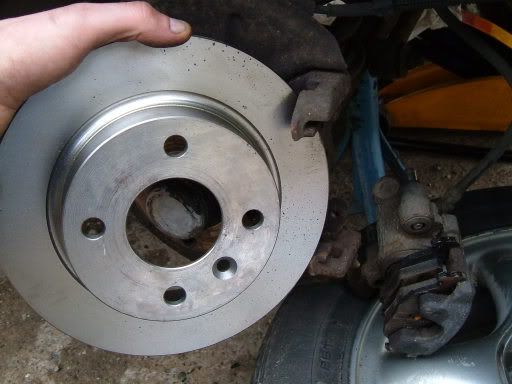
Remove the old pads and replace. And you can now remove the disc from the hub also as shown:
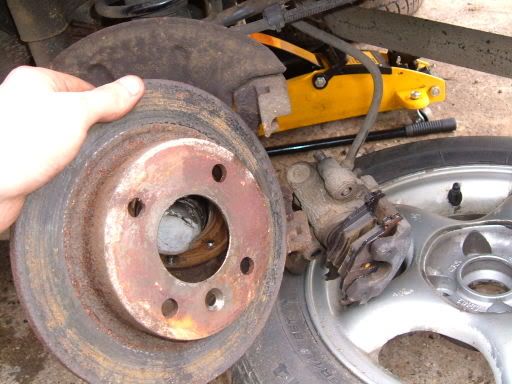
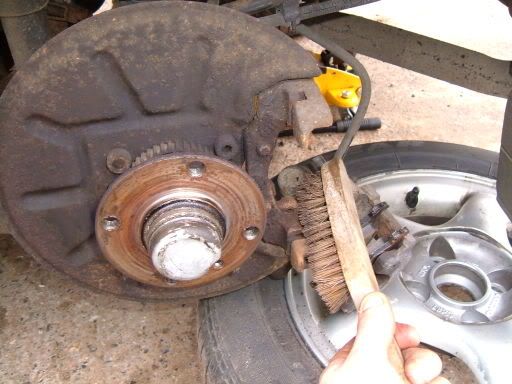
While you have the chance give everything a good wirebrush and WD40 (ensuring the pads aren't affected) as shown:
Now replace the disc (ensuring the new disc surfaces are degreased), and secure using the new retaining screw as shown:
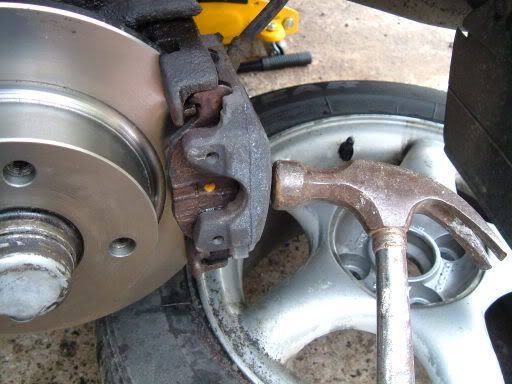
With the new pads installed, carefully replace the caliper over the new disc, you may find you have to slacken the smaller adjuster allenbolt again if there's not enough clearance onto the disc. Using a hammer, tap the caliper fully into place as shown:
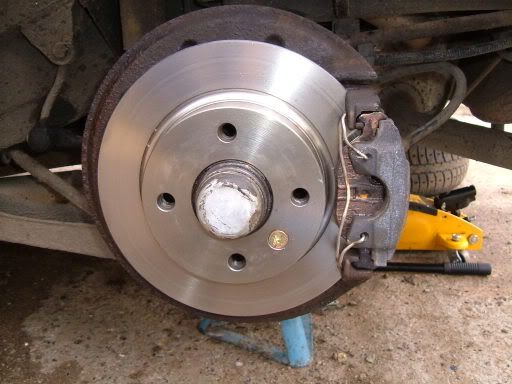
Your on the home straight now! Replace the 2 large top and bottom caliper retaining allenbolts, tighten and replace their plastic dustcaps. Replace the pad retaining spring (you might have to use pliers and slight tap with a hammer) as shown.
And lastly, you must set the self adjuster (smaller middle allenbolt). This is quite simple - when the disc is revolving freely (make sure the handbrake is still off!) slowly tighten the allenbolt until you can't spin the disc freely, then just slacken off enough again so you can spin the disc. Pump the brake pedal/use handbrake a couple of times and re-adjust if necessary. Grease the metal dustcap and replace.
Replace the wheels and before lowering check the operation of the handbrake - if not operating correctly you will need to adjust it (see Haynes) 1st.
Lower the car, tighten all wheel nuts, remove jack and axle stands. Test drive slowly ensuring all brakes are fully working before taking on the road.
Stu.
Last edited by
stu chacks on Mon Mar 27, 2006 5:06 pm, edited 1 time in total.
-
Milosz_480
- 480 Is my middle name
- Posts: 1413
- Joined: Mon Jan 10, 2005 9:13 pm
-
Contact:
Post
by Milosz_480 » Mon Mar 27, 2006 4:48 pm
Almost as good as your friday jokes

Well done Stu!
I propose to make all guides sticky. To have good access to them. I spent last weekend almost 15 min searching for Pol's powersteering fluid change guide.
no car, why drive a car if you can fly SAAB
Previous:
-Mitsubishi Lancer GLXi '93 LPG powered
-'92 480 ES red 'Sports Edition'
-'87 480 ES red
pics>>> http://photobucket.com/albums/v304/mayah480/
-
stu chacks
- Friend of Club 480 Europe
- Posts: 1796
- Joined: Sun Oct 03, 2004 7:30 pm
Post
by stu chacks » Mon Mar 27, 2006 5:27 pm
Thanks Misosz, I just thought Haynes is too general sometimes (and refers to the 440/460 alot without saying) and the b&w pics can be a bit poor, especially when you've got oily fingermarks all over those porous pages!
Also as a few people have mentioned, a lot of instructions are ott too - examples being: telling you to remove whole caliper assembly to replace discs when you only need to remove pad carrier - another good one tells you when swapping the bulb for the autobox selector backlight, to remove the whole centre console, when you can actaully just reach it by feeling under the plastic trim without removing anything but the sidewall carpet!
Steering fluid change! lol, remember trawling the section for that last year too. What a difference it made too my ES, used to be noisey as hell before.
FAQ or Sticky for guides gets my vote too! 
Stu.
-
chris1roll
- Friend of Club 480 Europe
- Posts: 3927
- Joined: Wed Feb 12, 2003 6:50 pm
- Location: Using LOTS of petrol!
Post
by chris1roll » Mon Mar 27, 2006 7:24 pm
cool.
I'm sure there must be variations in the thickness of replacement discs...or maybe the diameter of the hub spigot thing behind the disc the last lot we did they went in without taking the bracket off... but the set i did on mine I swear there was now way in hell they were ever going in without removing them...
So be prepared that you _may_ hae to, perhaps soak the bolts in WD 40 overnight for a few nights..
2001 V70 XC 2.5T
1989 744 GL Auto
-
guitarcarfanatic
- 480 Is my middle name
- Posts: 1782
- Joined: Fri Feb 18, 2005 12:31 am
- Location: Taunton, Somerset
Post
by guitarcarfanatic » Mon Mar 27, 2006 7:31 pm
We still havent got round to doing mine have we chris! I was ill all last week and i'm stuck on lates this week lol! Maybe if your free at the weekend or one night next week? If I get the time I will do the rears myself to save us work when i'm at yours but those front caliper bolts are bas**rds!
1996 Saab 9000 CSE 2litre EcoTurbo
Previously...
Peugeot 406 executive TD - The devil!
1991 Red Turbo - Great condition and surprisingly un-rusty!
1989 Light Blue metallic Turbo - Sold!
1993 Steel grey S - Bought for parts
1990 Red ES - Now resting in car heaven!
1989 Black ES - Great runner
1989 Black ES - Spares Car. I murdered it!
-
chris1roll
- Friend of Club 480 Europe
- Posts: 3927
- Joined: Wed Feb 12, 2003 6:50 pm
- Location: Using LOTS of petrol!
Post
by chris1roll » Mon Mar 27, 2006 7:53 pm
Oh yeah.... lol
Ok, ummm, I've got next week off. maybe one night then.
2001 V70 XC 2.5T
1989 744 GL Auto
-
guitarcarfanatic
- 480 Is my middle name
- Posts: 1782
- Joined: Fri Feb 18, 2005 12:31 am
- Location: Taunton, Somerset
Post
by guitarcarfanatic » Mon Mar 27, 2006 8:09 pm
Cool. Will PM you at the weekend and we can sort a date out! Wil try and get the rears done this weekend to save on time but saying that when we did the fronts on the red one it took hardly anytime with your socket set/long arm bar/brute force!
1996 Saab 9000 CSE 2litre EcoTurbo
Previously...
Peugeot 406 executive TD - The devil!
1991 Red Turbo - Great condition and surprisingly un-rusty!
1989 Light Blue metallic Turbo - Sold!
1993 Steel grey S - Bought for parts
1990 Red ES - Now resting in car heaven!
1989 Black ES - Great runner
1989 Black ES - Spares Car. I murdered it!
-
martinholmesuk
- Friend of Club 480 Europe
- Posts: 10049
- Joined: Thu Sep 05, 2002 9:43 pm
- Location: West Sussex
Post
by martinholmesuk » Mon Mar 27, 2006 9:50 pm
Good post Stu,
You should have painted your calipers to stop them getting any worse. I painted all of mine black.
Volvo 940 Turbo 19T (real Volvo :P)
Audi TT
-
Big Brother
- Moderator
- Posts: 5128
- Joined: Sun Sep 26, 2004 6:51 pm
- Location: North Wales
Post
by Big Brother » Tue Mar 28, 2006 11:47 am
Top guide Stu. Mine are next in line. Using the builders yard again to work on your car
 2001 V70
-
martinholmesuk
- Friend of Club 480 Europe
- Posts: 10049
- Joined: Thu Sep 05, 2002 9:43 pm
- Location: West Sussex
Post
by martinholmesuk » Tue Mar 28, 2006 12:19 pm
@ Stu,
The rear bump on mine is going to come off so that should be fun! One of the stud has already snapped in one attempt to remove it!

I'm expecting to find a rusted rear bumper so might as well loss it.
Doing a MatBat

Volvo 940 Turbo 19T (real Volvo :P)
Audi TT
-
coyote1980
- Volvo 480 Club Europe CREW
- Posts: 2972
- Joined: Thu Jan 03, 2002 12:18 pm
- Location: Groningen, The Netherlands
-
Contact:
Post
by coyote1980 » Wed Mar 29, 2006 7:20 pm
Excellent!
This really is top-material!
Daniël Wilten
Volvo 480 Turbo Collection 1995 Dark Green Metallic
Club Europe chairman/webmaster/forum admin

-
piper1st
- 480 Is my middle name
- Posts: 1263
- Joined: Mon Jun 13, 2005 11:44 am
- Location: Glasgow
Post
by piper1st » Thu Mar 30, 2006 11:02 am
stu ... this is fantastic ... now i would feel confident to do this myself!! many thanks!
Current:
Honda Civic ES I-VTEC

previous:
BMW E46 330i SE Touring
VW Mk4 Golf V6 4Motion
Toyota Celica GT-FOUR ST205 WRC
1995 (M) Dark Grey Metallic 480 Turbo
1994 (M) Flame Red Metallic 480GT
1992 (J) Black Metallic 480ES 1.7i
-
guitarcarfanatic
- 480 Is my middle name
- Posts: 1782
- Joined: Fri Feb 18, 2005 12:31 am
- Location: Taunton, Somerset
Post
by guitarcarfanatic » Thu Mar 30, 2006 11:30 am
Just like to say I will be doing this on Saturday. I'm sure if I get stuck I will refer back to this! I changed my rear pads ok last time though. I think the brakes on my Es are okish but gonna put new front and rear pads and discs and change the brake fluid just so I know it's all ok. Parts only cost £60 so it's not worth taking any risks at that price!
Should stop even better than it does now as well once it's all bedded in

I was worried that the new turbo might need new braking components (as they are shockingly bad at stoipping the car) but they look almost new so i'm gonna just do the brake fluid and hope it cures it (cheers to MHUK and his dad for all the advice about this over MSN!!!!!)
1996 Saab 9000 CSE 2litre EcoTurbo
Previously...
Peugeot 406 executive TD - The devil!
1991 Red Turbo - Great condition and surprisingly un-rusty!
1989 Light Blue metallic Turbo - Sold!
1993 Steel grey S - Bought for parts
1990 Red ES - Now resting in car heaven!
1989 Black ES - Great runner
1989 Black ES - Spares Car. I murdered it!
-
guitarcarfanatic
- 480 Is my middle name
- Posts: 1782
- Joined: Fri Feb 18, 2005 12:31 am
- Location: Taunton, Somerset
Post
by guitarcarfanatic » Sat Apr 01, 2006 3:36 pm
chris1roll wrote:cool.
I'm sure there must be variations in the thickness of replacement discs...or maybe the diameter of the hub spigot thing behind the disc the last lot we did they went in without taking the bracket off... but the set i did on mine I swear there was now way in hell they were ever going in without removing them...
So be prepared that you _may_ hae to, perhaps soak the bolts in WD 40 overnight for a few nights..
Right well it seems older cars have a longer lengh of guard round the disc. Couldn't get the rears out as it was in the way no matter which way you turned it. Mine are about a cm longer than the ones on stus car. Must just be an older deisign perhaps? I just changed the pads in the end as the discs seemed ok. Might get it done when I| do the fronts with chris perhaps if we have time. just a bit annoying! T40 torx screw got the dust covers out though a treat. Only had one bit though and it got stuck in the cap...took about 10 minutes of pullin on it with me pulling the bit with mole grips and my mate pulling the cap with another set of mole grips! It the end I got mad and hammered the cap un til it split with a lump hammer

1996 Saab 9000 CSE 2litre EcoTurbo
Previously...
Peugeot 406 executive TD - The devil!
1991 Red Turbo - Great condition and surprisingly un-rusty!
1989 Light Blue metallic Turbo - Sold!
1993 Steel grey S - Bought for parts
1990 Red ES - Now resting in car heaven!
1989 Black ES - Great runner
1989 Black ES - Spares Car. I murdered it!
-
prodjsxb
- Started learning about 480
- Posts: 56
- Joined: Sun Jun 24, 2007 4:06 pm
Post
by prodjsxb » Sun Feb 17, 2008 7:27 pm
Good guide, going to give this a go tomorrow.
-
stig
- Knows where Volvo is from
- Posts: 133
- Joined: Mon Mar 10, 2008 11:20 pm
- Location: Aberdeen, Scotland, UK
Post
by stig » Tue Sep 30, 2008 9:23 pm
Great stuff......thanks very much.......this guide helped S00000 much.
Cheers
stig
1968 SAAB V4, Left Hooker
And ,of course, my indulgence.....White Celebration No. 306. Love it !!
-
Paul240480
- Knows where Volvo is from
- Posts: 154
- Joined: Tue Feb 13, 2007 12:38 pm
- Location: Morbihan, France
-
Contact:
Post
by Paul240480 » Tue Oct 07, 2008 12:28 pm
I'm sooooooooo pleased that this guide is here. My Frenchy Controle Technique (MOT) advised that the rear discs are nearly worn out, so will be using this guide soon.
MOT was a pass though, 145K & rising!
Thanks again for this.
Paul240480
www.gitessouthbrittany.com
[img]http://i280.photobucket.com/albums/kk165/Paul480/EarlyEveningMidOct-LaBelleVilaine.jpg[/img][img]http://i280.photobucket.com/albums/kk165/Paul480/RocketPhotos009-1.jpg[/img]
www.gitessouthbrittanytouring.blogspot.com