1994 Volvo 480 Turbo Diary - Half an Update November 2023
Moderators: jifflemon, coyote1980, Rachel
Re: 1994 Volvo 480 Turbo Diary - Update May 2022
Amazing work. I'm not a fan of "perfect finish" paint - Simply because I think if you obsess about having perfect paint, it means you'll want to keep the perfect paint, and thus, turn the car into an ornament, never going out for fear of getting a flaw.
-
heavend
- Knows where Volvo is from
- Posts: 122
- Joined: Sun Aug 14, 2005 6:53 am
- Location: Auckland, New Zealand
Re: 1994 Volvo 480 Turbo Diary - Update May 2022
Good on you for taking the time to post an update. It's encouragine to read of another owners fun in keeping a 480 alive. I'm having a spell on my 480, having just replaced a noisy fuel pump and not rebuilding the rear bumper, there's plenty of new steel and MIG wire going into it.
-
Jay-Kay-Em

- 480 Rookie
- Posts: 439
- Joined: Tue Nov 27, 2012 10:42 pm
- Location: Huntingdon
- Contact:
Re: 1994 Volvo 480 Turbo Diary - Update July 2022
July 2022 - Rebuilding!
Soooo, here we go then!
False Start...
After getting it off the transporter and admiring fresh paint, how did it greet me?

Literally the first job - reconnecting the battery - instant 480 hassle!

I hunted high and low for the "closest-to-factory" earth strap. It's quite difficult to find a flat strap terminated with a post clamp. This is the best match I found from AES...

Battery and battery tray removed to fit. I should be fitting stuff, not taking it apart!

Anyway, this is where the actual rebuilding begins...
Glass
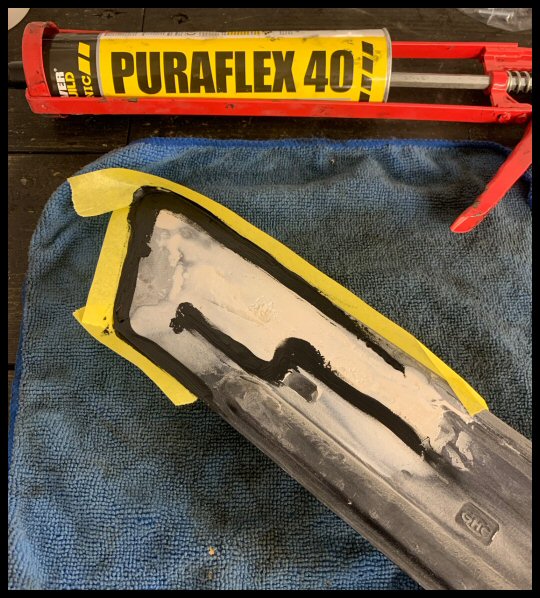
Fitting the new front screen...
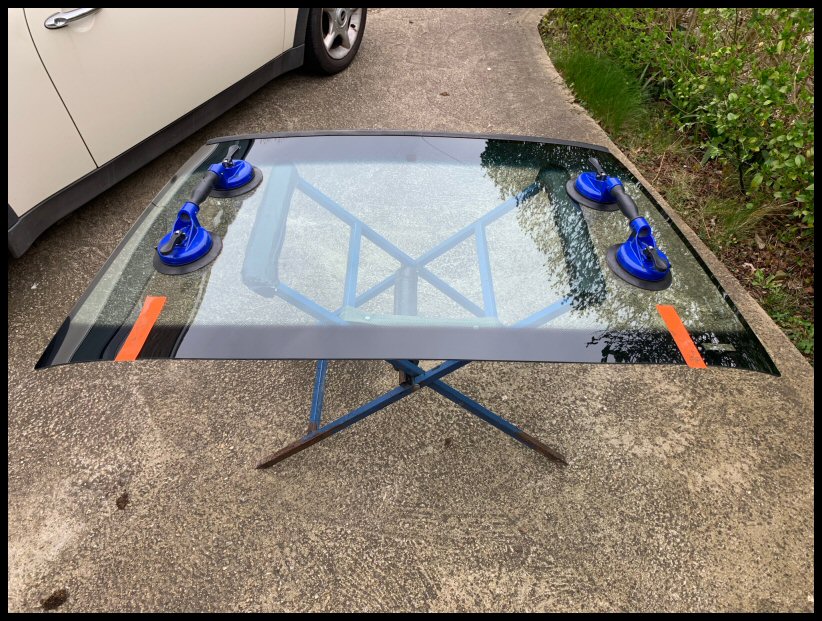
Really happy with it. It's a 2018 made Pilkington with a perfect colour top tint (as OE as possible).
Applying the bonding mastic...

Fitting the non-bonded side glass using the "rope-and-soap" method...

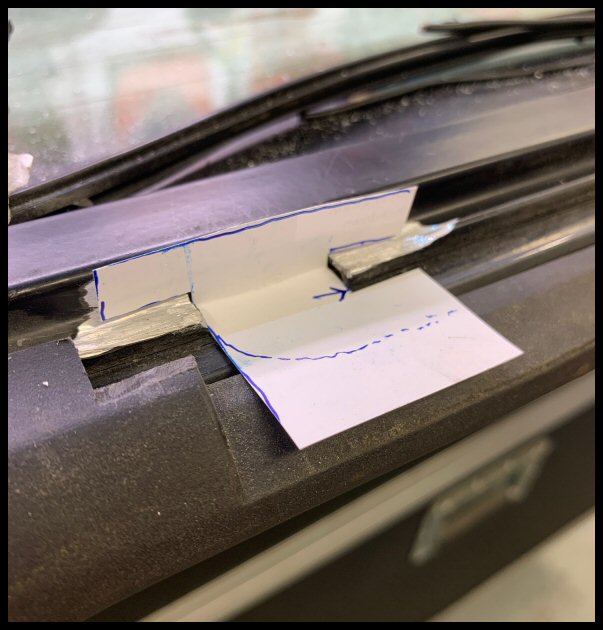
Washer Jets
These were victim to the windscreen removal - sawn clean in half!
I visited "The Lakes" and tried to salvage a pair of jets off a blue 440. Snapped the securing tags on them both. These are non-salvageable now, even if you do find a pair.
I researched as many alternatives as possible. A Land Rover Defender is pretty close but not quite.
Anyway, I found these...

I wish I could provide a part number or make, but they are just generic "universal" items.
To fit them, the following is necessary...
Wiper Motor
You need to remove the wiper motor assembly for access to the offside washer jet.
Sadly, this happened...

Snap!
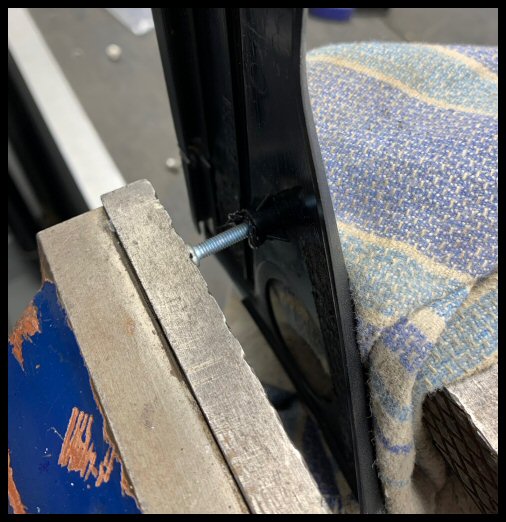
Still it fights me!
The bolts go into "floating" nuts which makes the wiper assembly rubber bushed and insulated. This is presumably to cancel out motor noise resonance within the cabin.
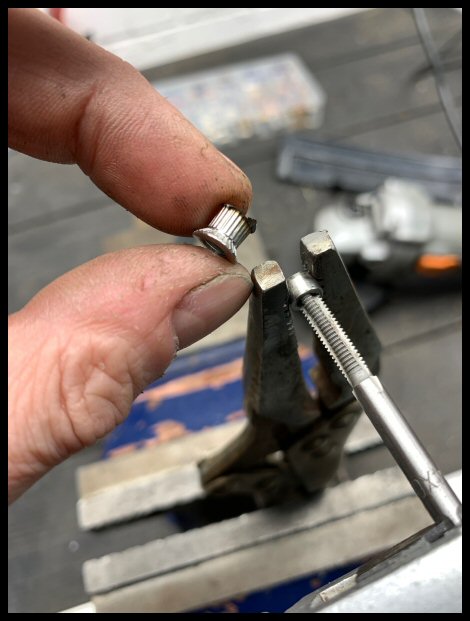
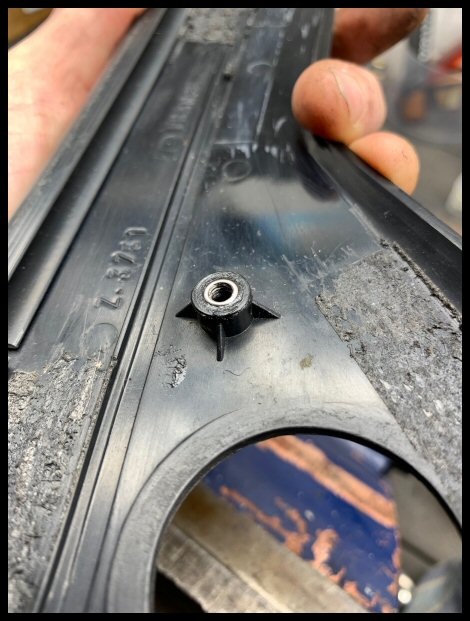
Floating nuts removed with the offending broken bolt in situe...

Time to use my new purchase - a rivnut gun...

Made some new captive nuts...

Fitted and still maintaining the rubber insulation...

Enabling washer jet and scuttle trim fitment...
Scuttle trims fitted with a few small pieces of double sided tape against the windscreen to prevent rattling as advised on here, although no tape was ever used from factory.
Wipers
Sanded down, primed and painted...

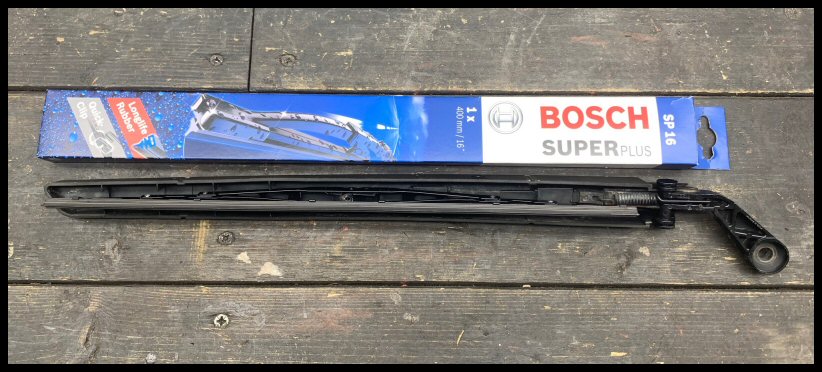
New Bosch blades, with the driver's side getting a spoiler...

I must admit, on my newer cars, I have had great results with these single piece or "flat" blades. However, in my eyes, they are incongruous with older cars and don't look right, irrespective of any performance benefits. Therefore, the old style mechanical blades used.
All fitted with new yellow zinc flange nuts...

Note of Warning!
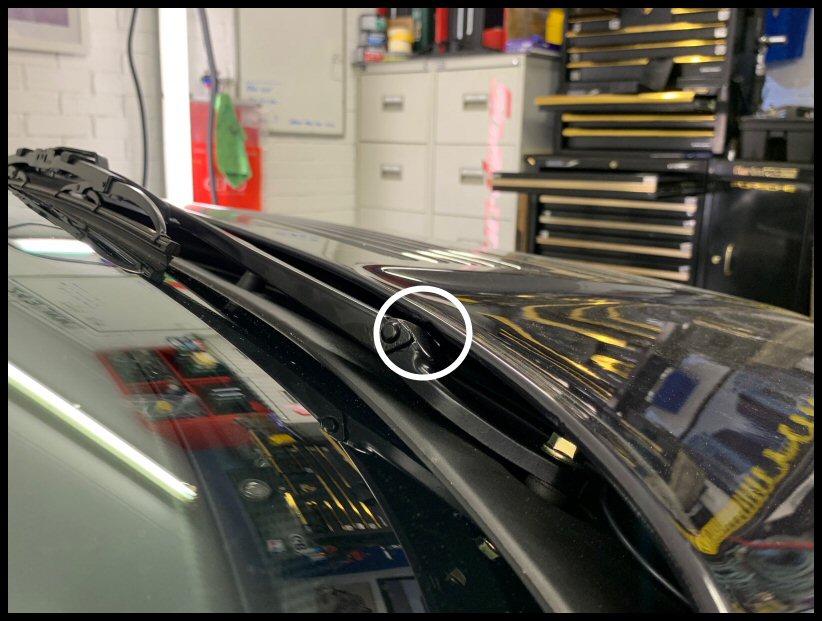
A common trait of right hand drive 480's is the offside wiper arm fouling the bonnet. My wiper arm was historically worn away, in conjunction with a tiny chunk of bonnet worn away too. My making of new bolts for the wiper arm mechanism affects spindle height. Upon reassembly, the wiper motor assembly was shimmed to achieve optimum wiper arm height...
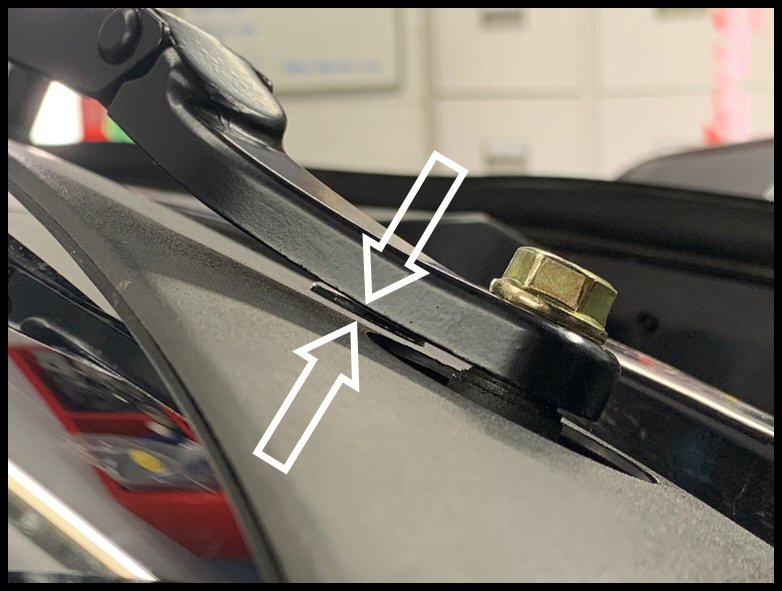
Basically, you need this measurement as small as possible or you'll have a hell of a time fitting & adjusting the bonnet. Ask me how I know!
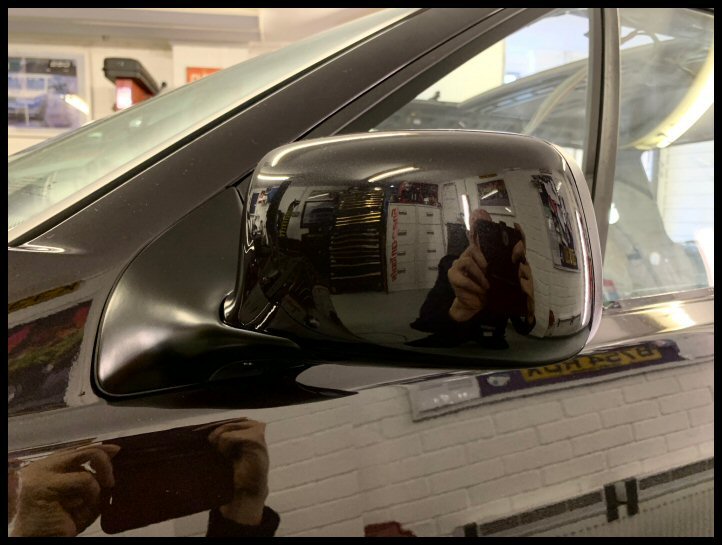
Mirrors
With the door quarterlights fitted by the windscreen guy (again, rope & soap), mirrors can follow....
The bases were looking pretty scabby....

Stripped down further...

Bases zinc primed and painted...

Freshly painted mirror caps fitted and mirror assemblies fitted left & right...
Sunroof
Sorry, I mean Moonroof
Joking aside, the glass has an amazing bronze tint. It's like some special coating worthy of a spaceship. Perhaps that's why it has the 'moon' name?
Anyway, as magnificent as it is, it has never worked
The motor worked fine, but upon opening, it immediately strains then stops.
Time to diagnose...

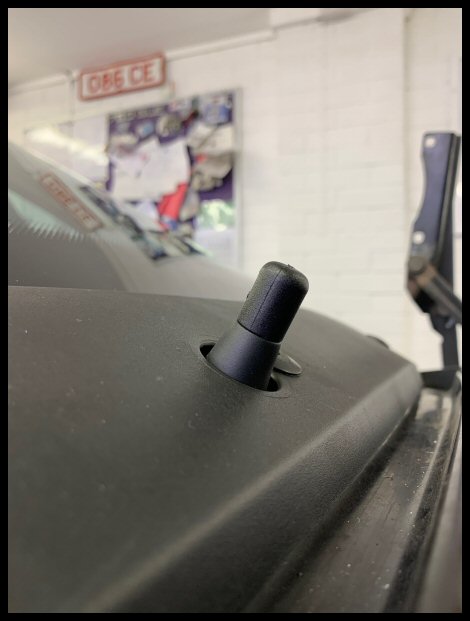
Upon disassembly, it was noticed this little pin (tip of my finger) had backed out ...

The slider (arrowed, back & forth) was hitting this tiny little pin and sliding no more as its path was blocked.
Stripped apart, pin pushed back home and all lubricated...

What more can I do... I can't introduce glue to a moving hinge?!? Let's just hope that if it has taken 28 years for that pin to back out, then it will only back out in another 28 years time....
All the crud washed out with the drainage ports cleared...

Amazingly the pieces known to be the weak point - the push/pull rods - are just fine. Packed with fresh grease regardless...

Before reassembly, the sun shade needed some attention...

Contact adhesive used to secure the leading edge fabric...

All reinstalled and looking great...

Also, I remembered struggling with the sunroof switch when I was removing the headlining. Memory tells me it was impossible to disconnect with the headlining in place. This is very silly if the switch fails in the future. Harness therefore extended with a switch disconnection method...

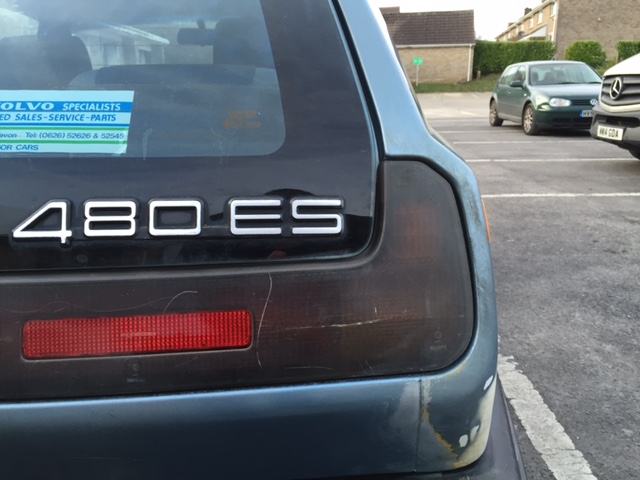
Tailgate Overhaul
First annoyance, the third brake light had what appeared to be a dead earthworm when looking through the glass...

The seal had dropped down and subsequently gone rock hard and glued itself to the lens.
All cleaned and refitted...

Then, attention turned to a common 480 problem; the wiring...

This is all fairly standard, but it became a lot worse on dissasembly...

What to do when that rubber jumper 'flex' is long since NLA?
This is my take.
Firstly, extract, repair and waterproof the actual harness. This is made easier (not) by Volvo making all the wires black. Some are a different gauge of wire, but just make sure you mark everything up as per the pin-outs...

All tagged for correct reconnection...

Then, remove the clip-on top spoiler, drill and tap two M4 holes...

Steps to make a support bracket with templates...
A new 'lower' bracket then fabricated from stainless steel, with two grommets...

Pass the new wires through the grommets and install to the tailgate frame with some silicone and tiny M4 bolts. Secure the harness to the bracket with a tiny cable tie...

Next, construct an 'upper' bracket to cap the top off...

More silicone in the 'sandwich'...

Install the top bracket and smooth the excess silcone from the sandwich...

Install a cable tie through the drilled holes to secure the loom...

All done. Hopefully we now have a durable and watertight connection point that is now serviceable (by being unscrewable)...

Then, make a third bracket from stainless for the vehicle body. This will secure and waterproof the body connection point...

Again, use the rivnut gun for the body aperture...

I use rigid corrugated tube and a VW/Audi grommet 4H0915143. I like this grommet as it is "half-blind"; i.e. whatever gauge tube you pass through, it creates a seal...

Pre-fitment trails...

I ran some trials looking for the best tailgate seal...
This is critical as the tailgate harness can foul the seal upon tailgate closure...

It's super super tight up there. I picked the best seal that gives the strongest fit vs. provides the most space.
Anyway, all done, time will tell as they say...
Rear Wiper
This had lost all its spring effect. The pivot hinge was seized. All lubricated and free'd off...

Again, new Bosch blade that is surprisingly awkward to remove & reinstall without damaging the trim...
All fitted with the new gas struts from previous...

Rear Washer Jet
Some minor repairs required to what is becoming a rare item (when intact!)...

Heavily rejuvenated with plastic reviver and installed...

More updates to follow next month. We are cracking on....
Soooo, here we go then!
False Start...
After getting it off the transporter and admiring fresh paint, how did it greet me?
Literally the first job - reconnecting the battery - instant 480 hassle!
I hunted high and low for the "closest-to-factory" earth strap. It's quite difficult to find a flat strap terminated with a post clamp. This is the best match I found from AES...
Battery and battery tray removed to fit. I should be fitting stuff, not taking it apart!
Anyway, this is where the actual rebuilding begins...
Glass
Fitting the new front screen...
Really happy with it. It's a 2018 made Pilkington with a perfect colour top tint (as OE as possible).
Applying the bonding mastic...
Fitting the non-bonded side glass using the "rope-and-soap" method...
Washer Jets
These were victim to the windscreen removal - sawn clean in half!
I visited "The Lakes" and tried to salvage a pair of jets off a blue 440. Snapped the securing tags on them both. These are non-salvageable now, even if you do find a pair.
I researched as many alternatives as possible. A Land Rover Defender is pretty close but not quite.
Anyway, I found these...
I wish I could provide a part number or make, but they are just generic "universal" items.
To fit them, the following is necessary...
Wiper Motor
You need to remove the wiper motor assembly for access to the offside washer jet.
Sadly, this happened...
Snap!
Still it fights me!
The bolts go into "floating" nuts which makes the wiper assembly rubber bushed and insulated. This is presumably to cancel out motor noise resonance within the cabin.
Floating nuts removed with the offending broken bolt in situe...
Time to use my new purchase - a rivnut gun...
Made some new captive nuts...
Fitted and still maintaining the rubber insulation...
Enabling washer jet and scuttle trim fitment...
Scuttle trims fitted with a few small pieces of double sided tape against the windscreen to prevent rattling as advised on here, although no tape was ever used from factory.
Wipers
Sanded down, primed and painted...
New Bosch blades, with the driver's side getting a spoiler...
I must admit, on my newer cars, I have had great results with these single piece or "flat" blades. However, in my eyes, they are incongruous with older cars and don't look right, irrespective of any performance benefits. Therefore, the old style mechanical blades used.
All fitted with new yellow zinc flange nuts...
Note of Warning!
A common trait of right hand drive 480's is the offside wiper arm fouling the bonnet. My wiper arm was historically worn away, in conjunction with a tiny chunk of bonnet worn away too. My making of new bolts for the wiper arm mechanism affects spindle height. Upon reassembly, the wiper motor assembly was shimmed to achieve optimum wiper arm height...
Basically, you need this measurement as small as possible or you'll have a hell of a time fitting & adjusting the bonnet. Ask me how I know!
Mirrors
With the door quarterlights fitted by the windscreen guy (again, rope & soap), mirrors can follow....
The bases were looking pretty scabby....
Stripped down further...
Bases zinc primed and painted...
Freshly painted mirror caps fitted and mirror assemblies fitted left & right...
Sunroof
Sorry, I mean Moonroof
Joking aside, the glass has an amazing bronze tint. It's like some special coating worthy of a spaceship. Perhaps that's why it has the 'moon' name?
Anyway, as magnificent as it is, it has never worked
The motor worked fine, but upon opening, it immediately strains then stops.
Time to diagnose...
Upon disassembly, it was noticed this little pin (tip of my finger) had backed out ...
The slider (arrowed, back & forth) was hitting this tiny little pin and sliding no more as its path was blocked.
Stripped apart, pin pushed back home and all lubricated...
What more can I do... I can't introduce glue to a moving hinge?!? Let's just hope that if it has taken 28 years for that pin to back out, then it will only back out in another 28 years time....
All the crud washed out with the drainage ports cleared...
Amazingly the pieces known to be the weak point - the push/pull rods - are just fine. Packed with fresh grease regardless...
Before reassembly, the sun shade needed some attention...
Contact adhesive used to secure the leading edge fabric...
All reinstalled and looking great...
Also, I remembered struggling with the sunroof switch when I was removing the headlining. Memory tells me it was impossible to disconnect with the headlining in place. This is very silly if the switch fails in the future. Harness therefore extended with a switch disconnection method...
Tailgate Overhaul
First annoyance, the third brake light had what appeared to be a dead earthworm when looking through the glass...
The seal had dropped down and subsequently gone rock hard and glued itself to the lens.
All cleaned and refitted...
Then, attention turned to a common 480 problem; the wiring...
This is all fairly standard, but it became a lot worse on dissasembly...
What to do when that rubber jumper 'flex' is long since NLA?
This is my take.
Firstly, extract, repair and waterproof the actual harness. This is made easier (not) by Volvo making all the wires black. Some are a different gauge of wire, but just make sure you mark everything up as per the pin-outs...
All tagged for correct reconnection...
Then, remove the clip-on top spoiler, drill and tap two M4 holes...
Steps to make a support bracket with templates...
A new 'lower' bracket then fabricated from stainless steel, with two grommets...
Pass the new wires through the grommets and install to the tailgate frame with some silicone and tiny M4 bolts. Secure the harness to the bracket with a tiny cable tie...
Next, construct an 'upper' bracket to cap the top off...
More silicone in the 'sandwich'...
Install the top bracket and smooth the excess silcone from the sandwich...
Install a cable tie through the drilled holes to secure the loom...
All done. Hopefully we now have a durable and watertight connection point that is now serviceable (by being unscrewable)...
Then, make a third bracket from stainless for the vehicle body. This will secure and waterproof the body connection point...
Again, use the rivnut gun for the body aperture...
I use rigid corrugated tube and a VW/Audi grommet 4H0915143. I like this grommet as it is "half-blind"; i.e. whatever gauge tube you pass through, it creates a seal...
Pre-fitment trails...
I ran some trials looking for the best tailgate seal...
This is critical as the tailgate harness can foul the seal upon tailgate closure...
It's super super tight up there. I picked the best seal that gives the strongest fit vs. provides the most space.
Anyway, all done, time will tell as they say...
Rear Wiper
This had lost all its spring effect. The pivot hinge was seized. All lubricated and free'd off...
Again, new Bosch blade that is surprisingly awkward to remove & reinstall without damaging the trim...
All fitted with the new gas struts from previous...
Rear Washer Jet
Some minor repairs required to what is becoming a rare item (when intact!)...
Heavily rejuvenated with plastic reviver and installed...
More updates to follow next month. We are cracking on....
Last edited by Jay-Kay-Em on Mon Jul 11, 2022 8:57 pm, edited 2 times in total.
Jay-Kay-Em
-------------------------------------
Click here for My 480 Turbo Diary
Click here for My Cars
-------------------------------------
Click here for My 480 Turbo Diary
Click here for My Cars
-
jamescarruthers

- 480 Is my middle name
- Posts: 2507
- Joined: Mon Jul 07, 2003 3:19 pm
- Location: Cambridge
Re: 1994 Volvo 480 Turbo Diary - Update July 2022
Some lovely solutions there!
1987 Volvo 480 ES, 507274, 217 - Red (Ness)
2006 Citroen C6 Exclusive 3.0 petrol/LPG
2008 Mini Cooper convertible (Mau)
Previous 480's:
J123 CFU -- ES
J449 MNL -- ES auto
D864 CPV -- ES
L691 JFC -- Turbo
F70 MNR -- ES
H858 FGV -- Turbo auto
E981 KHM -- ES (509849)
2006 Citroen C6 Exclusive 3.0 petrol/LPG
2008 Mini Cooper convertible (Mau)
Previous 480's:
J123 CFU -- ES
J449 MNL -- ES auto
D864 CPV -- ES
L691 JFC -- Turbo
F70 MNR -- ES
H858 FGV -- Turbo auto
E981 KHM -- ES (509849)
-
WillC9303

- Can tell where the 480 was built
- Posts: 305
- Joined: Mon Oct 18, 2021 8:46 pm
- Location: Surrey
Re: 1994 Volvo 480 Turbo Diary - Update July 2022
looks great!
I had the same problem as you with the battery terminal & 3rd brake light gasket. However, the battery terminal broken on mine was the positive, so didn't have the luxury of just swapping it out - rather had to SAW it off and put a new one on.
I had the same problem as you with the battery terminal & 3rd brake light gasket. However, the battery terminal broken on mine was the positive, so didn't have the luxury of just swapping it out - rather had to SAW it off and put a new one on.
William
1993 2.0i Limited Edition
1993 2.0i Limited Edition
-
Jay-Kay-Em
- 480 Rookie
- Posts: 439
- Joined: Tue Nov 27, 2012 10:42 pm
- Location: Huntingdon
- Contact:
Re: 1994 Volvo 480 Turbo Diary - Update August 2022
August 2022 - Bonnet
I have collected quite a few photographs here, so this is an update solely for the bonnet.
Again, I have wasted far too much time on this, and a whole update just for a bonnet seems a bit bonkers I know. But here goes.
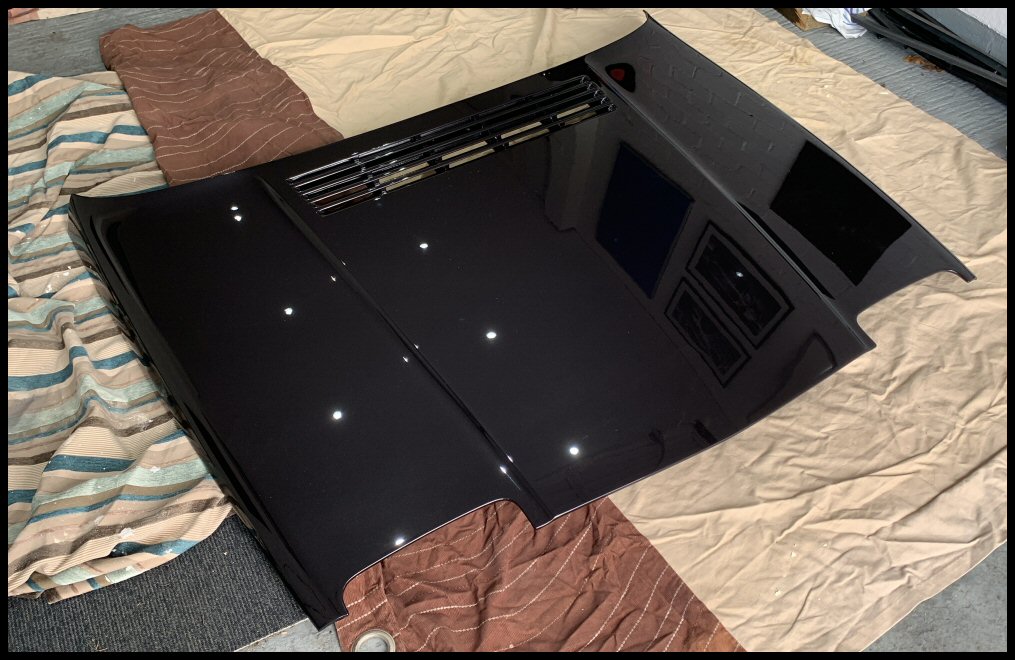
How do you work with a freshly painted bonnet, both top and underside? I was scared to touch it, move it, even go near it!
The 480 bonnet is a genuine work of art. I love the intake louvres....
Under-bonnet Insulation
I wanted something as OE as possible here. This is how I did it.
Carefully flip the bonnet up on well protected surfaces. Start by building an aluminium foil layer in 60mm strips...

Shame to cover all that beautiful new paint, but there you go.
There has been debate if this is needed or not, but it's factory, so I have to do my best.
This foil layer is in three pieces under the bonnet, left, centre & right. You therefore need continuity between the sections. You also need to create the earthing wires that go to the wiper scuttle.
Strip wire back and create a fan...

Then foil over the top...
Testing the individual sections have continuity...

Then, when all the sections are foiled, strategically place some matt black vinyl in key areas (to be revealed why later)...
Now, there is plenty of foam on eBay, but I don't trust any of it. Once bitten, twice shy with eBay. I'd rather have stuff that's designed for the job, because:
a) it's an extremely hostile environment
b) it comes already adhesive lined - with adhesive supposedly designed for the said hostile environment
c) it needs to look as "OE" as possible
With this criteria, I searched for another car that has the biggest area of insulation possible. My search turned to the Mercedes W123 and I ordered this from Partworks.de in Germany.

It's designed to be resilient between -40°C to +150°C and conforms to automotive standards for fire behaviour according to DIN 75200.

Arrived from Germany in no time at all. It's certainly big enough!

I made paper templates in preparation for cutting...

You can trace the outline using the brown paper...

I then visited Jeff's (sorry to pester you Jeff, thanks as always) and measured all the late turbo cut-outs required...

These measurements get transferred to the brown paper templates...

Supplied foam cut accordingly and applied...

Not looking too shabby...

You can just notice the earth link wires between sections...

With the main earth-to-body wire secured with a clip-tie...

Another victim of the paintshop - the little grey clips that hold the earthing wires. The bonnet came back bare, so I presume my original clips went in the bin (or snapped). The closest I could find new were Restagraf "359" which are 99% identical...

Earth wires all clipped...

...terminated...
... and secured both nearside & offside...

Job job'd as they say. Overkill? Of course.
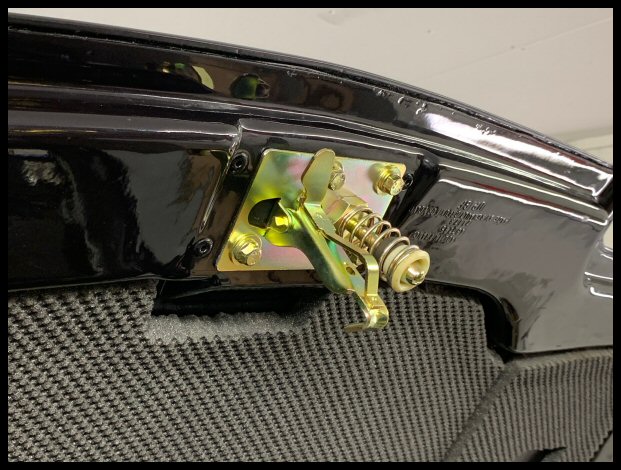
Bonnet Striker
This is also a bit OTT, but i'd gone to all the effort to paint the underside and apply foam to as close to OE as possible. Just felt a real shame to refit the skanky corroded striker...

All stripped apart and de-greased...

Over the years, I have really struggled to find a plater in Cambridgeshire. Many companies who do chemical plating, just aren't interesting in the classic car scene. Too fiddly, too low volume and customers who are too fussy! Anyway, success. I used "Vehicle & General Polishers & Platers Ltd" in Arlesey, Beds.
I was told yellow passivate was illegal now due to various haz-chem laws, but whatever substitute they are using, it's amazing.
All rebuilt...

That is a work of art. Shame to smear it with grease really...
All fitted...
Type Approval Striker
Sadly, another item that didn't survive the paintshop...
My bestest Paintshop skillz...

Printed and applied...

Let's hope it's durable enough under there. It's the same sticker material and manufacturer as the timing belt cover sticker, so lets hope so.
Wing Top Seals
All cleaned and secured solely by 6mm self-adhesive strip tape...

All done...
Between you and me, i'm quite pleased with that...

Not going to lie, adjustment was a pig. There's about 6 elements that all have to look good, and adjusting any one element, compromises another...
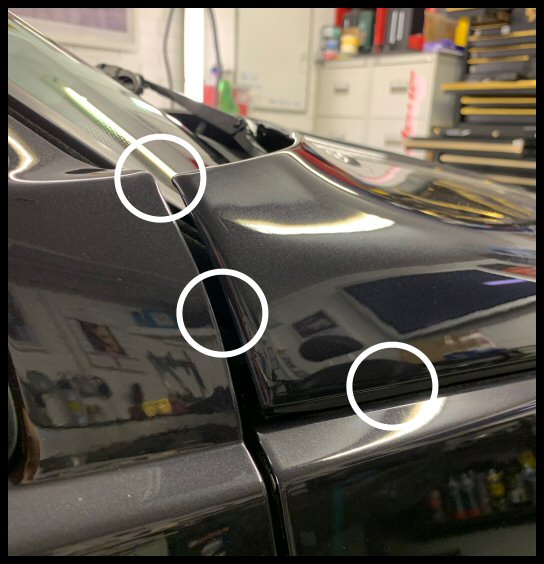
That's as good as it's going to get, trust me!
Even with the bonnet adjusted correctly, and my wiper motor assembly "shimmed" as deep as possible, its still bloomin' close....
Next update to follow very soon... with even more headaches
Best Regards
JKM
I have collected quite a few photographs here, so this is an update solely for the bonnet.
Again, I have wasted far too much time on this, and a whole update just for a bonnet seems a bit
How do you work with a freshly painted bonnet, both top and underside? I was scared to touch it, move it, even go near it!
The 480 bonnet is a genuine work of art. I love the intake louvres....
Under-bonnet Insulation
I wanted something as OE as possible here. This is how I did it.
Carefully flip the bonnet up on well protected surfaces. Start by building an aluminium foil layer in 60mm strips...
Shame to cover all that beautiful new paint, but there you go.
There has been debate if this is needed or not, but it's factory, so I have to do my best.
This foil layer is in three pieces under the bonnet, left, centre & right. You therefore need continuity between the sections. You also need to create the earthing wires that go to the wiper scuttle.
Strip wire back and create a fan...
Then foil over the top...
Testing the individual sections have continuity...
Then, when all the sections are foiled, strategically place some matt black vinyl in key areas (to be revealed why later)...
Now, there is plenty of foam on eBay, but I don't trust any of it. Once bitten, twice shy with eBay. I'd rather have stuff that's designed for the job, because:
a) it's an extremely hostile environment
b) it comes already adhesive lined - with adhesive supposedly designed for the said hostile environment
c) it needs to look as "OE" as possible
With this criteria, I searched for another car that has the biggest area of insulation possible. My search turned to the Mercedes W123 and I ordered this from Partworks.de in Germany.
It's designed to be resilient between -40°C to +150°C and conforms to automotive standards for fire behaviour according to DIN 75200.
Arrived from Germany in no time at all. It's certainly big enough!
I made paper templates in preparation for cutting...
You can trace the outline using the brown paper...
I then visited Jeff's (sorry to pester you Jeff, thanks as always) and measured all the late turbo cut-outs required...
These measurements get transferred to the brown paper templates...
Supplied foam cut accordingly and applied...
Not looking too shabby...
You can just notice the earth link wires between sections...
With the main earth-to-body wire secured with a clip-tie...
Another victim of the paintshop - the little grey clips that hold the earthing wires. The bonnet came back bare, so I presume my original clips went in the bin (or snapped). The closest I could find new were Restagraf "359" which are 99% identical...
Earth wires all clipped...
...terminated...
... and secured both nearside & offside...
Job job'd as they say. Overkill? Of course.
Bonnet Striker
This is also a bit OTT, but i'd gone to all the effort to paint the underside and apply foam to as close to OE as possible. Just felt a real shame to refit the skanky corroded striker...
All stripped apart and de-greased...
Over the years, I have really struggled to find a plater in Cambridgeshire. Many companies who do chemical plating, just aren't interesting in the classic car scene. Too fiddly, too low volume and customers who are too fussy! Anyway, success. I used "Vehicle & General Polishers & Platers Ltd" in Arlesey, Beds.
I was told yellow passivate was illegal now due to various haz-chem laws, but whatever substitute they are using, it's amazing.
All rebuilt...
That is a work of art. Shame to smear it with grease really...
All fitted...
Type Approval Striker
Sadly, another item that didn't survive the paintshop...
My bestest Paintshop skillz...
Printed and applied...
Let's hope it's durable enough under there. It's the same sticker material and manufacturer as the timing belt cover sticker, so lets hope so.
Wing Top Seals
All cleaned and secured solely by 6mm self-adhesive strip tape...
All done...
Between you and me, i'm quite pleased with that...
Not going to lie, adjustment was a pig. There's about 6 elements that all have to look good, and adjusting any one element, compromises another...
That's as good as it's going to get, trust me!
Even with the bonnet adjusted correctly, and my wiper motor assembly "shimmed" as deep as possible, its still bloomin' close....
Next update to follow very soon... with even more headaches
Best Regards
JKM
Jay-Kay-Em
-------------------------------------
Click here for My 480 Turbo Diary
Click here for My Cars
-------------------------------------
Click here for My 480 Turbo Diary
Click here for My Cars
-
jamescarruthers
- 480 Is my middle name
- Posts: 2507
- Joined: Mon Jul 07, 2003 3:19 pm
- Location: Cambridge
Re: 1994 Volvo 480 Turbo Diary - Update August 2022
Puts my afternoon rush job with wonky Dyanliner and Dynomat to shame, especially on the radio interference suppression front! Well done as usual mate.
I had my new pipes plated in Cambridge at Cambridge Electro Platers who seemed decent enough. I’ve been meaning to take the bonnet striker to them to complete my own engine bay but never had the time yet. They even re-did one for free after I had to rework it.
https://www.yell.com/biz/cambridge-elec ... e-1390991/
1987 Volvo 480 ES, 507274, 217 - Red (Ness)
2006 Citroen C6 Exclusive 3.0 petrol/LPG
2008 Mini Cooper convertible (Mau)
Previous 480's:
J123 CFU -- ES
J449 MNL -- ES auto
D864 CPV -- ES
L691 JFC -- Turbo
F70 MNR -- ES
H858 FGV -- Turbo auto
E981 KHM -- ES (509849)
2006 Citroen C6 Exclusive 3.0 petrol/LPG
2008 Mini Cooper convertible (Mau)
Previous 480's:
J123 CFU -- ES
J449 MNL -- ES auto
D864 CPV -- ES
L691 JFC -- Turbo
F70 MNR -- ES
H858 FGV -- Turbo auto
E981 KHM -- ES (509849)
Re: 1994 Volvo 480 Turbo Diary - Update August 2022
O.M.F.G.
That is an incredible job JK, I am in shock
It really makes me want to get the Wing Top Seal on my car sorted, currently it is poking out of the front nose cone, I thought it was because the paintshop messed it up, but it was actually the wing itself needs straightening, but we will see what can be done.
And I am in love with that insulation, all those beautiful knobbly bits to aid in insulation, great stuff!
Current Jobs to do (23/1/22):
Fix Central Locking
Fix drivers side speaker
Annoying Scratching Squeak
Water leaks
Complete Front O/S rebuild
Fix Central Locking
Fix drivers side speaker
Annoying Scratching Squeak
Water leaks
Complete Front O/S rebuild
-
Jay-Kay-Em
- 480 Rookie
- Posts: 439
- Joined: Tue Nov 27, 2012 10:42 pm
- Location: Huntingdon
- Contact:
Re: 1994 Volvo 480 Turbo Diary - Update August 2022
Cheers Ben, James.

I did the Ford Festival at Santa pod just gone, walked round Show & Shine. The guys with mirrors under their cars.... what they have spent on zinc plating must be phenomenal....
Thanks James, I'll check them out. Problem is, once you find somewhere decent, every bracket from this point forwards needs doing...
I did the Ford Festival at Santa pod just gone, walked round Show & Shine. The guys with mirrors under their cars.... what they have spent on zinc plating must be phenomenal....
Jay-Kay-Em
-------------------------------------
Click here for My 480 Turbo Diary
Click here for My Cars
-------------------------------------
Click here for My 480 Turbo Diary
Click here for My Cars
-
Jay-Kay-Em
- 480 Rookie
- Posts: 439
- Joined: Tue Nov 27, 2012 10:42 pm
- Location: Huntingdon
- Contact:
Re: 1994 Volvo 480 Turbo Diary - Update September 2022
September 2021 - Ups & Downs
Continued re-building. Not long until this is finished right?
Doors
Time to rebuild the doors and seals...
Sadly, the paintshop returned me a collection of torn and ripped apart seals...

Paintshops are used to working on insurance repairs, where all seals are ordered new. They don't work in a 480 mindset of "save and protect everything"!
Luckily, I had bought a spare pair of doors years ago...

These donated suprisingly good (after extensive cleaning!) single-piece window trim surrounds and guide runners...

Lock Trims
These were in a state of dis-repair. Captive nuts missing (A) and broken-off hook tabs (B)...

Everything is so bl**dy time consuming. There's no such thing in 480 land as just fitting something, everything is broken
Fixing the captive nuts. I chopped a new riv-nut in half and maintained the threaded section...
With some Tiger Seal, I then pressed it in...
Making a captive nut solution...
New lock trims from Joep...

All fitted...
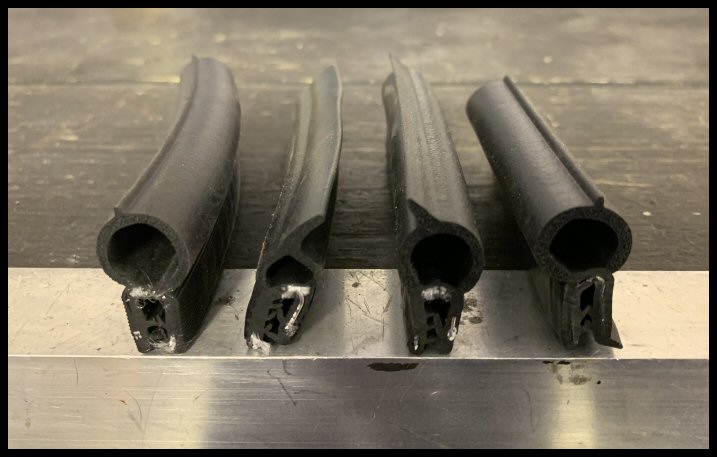
Window Scrapers
What to do with the window scraper seals? These, unsurprisingly, were badly corroded...
Well, it's been on my mind for over three years. So, over that time, I have collected various trims from various cars. This was the semi-finals...
Fitment trials...

You'll notice the S40 trim isn't there. I was at "The Lakes" and I pulled an S40 trim and walked over to a 480. Basically, the S40 has a double flange, whereas the 480 has just a single door top flange. There isn't the thickness for the S40 trim to grab onto and it wobbles about. Yes, I could pack it out. I think duct tape has been mentioned on here, but I wanted a 'pure' solution.
The winner in my eyes was the 3-door Vauxhall Corsa-"C"...

It grips on tight with no mods, and is a very similar profile...

Now, i'm not saying Corsa-C is the best solution. It's just the best solution I have found to-date. Again, happy to be proved wrong!
That saying, I have also chosen what is also becoming a rare car too! Where have all the Corsa-C's gone?!? They have instantly become rare overnight!
Then comes the cutting. You pay £20 a strip, and if you cut it too short, your seal is bin material!
Once cut, adding some black paint to the ends (which is what Volvo should have done in the first place!)...

All fitted at the front...

This might divide opinion, but for the rear, I decided for a "door trim over technique" by grinding the trim flat...

Then it sits on top of the trim, making things neater I think...

Best I can do for now i'm afraid.
Door Handles
This is a nice easy one... push fit with locking tabs...
All going swimmingly right?
The Highs & Lows of What We Do
I read Oli 100's last update with empathy. On his list of broken items was his spirit.
I have been building and restoring cars for nearly thirty years and it doesn't get any easier.
This is where it all went wrong...
Screw Up #1
So, a month or so ago, when it came back from the paintshop, I had to wash an engine bay of dust and rubbing compound debris.
All sparkly clean, but...

Post wash, it was driven into the garage and there it sat for a month (or so) whilst being worked on. Upon driving again, I tried to engage reverse, only to be greeted with an almighty crunch. Clutch not working
Basically my friction plate had rusted to the flywheel. Solution - I had the pedal depressed overnight, then in the morning with a screwdriver just tweaked the friction plate through the bell housing inspection hole. Rotate the engine 15 degrees, repeat. Rotate the engine 15 degrees, repeat. Eventually the friction plate finally broke free.
Screw Up #2
I'm guessing this is the same root cause from an engine bay wash. Having just released the clutch, I noticed my charge light was on and failed to extinguish with the engine running.
All the standard diagnostic checks made - all earths good, all battery leads recently overhauled with minimal voltage drops. After finding nothing of interest, the only thing left was the alternator itself...

Sure enough, alternator had "gone bad". Again, probably due to water corrosion from the wash and the subsequent lack of use thereafter. That, and not doing much rotating in five years. Yes, I could of stripped it down and probably changed the rectifier or brush pack, but quite frankly, I was too p*ssed off to care.
Amazingly, still available from Euro Car Parts, with the correct pulley too.
Side Mouldings
I made a start fitting the freshly painted side mouldings...
These are not clipped and are self adhesive only. There is very little reference to their correct height other than the loose tongue and groove moulding. I did take height measurements upon disassembly and re-matched those - only on the assumption they were factory height to begin with!
I am always nervous of double sided tape and longevity. My worst fear being in a few years, the adhesive fails, and my rubbing strip is bouncing down the motorway
To prevent this, way before paint, I drilled holes for a tiny "safety screw". This is not really to secure - the adhesive tape does that - but should the tape eventually fail, my rubbing strip is always safe.
Screw Up #3
Went to fit the rear quarter rubbing strips only to be greeted by a major clanger.
Problem being, they no longer fit...

The new rear arches give the body a slightly new profile and I never even thought of testing the side moulding strips. My bad.
This meant my freshly painted and immaculate rubbing strips needed serious modifying, which is not ideal.
This edge needs adjusting to match the car...
With a flat disc sander and my heart in my mouth, they went under the knife. Amazingly the paint survived which saved some money...

Only problem is, the strips are hollow, so the more you sand, the more the backing disappears...
You need a flat surface for the adhesive tape, so the voids were all filled up and all sealed...
Backsides all painted black and ready for application...

Screw Up #4
In the five weeks the car has been home, the fresh paint has been "evolving". This is all part of the curing process I guess.
Every evening in the garage, I would notice something new.
The bonnet has a some major sanding marks...

The front bumper has some serious fish-eyes where paint has been repelled...

Some panels have D/A sander swirls....

Further bodywork sanding marks...
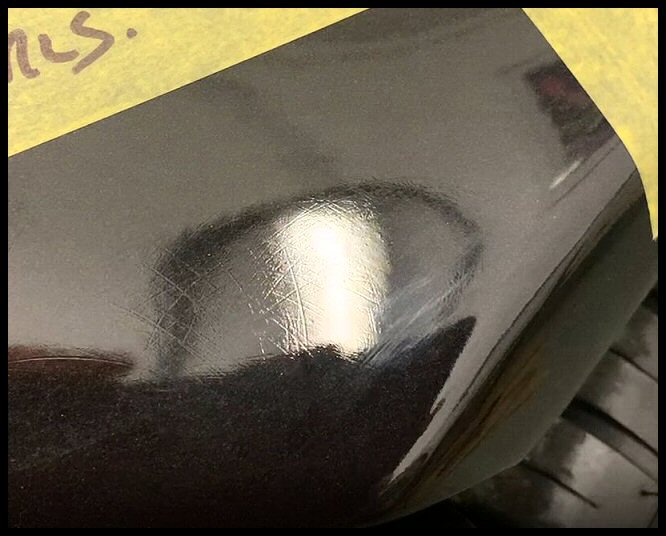
Anyway, when I noticed a crack-like mark in the nearside rear quarter, enough was enough...
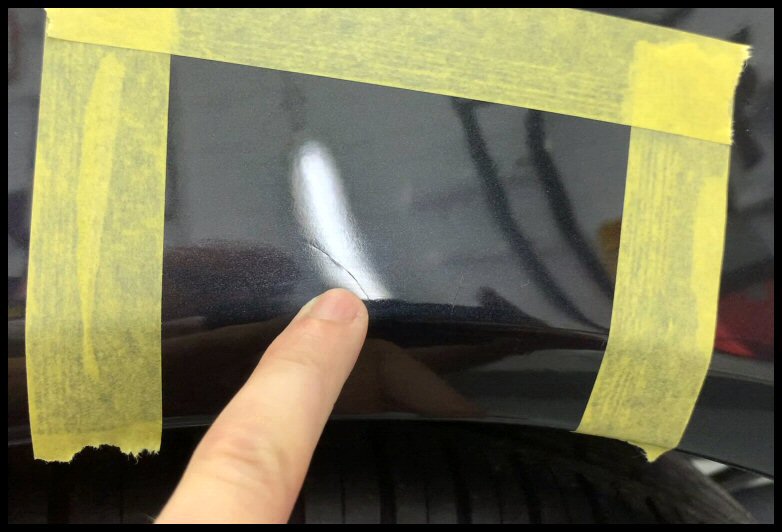
I swear all these things had evolved over time. Sadly, I had paid my paintshop bill in full already.
Cue a frosty chat with the paintshop
Having paid in full, I'm on the back foot here. I also don't want to keep paying £100 for vehicle transportation costs between my house and paintshop.
I refer to my opening paragraph of this car breaking my spirit.
The only way to proceed was to make the car road legal - but try and leave off as much trim as possible so the paintshop have nothing to mask for rectification works. That included a nearside rear window made of cardboard, no rear bumper or tail lights, all so the nearside rear quarter could be repainted.
I therefore spent two weeks getting the car to a "bare minimum" MoT wise. One seat. One seatbelt. Trailer board lights...
Anyway, for the first time in four years, I ventured out on the public highway in a somewhat dodgy looking 480. What a complete screw up...

I really wanted that "first drive" out and about to be something special. It wasn't. No carpets. It was loud. Also very very toxic as all the exhaust gasses were getting drawn in through the rear light apertures. I had a headache for days.
Presented for test...

My MoT station hates me!
With much checking of the ministry manual for every "loop hole" I could think of, we now have an Mot. We now have tax. We now have insurance.
I marked up all the defects and drove it to the paintshop, leaving them the keys. I left the industrial estate on foot, turned, and looked over my shoulder...

...and I haven't heard a thing since.
That folks, was my August.
I predict a long radio silence here until the paintshop delivers. So, Happy New Year.
JKM.
Continued re-building. Not long until this is finished right?
Doors
Time to rebuild the doors and seals...
Sadly, the paintshop returned me a collection of torn and ripped apart seals...
Paintshops are used to working on insurance repairs, where all seals are ordered new. They don't work in a 480 mindset of "save and protect everything"!
Luckily, I had bought a spare pair of doors years ago...
These donated suprisingly good (after extensive cleaning!) single-piece window trim surrounds and guide runners...
Lock Trims
These were in a state of dis-repair. Captive nuts missing (A) and broken-off hook tabs (B)...
Everything is so bl**dy time consuming. There's no such thing in 480 land as just fitting something, everything is broken
Fixing the captive nuts. I chopped a new riv-nut in half and maintained the threaded section...
With some Tiger Seal, I then pressed it in...
Making a captive nut solution...
New lock trims from Joep...
All fitted...
Window Scrapers
What to do with the window scraper seals? These, unsurprisingly, were badly corroded...
Well, it's been on my mind for over three years. So, over that time, I have collected various trims from various cars. This was the semi-finals...
Fitment trials...
You'll notice the S40 trim isn't there. I was at "The Lakes" and I pulled an S40 trim and walked over to a 480. Basically, the S40 has a double flange, whereas the 480 has just a single door top flange. There isn't the thickness for the S40 trim to grab onto and it wobbles about. Yes, I could pack it out. I think duct tape has been mentioned on here, but I wanted a 'pure' solution.
The winner in my eyes was the 3-door Vauxhall Corsa-"C"...
It grips on tight with no mods, and is a very similar profile...
Now, i'm not saying Corsa-C is the best solution. It's just the best solution I have found to-date. Again, happy to be proved wrong!
That saying, I have also chosen what is also becoming a rare car too! Where have all the Corsa-C's gone?!? They have instantly become rare overnight!
Then comes the cutting. You pay £20 a strip, and if you cut it too short, your seal is bin material!
Once cut, adding some black paint to the ends (which is what Volvo should have done in the first place!)...
All fitted at the front...
This might divide opinion, but for the rear, I decided for a "door trim over technique" by grinding the trim flat...
Then it sits on top of the trim, making things neater I think...
Best I can do for now i'm afraid.
Door Handles
This is a nice easy one... push fit with locking tabs...
All going swimmingly right?
The Highs & Lows of What We Do
I read Oli 100's last update with empathy. On his list of broken items was his spirit.
I have been building and restoring cars for nearly thirty years and it doesn't get any easier.
This is where it all went wrong...
Screw Up #1
So, a month or so ago, when it came back from the paintshop, I had to wash an engine bay of dust and rubbing compound debris.
All sparkly clean, but...
Post wash, it was driven into the garage and there it sat for a month (or so) whilst being worked on. Upon driving again, I tried to engage reverse, only to be greeted with an almighty crunch. Clutch not working
Basically my friction plate had rusted to the flywheel. Solution - I had the pedal depressed overnight, then in the morning with a screwdriver just tweaked the friction plate through the bell housing inspection hole. Rotate the engine 15 degrees, repeat. Rotate the engine 15 degrees, repeat. Eventually the friction plate finally broke free.
Screw Up #2
I'm guessing this is the same root cause from an engine bay wash. Having just released the clutch, I noticed my charge light was on and failed to extinguish with the engine running.
All the standard diagnostic checks made - all earths good, all battery leads recently overhauled with minimal voltage drops. After finding nothing of interest, the only thing left was the alternator itself...
Sure enough, alternator had "gone bad". Again, probably due to water corrosion from the wash and the subsequent lack of use thereafter. That, and not doing much rotating in five years. Yes, I could of stripped it down and probably changed the rectifier or brush pack, but quite frankly, I was too p*ssed off to care.
Amazingly, still available from Euro Car Parts, with the correct pulley too.
Side Mouldings
I made a start fitting the freshly painted side mouldings...
These are not clipped and are self adhesive only. There is very little reference to their correct height other than the loose tongue and groove moulding. I did take height measurements upon disassembly and re-matched those - only on the assumption they were factory height to begin with!
I am always nervous of double sided tape and longevity. My worst fear being in a few years, the adhesive fails, and my rubbing strip is bouncing down the motorway
To prevent this, way before paint, I drilled holes for a tiny "safety screw". This is not really to secure - the adhesive tape does that - but should the tape eventually fail, my rubbing strip is always safe.
Screw Up #3
Went to fit the rear quarter rubbing strips only to be greeted by a major clanger.
Problem being, they no longer fit...
The new rear arches give the body a slightly new profile and I never even thought of testing the side moulding strips. My bad.
This meant my freshly painted and immaculate rubbing strips needed serious modifying, which is not ideal.
This edge needs adjusting to match the car...
With a flat disc sander and my heart in my mouth, they went under the knife. Amazingly the paint survived which saved some money...
Only problem is, the strips are hollow, so the more you sand, the more the backing disappears...
You need a flat surface for the adhesive tape, so the voids were all filled up and all sealed...
Backsides all painted black and ready for application...
Screw Up #4
In the five weeks the car has been home, the fresh paint has been "evolving". This is all part of the curing process I guess.
Every evening in the garage, I would notice something new.
The bonnet has a some major sanding marks...
The front bumper has some serious fish-eyes where paint has been repelled...
Some panels have D/A sander swirls....
Further bodywork sanding marks...
Anyway, when I noticed a crack-like mark in the nearside rear quarter, enough was enough...
I swear all these things had evolved over time. Sadly, I had paid my paintshop bill in full already.
Cue a frosty chat with the paintshop
Having paid in full, I'm on the back foot here. I also don't want to keep paying £100 for vehicle transportation costs between my house and paintshop.
I refer to my opening paragraph of this car breaking my spirit.
The only way to proceed was to make the car road legal - but try and leave off as much trim as possible so the paintshop have nothing to mask for rectification works. That included a nearside rear window made of cardboard, no rear bumper or tail lights, all so the nearside rear quarter could be repainted.
I therefore spent two weeks getting the car to a "bare minimum" MoT wise. One seat. One seatbelt. Trailer board lights...
Anyway, for the first time in four years, I ventured out on the public highway in a somewhat dodgy looking 480. What a complete screw up...
I really wanted that "first drive" out and about to be something special. It wasn't. No carpets. It was loud. Also very very toxic as all the exhaust gasses were getting drawn in through the rear light apertures. I had a headache for days.
Presented for test...
My MoT station hates me!
With much checking of the ministry manual for every "loop hole" I could think of, we now have an Mot. We now have tax. We now have insurance.
I marked up all the defects and drove it to the paintshop, leaving them the keys. I left the industrial estate on foot, turned, and looked over my shoulder...
...and I haven't heard a thing since.
That folks, was my August.
I predict a long radio silence here until the paintshop delivers. So, Happy New Year.
JKM.
Jay-Kay-Em
-------------------------------------
Click here for My 480 Turbo Diary
Click here for My Cars
-------------------------------------
Click here for My 480 Turbo Diary
Click here for My Cars
Re: 1994 Volvo 480 Turbo Diary - Update September 2022
Superb work as ever.....
Keep the faith, and keep up the amazing research, you're a bloody inspiration!
You now join Mr Carruthers in "most amazing MOT presentation, EVER"Jay-Kay-Em wrote: ↑Fri Sep 02, 2022 8:08 pmI therefore spent two weeks getting the car to a "bare minimum" MoT wise. One seat. One seatbelt. Trailer board lights...
Anyway, for the first time in four years, I ventured out on the public highway in a somewhat dodgy looking 480. What a complete screw up...
Keep the faith, and keep up the amazing research, you're a bloody inspiration!
-
Jay-Kay-Em
- 480 Rookie
- Posts: 439
- Joined: Tue Nov 27, 2012 10:42 pm
- Location: Huntingdon
- Contact:
Re: 1994 Volvo 480 Turbo Diary - Update September 2022
Cheers Jeff, likewise. One's enough in my world, how you juggle 5(?) is beyond me!
The trip to the MoT station was a testing ground for many of my things - the PSA engine mount - the Audi TT crankcase ventilation system.
I think Rachel Essex was the first guinea pig of that mount and she must of racked up some serious miles by now.
Apart from the fear of death and imminent toxication, the car drove really nice. The turbo was really responsive - more responsive than I remember it being.
I get a constant trickle of PM's about the B18FT crankcase breather set up. One day, I promise to get this thread of mostly misery, and extract some abbreviated "how-to's". I just don't like telling people how to do stuff with only 12 test miles under it's belt!
Although it's another huge delay, its worked out quite well. Just like Ben, I like my Germanic excellence on the Q.T..... so the Mk2 and the new TVR replacement has just arrived, so some workshop time is distributed elsewhere!
Jay-Kay-Em
-------------------------------------
Click here for My 480 Turbo Diary
Click here for My Cars
-------------------------------------
Click here for My 480 Turbo Diary
Click here for My Cars
-
martinholmesuk

- Friend of Club 480 Europe
- Posts: 10049
- Joined: Thu Sep 05, 2002 9:43 pm
- Location: West Sussex
Re: 1994 Volvo 480 Turbo Diary - Update September 2022
Interesting and informative thread. I like your dedication to detail. I last saw a 480 some months back in Barnham, West Sussex. Before that I do not remember. I have a 940t and those are starting to be hard to spot.
Volvo 940 Turbo 19T (real Volvo :P)
Audi TT
Audi TT
Re: 1994 Volvo 480 Turbo Diary - Update September 2022
Man,
this is so much inspiration for me! I am currently also restoring a 480 turbo I already own since 1995. It is one of the first turbo's it is from March 1988. It hasn't been on the road since 2000, but always kept it, knowing some day I will restore it. You have paved the way for me, as a lot of issues you have already faced will be mine to tackle to.
Mine has been complete body-off, and I am now rebuilding it. On request I can post some pictures, but here is how I got it back from the painters back in 2020:


I progress slowly, as that is also part of the fun. Therefore no statements on when it will be ready I am currently working on the wiring and the dashboard.
Again, thanks for your posts, it is helping me a lot.
this is so much inspiration for me! I am currently also restoring a 480 turbo I already own since 1995. It is one of the first turbo's it is from March 1988. It hasn't been on the road since 2000, but always kept it, knowing some day I will restore it. You have paved the way for me, as a lot of issues you have already faced will be mine to tackle to.
Mine has been complete body-off, and I am now rebuilding it. On request I can post some pictures, but here is how I got it back from the painters back in 2020:
I progress slowly, as that is also part of the fun. Therefore no statements on when it will be ready
Again, thanks for your posts, it is helping me a lot.
--
Allthough it says newby: over 25 years of 480 experience!
Allthough it says newby: over 25 years of 480 experience!
Re: 1994 Volvo 480 Turbo Diary - Update September 2022
looks very smart but those supports scare me as there are NO diagonals>>>>>>
espaecially if those wheels dig into something???
espaecially if those wheels dig into something???
Alan
480 ES 2litre 'Celebration' ? , C30 1.8ES, SS1
480 ES 2litre 'Celebration' ? , C30 1.8ES, SS1
-
Jay-Kay-Em
- 480 Rookie
- Posts: 439
- Joined: Tue Nov 27, 2012 10:42 pm
- Location: Huntingdon
- Contact:
Re: 1994 Volvo 480 Turbo Diary - Update September 2022
Wow!
That is gorgeous.
2 posts in 18 years! Ervine, you need your own build thread!
Jay-Kay-Em
-------------------------------------
Click here for My 480 Turbo Diary
Click here for My Cars
-------------------------------------
Click here for My 480 Turbo Diary
Click here for My Cars
Re: 1994 Volvo 480 Turbo Diary - Update September 2022
Exactly what he said!!!Jay-Kay-Em wrote: ↑Mon Sep 05, 2022 6:06 pmWow!
That is gorgeous.
2 posts in 18 years! Ervine, you need your own build thread!
Re: 1994 Volvo 480 Turbo Diary - Update September 2022
I was going to make some comment about the continued quality of work that I dream of being able to replicate but sod that... a 968 CS! I would love a 968 and briefly looked at one last year - I remember when they were £15k - £20k! What a fantastic colour; both your cars sat together will make for a momentous picture when the body shop rectify the issues.
Re: 1994 Volvo 480 Turbo Diary - Update September 2022
I know, I know, and within these 2 posts I haven't even properly introduced myself, which I will do asap (I am already lurking on this forum since 2004...)Jay-Kay-Em wrote: ↑Mon Sep 05, 2022 6:06 pm
Wow!
That is gorgeous.
2 posts in 18 years! Ervine, you need your own build thread!
I have my own build thread, but it is on the Dutch Volvo480forum.com. Let me think of a way to also keep you guys overhere updated.
At least I will try to update this forum as well with my progress from now on. But first: a proper introduction will follow asap.
--
Allthough it says newby: over 25 years of 480 experience!
Allthough it says newby: over 25 years of 480 experience!
-
Jay-Kay-Em
- 480 Rookie
- Posts: 439
- Joined: Tue Nov 27, 2012 10:42 pm
- Location: Huntingdon
- Contact:
Re: 1994 Volvo 480 Turbo Diary - Update September 2022
Cheers Oli; 2 years to find a CS in Riviera Blue. We got there in the end. Dream spec, body colour hardback Recaro's, not even a radio! I had my first 944 in 2003 and remember a '68 CS at £12k.....
Look forward to it Ervine!
Jay-Kay-Em
-------------------------------------
Click here for My 480 Turbo Diary
Click here for My Cars
-------------------------------------
Click here for My 480 Turbo Diary
Click here for My Cars