if any consolation our's has similar 'rust proofing' over-spray . . . . .
but that looks VERY clean, check up behind teh petrol filler pipe, give it a darn good wash out
So, today was the day...
Moderators: jifflemon, coyote1980, Rachel
Re: So, today was the day...
Alan
480 ES 2litre 'Celebration' ? , C30 1.8ES, SS1
480 ES 2litre 'Celebration' ? , C30 1.8ES, SS1
-
Ade
- Can tell where the 480 was built
- Posts: 337
- Joined: Tue Feb 28, 2012 3:25 pm
- Location: Northants
Re: So, today was the day...
You wanna take the carpet and the side panels out of the boot as well, beneath the trim can lurk horrors! if you're aiming for prevention of rust rather than cure when you end up with a big hole (which is most sensible) then you need to strip all the back out and check every bloody square inch of it. Given the appallingly crap sealing of the rear glass, the boot floor tends to be where they rot from because all that foam on the boot carpet holds water like a great big sponge. Every rusty 480 I've ever seen has the rot in almost identical spots. Rear seat belt anchorages are another favourite, must say though, on the whole, it doesn't look too bad rot wise but as I say, you never can tell until you strip the boot out as the scary bits are often well concealed!
O.C. 480 D.
Re: So, today was the day...
and also remove the rear bumper and ditch the foam 'filters' AKA salt water holders that rot the floor through from below . . . . .
I took the plastic rear trim out and injected waxoyl into the area ABOVE the arches from within the boot with a long flexible pipe to try and keep the rust at bay, best done when car is warm, even half an hour with sun shining on it is enough to let the waxoyl flow . . . .
I took the plastic rear trim out and injected waxoyl into the area ABOVE the arches from within the boot with a long flexible pipe to try and keep the rust at bay, best done when car is warm, even half an hour with sun shining on it is enough to let the waxoyl flow . . . .
Alan
480 ES 2litre 'Celebration' ? , C30 1.8ES, SS1
480 ES 2litre 'Celebration' ? , C30 1.8ES, SS1
-
Ade
- Can tell where the 480 was built
- Posts: 337
- Joined: Tue Feb 28, 2012 3:25 pm
- Location: Northants
Re: So, today was the day...
Oh yeah, those bloody foam things! I forgot all about those, I remember now you mention it thinking what a horrendous idea that was when I cut the blue one to bits to save it from 'death by rust', awful water trap in a really really bad place! That's definitely sound advice to get rid of them ASAP, mine were totally water logged and although deteriorated, still holding more than enough water to have played a big part in the devastation before me. Get 'em gone!
O.C. 480 D.
-
jamescarruthers

- 480 Is my middle name
- Posts: 2505
- Joined: Mon Jul 07, 2003 3:19 pm
- Location: Cambridge
Re: So, today was the day...
WATDF
Wheel arches to die for
Might be bashed about but on arches alone, I would have bought that car! Well done!
Wheel arches to die for
Might be bashed about but on arches alone, I would have bought that car! Well done!
1987 Volvo 480 ES, 507274, 217 - Red (Ness)
2006 Citroen C6 Exclusive 3.0 petrol/LPG
2008 Mini Cooper convertible (Mau)
Previous 480's:
J123 CFU -- ES
J449 MNL -- ES auto
D864 CPV -- ES
L691 JFC -- Turbo
F70 MNR -- ES
H858 FGV -- Turbo auto
E981 KHM -- ES (509849)
2006 Citroen C6 Exclusive 3.0 petrol/LPG
2008 Mini Cooper convertible (Mau)
Previous 480's:
J123 CFU -- ES
J449 MNL -- ES auto
D864 CPV -- ES
L691 JFC -- Turbo
F70 MNR -- ES
H858 FGV -- Turbo auto
E981 KHM -- ES (509849)
Re: So, today was the day...
Thanks for the comments - Funnily enough, the whole carpet and rear trim is all slowly coming out, along with the bumper, which from the wibbly-wobbly'ness of the skin, leads me to think I'll be fabricating a new bumper bar!
Ade - Boot floor - Carpet already out! Was dry coming out, which I took as a positive sign (although the rear lights will be coming out and resealed). I'll possibly get the rear trim out this weekend.

However, this evening was spent removing both front seats. Boy that was fun. I think I mentioned the passenger side one struggled to slide, so getting to the T50 Torx bolts was "fun". And boy are they tight.
Anyhoo, both seats are currently in the kitchen (thank heavens the girlfriend is away on a training course) and the interior of the car is looking like this:

The carpet should be out this weekend, as the rear carpets are damp, which I'm hoping was spilt screenwash fluid, but until they're properly out, I can't confirm.
So.... that passenger seat. Once out and indoors, I gave the rails a gentle tap with a BFH. Out dropped this:

It now slides like a dream! May have also resolved the lack of seat heater - one of the pins had dislodged from the plug.
Finally, I took the opportunity to give the leather a good treatment of Gliptones Liquid leather. It's the best leather treatment I've found. Seat looks like this now:

Ade - Boot floor - Carpet already out! Was dry coming out, which I took as a positive sign (although the rear lights will be coming out and resealed). I'll possibly get the rear trim out this weekend.
However, this evening was spent removing both front seats. Boy that was fun. I think I mentioned the passenger side one struggled to slide, so getting to the T50 Torx bolts was "fun". And boy are they tight.
Anyhoo, both seats are currently in the kitchen (thank heavens the girlfriend is away on a training course) and the interior of the car is looking like this:
The carpet should be out this weekend, as the rear carpets are damp, which I'm hoping was spilt screenwash fluid, but until they're properly out, I can't confirm.
So.... that passenger seat. Once out and indoors, I gave the rails a gentle tap with a BFH. Out dropped this:
It now slides like a dream! May have also resolved the lack of seat heater - one of the pins had dislodged from the plug.
Finally, I took the opportunity to give the leather a good treatment of Gliptones Liquid leather. It's the best leather treatment I've found. Seat looks like this now:
Last edited by jifflemon on Sun Jul 09, 2017 8:11 pm, edited 1 time in total.
Re: So, today was the day...
Coming on really well!
Always good when problems are as easily explained as a key caught in the seat runner...
Keep the updates coming!
David
Always good when problems are as easily explained as a key caught in the seat runner...
Keep the updates coming!
David
Current: 1994 480 GT, 1996 460 CD & 1997 440 LE with lots of optional extras & 2007 V50 SE Sport
Previous: Celebration 331 (re-homed with Richard S), Celebration 467 (returned to Martin Mc); Celebration 346 (re-homed with Alan480); Celebration 269 (scrapped abandoned project), Celebration 73 (sold on after 6 years), 1992 ES, 1988 ES - and numerous other non-480 Volvos!
Previous: Celebration 331 (re-homed with Richard S), Celebration 467 (returned to Martin Mc); Celebration 346 (re-homed with Alan480); Celebration 269 (scrapped abandoned project), Celebration 73 (sold on after 6 years), 1992 ES, 1988 ES - and numerous other non-480 Volvos!
Re: So, today was the day...
Litte more done this evening.... You'll be pleased to discover that finally, we've a typical 480 fault! Yes, I've leaking rear clusters!
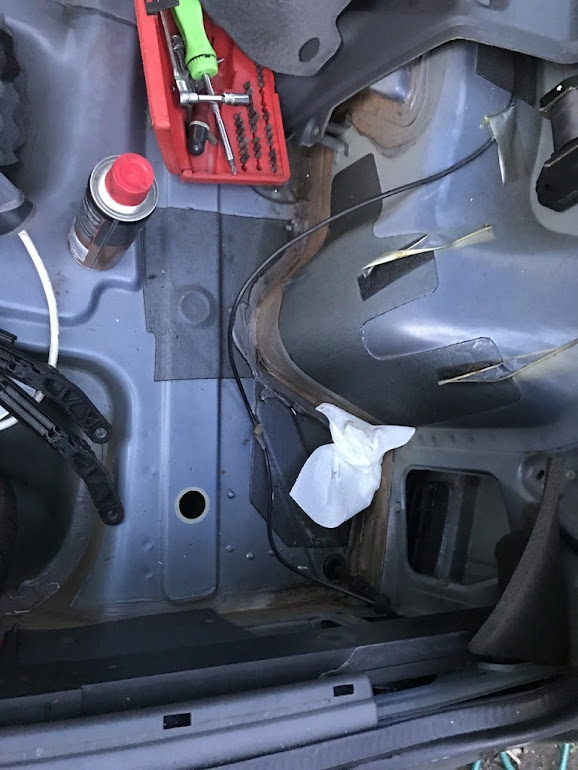
Coming in, running down the body and into the footwells. Got some Butyl tape, so will seal them up and monitor. However, need to get the insides dry, so.... Out with the carpet!


The Sounding deadening is quite damp, but the floor's still good underneath. Carpet in the airing cupboard drying out too. Whilst removing, I may have also solved why the aircon only worked on certain settings.

That orange Vacuum pipe should be connected to the servo!
Coming in, running down the body and into the footwells. Got some Butyl tape, so will seal them up and monitor. However, need to get the insides dry, so.... Out with the carpet!
The Sounding deadening is quite damp, but the floor's still good underneath. Carpet in the airing cupboard drying out too. Whilst removing, I may have also solved why the aircon only worked on certain settings.
That orange Vacuum pipe should be connected to the servo!
Last edited by jifflemon on Sun Jul 09, 2017 8:14 pm, edited 1 time in total.
-
WRDendy

- Can tell where the 480 was built
- Posts: 325
- Joined: Wed Dec 30, 2009 5:33 pm
- Location: Oxford
Re: So, today was the day...
Looks like you're doing a proper job on this one!
Would you mind going into more detail on your leather treatment? I've been using Autoglym leather cleaner and balm on my seats and honestly I wouldn't rate them particularly highly. I've got the GT interior so unfortunately I can't really start touching it up with dyes without ruining the finish, so I'm always interested in alternative ways to look after the leather.
Also, is that a pair of aux gauges?

What's going on there? Twin turbos?
Would you mind going into more detail on your leather treatment? I've been using Autoglym leather cleaner and balm on my seats and honestly I wouldn't rate them particularly highly. I've got the GT interior so unfortunately I can't really start touching it up with dyes without ruining the finish, so I'm always interested in alternative ways to look after the leather.
Also, is that a pair of aux gauges?
What's going on there? Twin turbos?
Formerly known as 'Jaster'
Current: '94 GT & '88 ES
Former: '89 ES
Current: '94 GT & '88 ES
Former: '89 ES
Re: So, today was the day...
Hahahaha - caught out! The top one is the replacement one; the backing was going on the other one, so unless anyone wants it, it'll be heading for the bin.
Liquid leather treatment is quite simple; its a two step process - Clean then condition.
Start with some GT12 Intensive cleaner, Wipe the surface with a damp clean cloth. Apply neat GT12 Intensive Cleaner on to the leather with a soft cloth and use a soft nail brush to agitate and gently stir it onto and around the surface and into any creases and cracks if necessary - do not scrub.
Leave the cleaner to dry for about five minutes before wiping off with another clean damp cloth. Leave to dry
GT11 Leather Conditioner should then be applied sparingly with a soft white cloth and rubbed well and evenly into the leather. For very dry leather, apply two more coats within 48 hours.
You'll find it even brings back the smell of the leather.
Back to the car... Bit more playtime today!
The centre console came out and the damp sound deadening removed and stuck in the airing cupboard. Carpet was pulled out of airing cupboard and is sat in the living room. Just got to hope the girlfriend doesn't pop round!
Fixed the little vacuum pipe back onto the servo - Yup, all my vents on the A/C panel now work.
Then set about removing the dashboard - It's off to the Netherlands for a health check - and oh dear lord, more unobtainium required - Both dash parts (front and back) were held in by 2, very loose self tappers as the rest of the clips were broken. The front part is cracked too.
Speaking of unobtainium, I phoned Volvo to see if front washer jets are available - I'm sure you can guess the answer! Looking at either TX2 taxi rear jets, or Landrover Defender front jets as possible options, unless anyone knows anything better?
Put the back seats back in - Just to make some space in the house more than anything and then added some Buytl tape to the rear lenses seals; The rear carpet is staying out for now, because although it passed a quick shower test, I want to make absolutely sure they're dry before carpets and underlay go back in.
By the way, I've got some photos I can add to GJ's "how to remove the carpet and centre console" if anyone's interested?
Finally, I HAD to sort the backs of the wheels... It's been bugging me ever since I put them back on; Don't like doing half a job!
So.... Here's what we started with.
OSR

NSR

And here they are after dosing them in petrol!
OSR
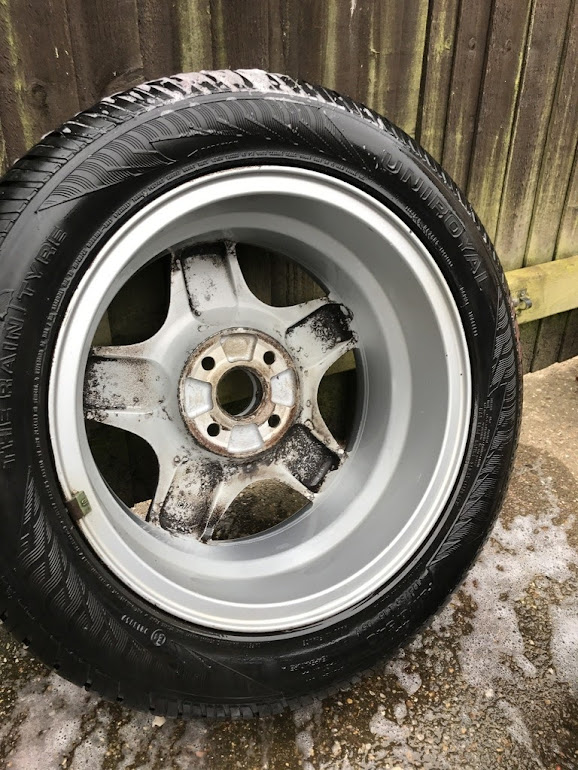
NSR

Liquid leather treatment is quite simple; its a two step process - Clean then condition.
Start with some GT12 Intensive cleaner, Wipe the surface with a damp clean cloth. Apply neat GT12 Intensive Cleaner on to the leather with a soft cloth and use a soft nail brush to agitate and gently stir it onto and around the surface and into any creases and cracks if necessary - do not scrub.
Leave the cleaner to dry for about five minutes before wiping off with another clean damp cloth. Leave to dry
GT11 Leather Conditioner should then be applied sparingly with a soft white cloth and rubbed well and evenly into the leather. For very dry leather, apply two more coats within 48 hours.
You'll find it even brings back the smell of the leather.
Back to the car... Bit more playtime today!
The centre console came out and the damp sound deadening removed and stuck in the airing cupboard. Carpet was pulled out of airing cupboard and is sat in the living room. Just got to hope the girlfriend doesn't pop round!
Fixed the little vacuum pipe back onto the servo - Yup, all my vents on the A/C panel now work.
Then set about removing the dashboard - It's off to the Netherlands for a health check - and oh dear lord, more unobtainium required - Both dash parts (front and back) were held in by 2, very loose self tappers as the rest of the clips were broken. The front part is cracked too.
Speaking of unobtainium, I phoned Volvo to see if front washer jets are available - I'm sure you can guess the answer! Looking at either TX2 taxi rear jets, or Landrover Defender front jets as possible options, unless anyone knows anything better?
Put the back seats back in - Just to make some space in the house more than anything and then added some Buytl tape to the rear lenses seals; The rear carpet is staying out for now, because although it passed a quick shower test, I want to make absolutely sure they're dry before carpets and underlay go back in.
By the way, I've got some photos I can add to GJ's "how to remove the carpet and centre console" if anyone's interested?
Finally, I HAD to sort the backs of the wheels... It's been bugging me ever since I put them back on; Don't like doing half a job!
So.... Here's what we started with.
OSR
NSR
And here they are after dosing them in petrol!
OSR
NSR
Last edited by jifflemon on Sun Jul 09, 2017 8:17 pm, edited 1 time in total.
Re: So, today was the day...
Another quick update! OSF arch liner removed (although the lower two screws wanted to put up a fight.
Underneath looks like this after a quick degrease and rinse

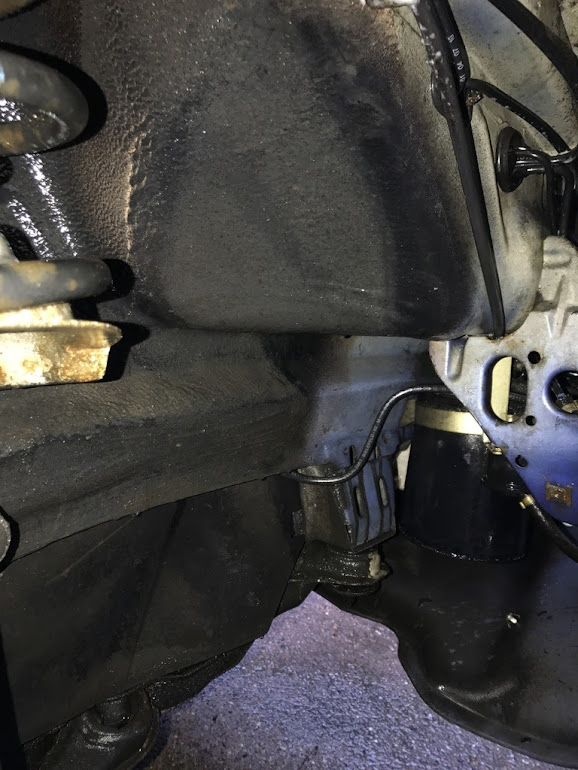
And I'm sure you can guess what the wheel was like!
Before

After

Also thought I'd check the brake fluid...

Yuck! But surprisingly, according to my fluid tester, there's <1% water in there!

Anything more than 3% water and you should change it. I'll be flushing it through regardless, so it'll be interesting to take a reading from the calipers, rather than reservoir.
Also had some good news from the other side of the pond! These should be arriving soon!

Underneath looks like this after a quick degrease and rinse
And I'm sure you can guess what the wheel was like!
Before
After
Also thought I'd check the brake fluid...
Yuck! But surprisingly, according to my fluid tester, there's <1% water in there!
Anything more than 3% water and you should change it. I'll be flushing it through regardless, so it'll be interesting to take a reading from the calipers, rather than reservoir.
Also had some good news from the other side of the pond! These should be arriving soon!
Last edited by jifflemon on Sun Jul 09, 2017 8:22 pm, edited 1 time in total.
Re: So, today was the day...
The fluid res is probably just mucky, I have had that over the years sometimes it is from old rubber seals breaking down.
Would be a good idea to clean it out that way it will be easier to spot seal and fluid issues for the future.
Would be a good idea to clean it out that way it will be easier to spot seal and fluid issues for the future.
Re: So, today was the day...
More updates!
Just because I could, I bled both calipers on the O/S (its the side I've currently got jacked up) - this little fella makes it a simple one man job

Then it was on to something that's been worrying me.... You can see in the picture below that the side strip on the wing sits higher than the one on the door; Oh and the one on the door is coming away...
That combined with jamescarruthers response in this thread meant that they were going to have to come off!
Oh the horrors....

They were held on with a combination of Bodytape, bathroom sealer and builders caulk.
That's going to be keeping me busy for a fair few days, and I've still the rear and the N/Side to remove!
Just because I could, I bled both calipers on the O/S (its the side I've currently got jacked up) - this little fella makes it a simple one man job
Then it was on to something that's been worrying me.... You can see in the picture below that the side strip on the wing sits higher than the one on the door; Oh and the one on the door is coming away...
That combined with jamescarruthers response in this thread meant that they were going to have to come off!
Oh the horrors....
They were held on with a combination of Bodytape, bathroom sealer and builders caulk.
That's going to be keeping me busy for a fair few days, and I've still the rear and the N/Side to remove!
Last edited by jifflemon on Sun Jul 09, 2017 8:23 pm, edited 1 time in total.
Re: So, today was the day...
There is a product called Goo Gone which will sort out the sticky stuff without damaging the paint.
Colin
Colin
Re: So, today was the day...
Cheers Colin, may pick some up. It's well and truly gunked up with a combination of stuff.arthuy wrote:There is a product called Goo Gone which will sort out the sticky stuff without damaging the paint.
Colin
May also try this stuff too. Been trying to scrape the bigger blobs off but its slow going
Re: So, today was the day...
Some of you may have spotted a pattern to the way I work - That is, there isn't really one! I tend to flit from job to job without really planning... One friend commented that I'm great at pulling things apart, not so good at putting them back together! 
My argument is that I have to understand the big picture - I know what I want to achieve, so need to know the extent of the work required.
As such, i had to tackle the back bumper. It's been niggling at me for far too long now! So last night I went underneath with the WD40 and gave everything a good soak. Returned home this afternoon, expecting everything to round or snap off. They didn't.
Bumper came off without too much of a struggle and I discovered the foam bits that Alan480 and Ade warned me of...

Thankfully, the metal was good!

So, to the bumper.... People of a delicate nature may wish to look away now....

The rear view:

The bumper bar itself:


Errrrr.... It's not supposed to look like that right? I'm meant to have the rotting remains of a bumper bar aren't I?
At least I've saved myself spending £2 on a lottery ticket for tonights draw - I've clearly used all my luck up today!
My argument is that I have to understand the big picture - I know what I want to achieve, so need to know the extent of the work required.
As such, i had to tackle the back bumper. It's been niggling at me for far too long now! So last night I went underneath with the WD40 and gave everything a good soak. Returned home this afternoon, expecting everything to round or snap off. They didn't.
Bumper came off without too much of a struggle and I discovered the foam bits that Alan480 and Ade warned me of...
Thankfully, the metal was good!
So, to the bumper.... People of a delicate nature may wish to look away now....
The rear view:
The bumper bar itself:
Errrrr.... It's not supposed to look like that right? I'm meant to have the rotting remains of a bumper bar aren't I?
At least I've saved myself spending £2 on a lottery ticket for tonights draw - I've clearly used all my luck up today!
Last edited by jifflemon on Sun Jul 09, 2017 8:26 pm, edited 1 time in total.
Re: So, today was the day...
Wow - I have never seen one looking that good!
Another way of looking at things might be to say DO buy a lottery ticket for the next draw - your luck is obviously well in at present!
David
Another way of looking at things might be to say DO buy a lottery ticket for the next draw - your luck is obviously well in at present!
David
Current: 1994 480 GT, 1996 460 CD & 1997 440 LE with lots of optional extras & 2007 V50 SE Sport
Previous: Celebration 331 (re-homed with Richard S), Celebration 467 (returned to Martin Mc); Celebration 346 (re-homed with Alan480); Celebration 269 (scrapped abandoned project), Celebration 73 (sold on after 6 years), 1992 ES, 1988 ES - and numerous other non-480 Volvos!
Previous: Celebration 331 (re-homed with Richard S), Celebration 467 (returned to Martin Mc); Celebration 346 (re-homed with Alan480); Celebration 269 (scrapped abandoned project), Celebration 73 (sold on after 6 years), 1992 ES, 1988 ES - and numerous other non-480 Volvos!
-
glasgowjim

- 480 Is my middle name
- Posts: 4830
- Joined: Sun Oct 01, 2006 5:28 pm
- Location: GLASGOW SCOTLAND
Re: So, today was the day...
That bumper bar IS in very good condition and I should know Have broken more than enough 480's for spare parts in the last 10 years.
DO NOT throw away recondition and replace .
DO NOT throw away recondition and replace .
-
Ade
- Can tell where the 480 was built
- Posts: 337
- Joined: Tue Feb 28, 2012 3:25 pm
- Location: Northants
Re: So, today was the day...
Jim's right, that's unreal! You lucky sod! You wanna see the state of some of these, not pretty. I once had one that had literally no good metal left on it anywhere and every time I shook it or knocked it, more gigantic pieces of rust would fall off 
Do everything you can to preserve that thing.
Do everything you can to preserve that thing.
O.C. 480 D.
Re: So, today was the day...
Bumper bar is booked into to be blasted next weekend, will then probably be powder coated, and injected with a few litres of Cavity wax!