Page 2 of 3
Posted: Tue Aug 12, 2008 7:11 am
by martinholmesuk
I'll check my turbo head for you.
Posted: Tue Aug 12, 2008 7:14 am
by Ben Harris
Just a guess, but the early ES's did have an auxillary water pump, for keeping the water flowing for a while once the engine was switched off. You might find that the bit you show was part of the original plumbing for that system, which is no longer on your engine as it's a later engine.
Mine was on a 1989 B18E, and I think the B18E was replaced in 1990, so yours would definitely be a later engine.
Ben.
Posted: Tue Aug 12, 2008 8:22 am
by pol
It would make sense to me if these were blanked channels that are used on other models.
Looks like a core plug?
I'd bet it's just a tight fit and probably corroded as you said. If this is the case, could you dril a small hole and use a self tap screw to remove it?
It'd be a whole lot easier with the head removed. It's not that much work once you get stuck in. You could do the cam belt at the same time if it's due. GSF or similar could sell you a head gasket for a fairly cheap price.
pol
Posted: Tue Aug 12, 2008 10:54 am
by Macaroon
Ben Harris wrote:early ES's did have an auxillary water pump
Nice Idea but mine has the auxiliary pump. They were fitted on all non turbo 1.7 models pre- and post 1990. Apparently they aren't really necessary which is why they were omitted on the 2 litre models (but don't quote me on this).
Pol wrote:Looks like a core plug?
Core plugs, after all, eh?
It kinda makes sense that it would be a blanking plate either to block unused channels or just to blank off openings in the normal channels. I tapped it with the screwdriver and it seemed quite solid though. If anybody can come up with a part number I'll buy them a pint or two!
Hopefully a pic of a Turbo head and Shimon's new 1.7 head will reveal a bit more.
As for replacement, I had budgeted for a head gasket and cam belt renewal at a local garage so I might throw this at him and see what he come up with. He can do a full 48k service at the same time. I have done head gaskets before on other cars but I really don't have the facilities now so I will have to spend cash instead. Can't afford it but I can't afford not to and Tonee is too good a car to allow her to rot.
Good job I'm not going on holiday this summer.

Posted: Tue Aug 12, 2008 11:19 am
by glasgowjim
have a 1.7 1992 turbo head just stripped down only a week ago. If you need it .
I will take a couple of photos later today or more likely tomorrow and see if either I or the photos can be of help to you.
best of luck jim
Posted: Tue Aug 12, 2008 12:12 pm
by shimon340
hi there
the pic you posted does look like it has a blanking plate in the centre.
I'll endevour to get some pics of the 1.7 non turbo head later today
best regards
shimon
Posted: Tue Aug 12, 2008 10:04 pm
by Macaroon
glasgowjim wrote:have a 1.7 1992 turbo head just stripped down only a week ago. If you need it.
Thanks. I'm hoping it doesn't come to that but its good to know you have one available if need be.
Should it turn out to be a blanking plate or core plug that has simply corroded, I may resort to Radweld or, failing that, even GunGum exhaust putty. So long as I can degrease the hole I should get good adhesion. It's not like the coolant runs at high pressure and the engine heat should set it good and proper. If I'm feeling clever I might even put a self tap screw in the putty to ensure I an pull it out at a later date.
But I'm getting ahead of meself. It still remains to be seen what this feature really is...
Anyway, I appreciate all your promises of pics and am feeling much more optimistic about this than I was a few days ago.
Cheers
Rich
Posted: Tue Aug 12, 2008 10:14 pm
by shimon340
hello
I went to see a friend of mine tonight who runs a volvo specialist independent garage and among other things we discussed your car and the coolant leak.
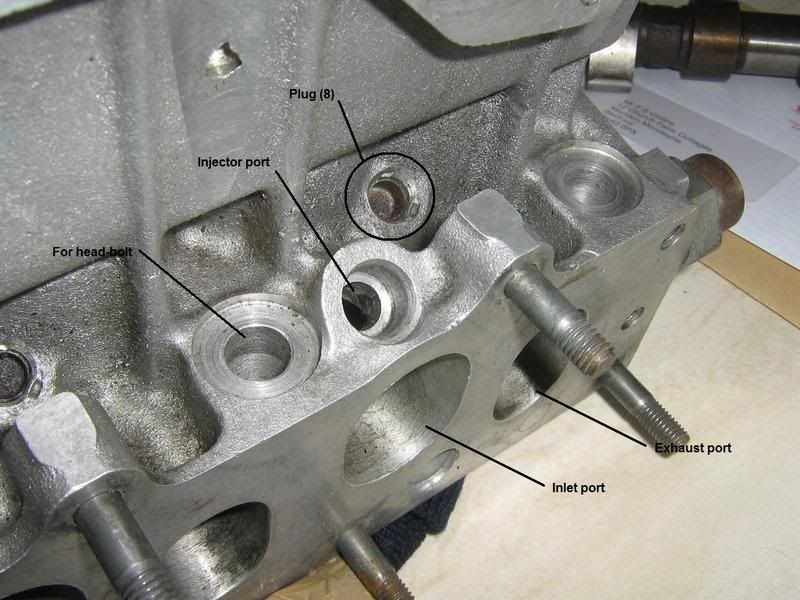
Below is a copy of the diagram on VADIS for the 480 turbo head
This exact diagram is for a 1992 B18FT with JC3 gearbox. I wasnt sure exactly what car you had when I was there. I did remember it was a turbo though!
I think where your coolant is leaking from is number 7. This is listed in the parts section as a "plug".
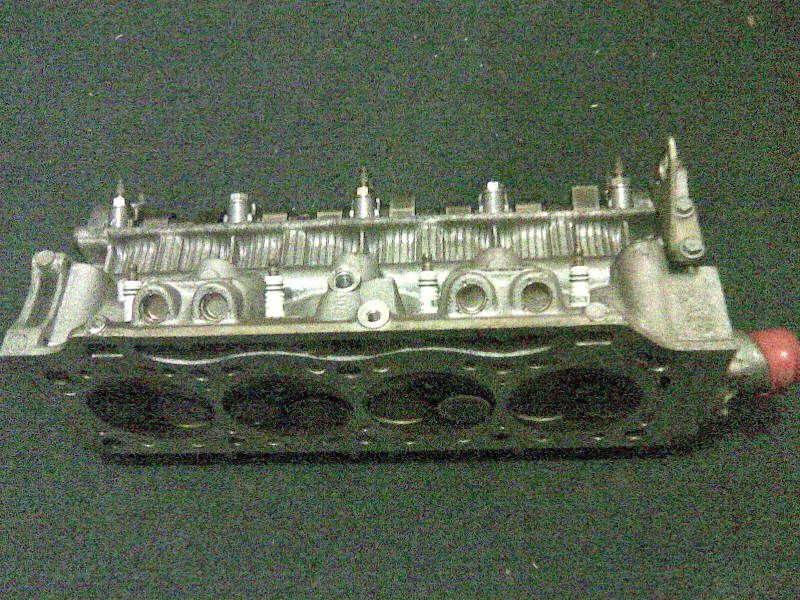
Here are some pics of a new 1.7 head. You can see that there are indeed core plugs, one in the location of your leak. Behind the plug on your head (near cam pulley side of head) is indeed coolant channels. A failing or corroded pulg would indeed leak coolant.
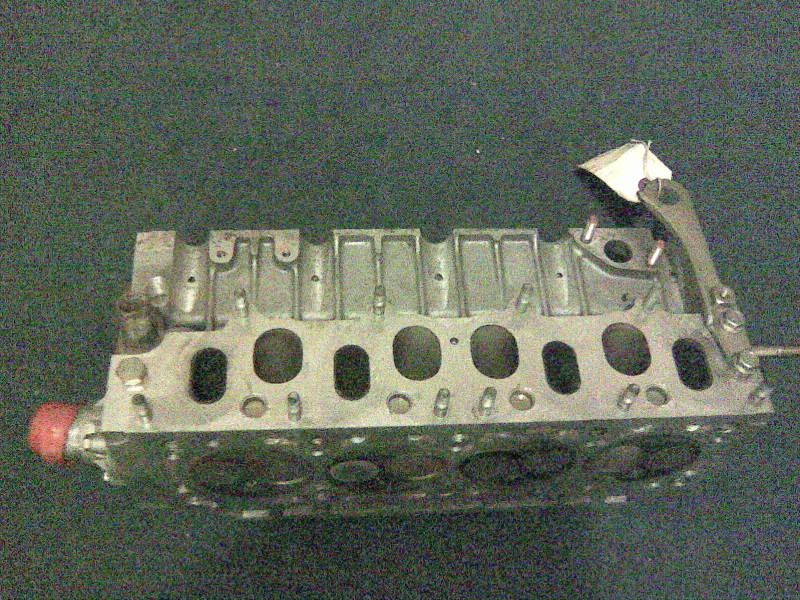
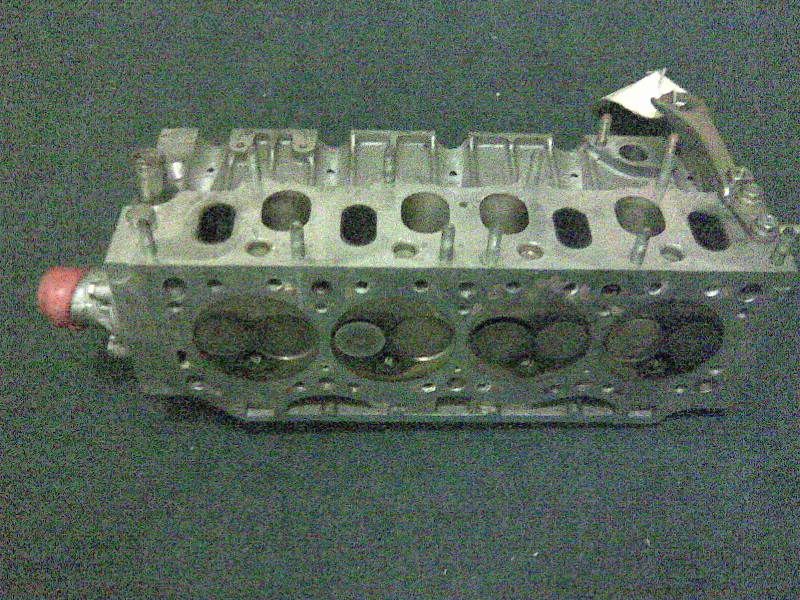
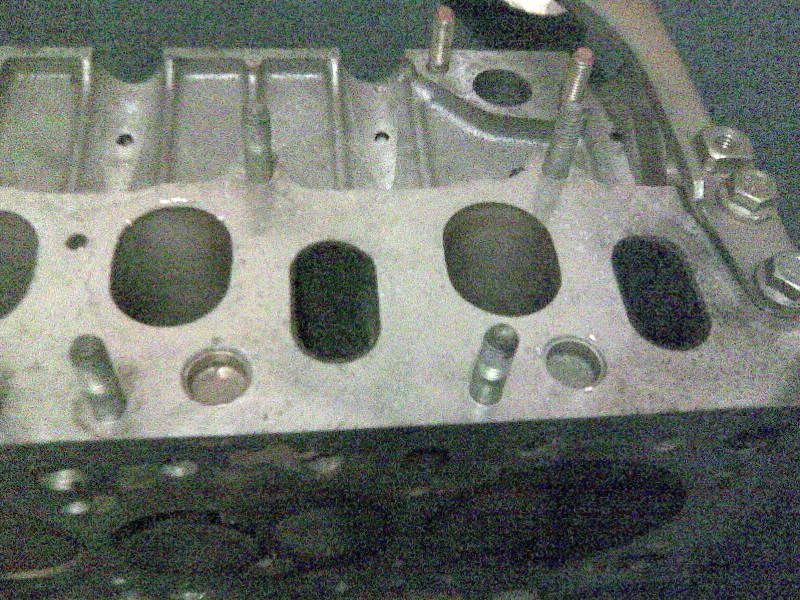
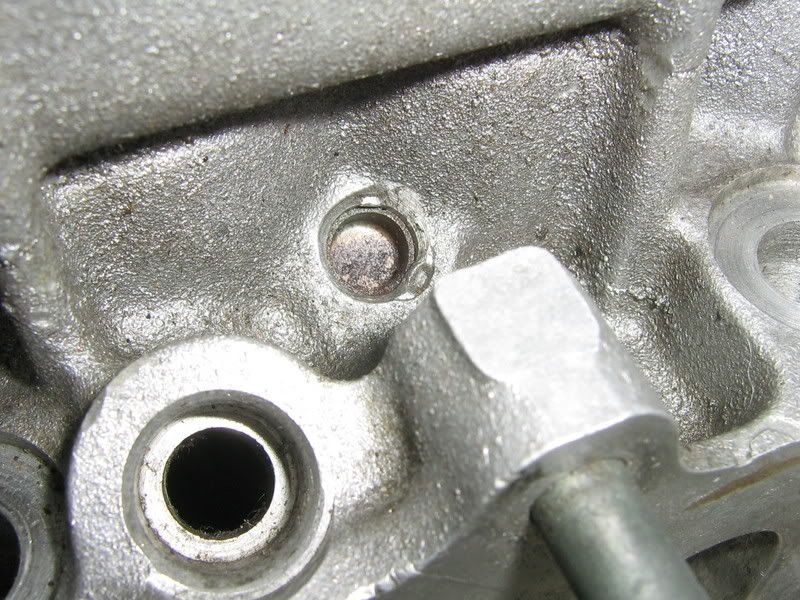
close up of the equivalent plug on your head which is leaking
there are some plugs on the spark plug side also

hope this helps you. Hopefully something easy to sort!
I might be able to get you the part number too if you need it
good luck and kind regards
Shimon
Posted: Tue Aug 12, 2008 11:41 pm
by eEm
I've just had a good look at the spare 1.7l head I've got and I think you're right about these holes being un-used waterways. They're very similar to the core plugs in the block just much much smaller.
Had the father have a look at them with his engineering glasses on and he recons any half decent welder should be able to sort it with the engine in-situ. But!! alloy heads warp, and the bungs in the holes are a different metal to the head so its only a matter of time before it happens again. Sooner or later it will happen to all of them.
Even following the Paynes manual you should be able to replace the head in a weekend. Theres a gasket set going for £35 on e-Bay, Belts shouldn't be more than £25 Max £150 for the head new, head bolts £45-80(depending where from), best get the head gasket from Volvo £75(?).
So £300+ for new head or max £50 for decent engineering firm to weld.
Its doable

Ian
ps. do you mean the ones shimon has noted or the smaller ones nearer the holes for the injectors? Smaller ones should be doable in situ.
Posted: Tue Aug 12, 2008 11:57 pm
by Macaroon
Hey Shimon, that's brilliant, thanks!

In fact mine is normally aspirated, a B18 FP, but it looks like those parts are the same on Turbo and non-turbo.
So a core plug it is then. That makes much more sense than my initial idea of some unused channels being opened via a broken head gasket - and potentially it is much cheaper to fix...
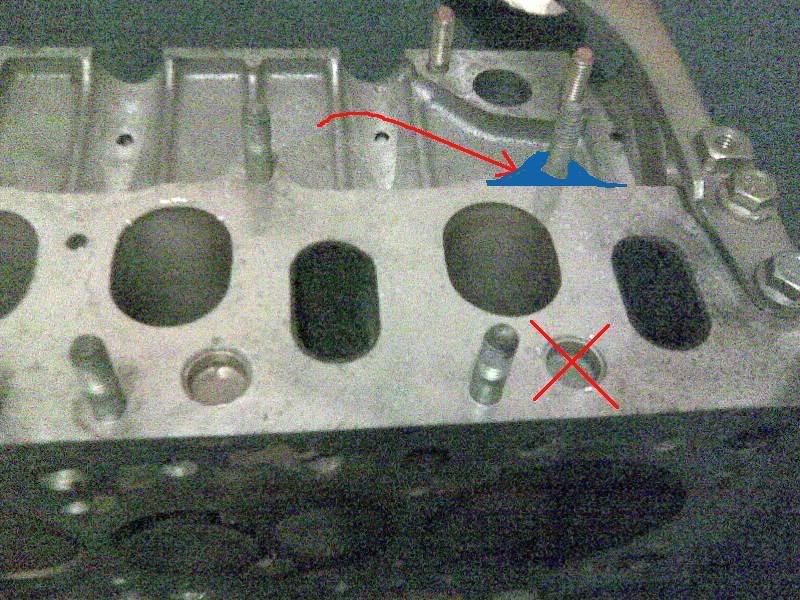
As it happens, my leak is from part 8 on the VADIS diagram which looks like it is a slightly smaller plug than 7. Also mine is still visible and exposed when the manifold is attached whereas part 7 would be covered - and what a bugger it would be to track down a leak there if you didn't know about the hidden core plugs!

I have modified one of your pics to show the location of the smaller plug. In this view it is hidden behind the stud mounting I have coloured blue and there should be one behind each of the upper manifold studs.
Any pics of this would still be handy.
So Gun Gum it is then. I don't see any reason to risk buggering up the alu head getting the plug out and with any luck I can apply the exhaust putty with all the manifolds in place. Mind you, I'd still appreciate a part number if you can get it in case the putty method doesn't work.
Amazingly the close up pic I took with my pocket camera on Macro really seems to show the plug is made from different metal (steel) to the alu head.
Anyway, I can see light at the end of the tunnel and things are looking up..

Posted: Wed Aug 13, 2008 12:04 am
by Macaroon
@ eEm: As you say, Ian, it is only a matter of time before they all rust as they will most probably be some sort of steel - but at least I know what they are now. And if things work out this one won't cost me more than a fiver and some scraped knuckles!
eEm wrote:do you mean the ones shimon has noted or the smaller ones nearer the holes for the injectors? Smaller ones should be doable in situ.
Yeah, the smaller ones. Doable in situ with a sealant, I hope. Putty ahoy me hearties! Parp Parp!
Man, I love this forum.
Rich
Posted: Wed Aug 13, 2008 8:25 am
by pol
If you're going down the 'bung it up' route, would it not be better to use chemical metal rather than gun gum?
Lots of plugs to go wrong there then. Can't wait!
pol
Posted: Wed Aug 13, 2008 10:16 am
by shimon340
hi there
yeah 8 is also listed as a plug so it looks like a simple thing that caused the leak. I'll try to get a pic of 8 for you tonight on the new head.
I hope it is accessable on the car for replacement. It seems on the 1.7 it is for a stud but isnt used on the turbo head hence the number 8 and why you have a plug.
It seems to have corroded from the rear to the front which is prob due to lack of antifreeze or old antifreeze (lack of corrosion protection) at some point in the cars life.
It has lasted 15 years so far and this isnt a common failure on these engines.
I'll hopefully post some more pics tonigh
kind regards
Shimon
Posted: Wed Aug 13, 2008 10:19 am
by shimon340
hi,
if you are going to seal it in situ and not replace the plug itself you might as well apply sealant over the whole hole rather than pull out the old plug - it is still doing some sealing! and...if you can get the old one out completely, might as well fit a brand new one. Can see these being very expensive bits from volvo...could even lathe your own
kind regards
shimon
Posted: Wed Aug 13, 2008 1:11 pm
by Macaroon
shimon340 wrote:I hope it is accessable on the car for replacement. It seems on the 1.7 it is for a stud but isnt used on the turbo head hence the number 8 and why you have a plug.
The 1.7 ES and Turbo both have plugs there apparently. Mine is an ES non-turbo. Seems we've found a whole new area of maintenance!
I can just about get my fingers in there so I will do it in situ. As you say, I'm gonna leave the corroded plug in for now, clean it the best I can and just patch over it until such time as it fails or the head has to come off when I will try to remove and replace it.
In fact I figure on a double approach. Putty on the outside and later Radweld on the inside.
Look forward to the pics, Cheers!

pol wrote:If you're going down the 'bung it up' route, would it not be better to use chemical metal rather than gun gum?l
I thought about chemical metal too but have never used it so don't know enough to choose.
The reason for gun gum was that it will not bond with the head so much that removing it at a later stage would become a pain (if I later want to remove and replace the patched plug) but I fear chemical metal might. Also gun gum strengthens with heat whereas I do not know the heat-handling characteristics of plastic metal / chemical metal.
All opinions and advice welcome!
Posted: Wed Aug 13, 2008 3:23 pm
by shimon340
oops typo
I wrote
" Can see these being very expensive bits from volvo...could even lathe your own"
That should red
CAN'T see these being very expensive...
Posted: Wed Aug 13, 2008 3:34 pm
by martinholmesuk
Take the head off and do it right mate. I'm not kidding as cleaning it up could cause it to leak more.
When I removed the spitfire core plugs they look OK from the outside but rusting badly on the inside. The last one looked new so was going to leave it but when removed it had almost gone through.
Getting them out ruins them so must replace.
Posted: Wed Aug 13, 2008 3:41 pm
by eEm
Radwelled is your best bet as the pressure is coming from the inside, bunging the hole from the outside won't last long, if at all. On the other hand, if you're DIY'ing it why not try radwelled on the inside and plumber's solder from the outside? just a thought...
Macro:-
Posted: Wed Aug 13, 2008 4:29 pm
by Macaroon
martinholmesuk wrote:Take the head off and do it right mate. I'm not kidding as cleaning it up could cause it to leak more.
Of course you're right Martin. And if one has gone they should all be knocked thru and replaced...
I'm all for doing things properly but a temporary seal would at least let me check whether the system is holding pressure and find out what else might be wrong - and should get it back up to London. Then I can get a few quotes for replacing all the core plugs in the head and the gaskets that will need to be done at the same time... and the timing belt while it is there and anything else I discover. I just don't have the facilities to do these things comfortably myself anymore.
eEm wrote:if you're DIY'ing it why not try radwelled on the inside and plumber's solder from the outside?
Am all for the radweld but hot solder would be a bugger to get in with everything still in place (which is the plan). That's why I think some sort of putty is the answer. (Or is plumbers solder a cold chemical paste?)
Great pics by the way! Plug 8 is the one, no doubt about it. Presumably removal is just a case of removing the head and knocking the plug thru using a dowel and hammer then the new one gets knocked in from the outside in similar fashion. I notice yours has been crimped in place so I wonder how you would get a new one in if you ever have to.
Incidentally, your pic clearly shows a recess in the plug for a dowel - which makes me think putty - or even chemical metal - could be pressed in there without bonding to the aluminium head. It won't last forever but it should buy me some time.
shimon340 wrote:That should read CAN'T see these being very expensive..
Understood
Posted: Wed Aug 13, 2008 5:48 pm
by eEm
Plumber's solder isn't really any different to electrical solder, it's melting point is just lower (correct me if I'm wrong). All you need is a mini butane torch to heat the metal around the plug, as it heats up and expands you need to apply the solder to the gap between the plug and the head, as it melts it should be drawn in to the gap, thus sealing it. Should be simple with the top of the induction off.
Best to do the radwelled first though, as it only cures when it comes in to contact with air.
The plugs can't be knocked out from the inside I'm affraid, it would be a self-tapping screw job, as they don't go right through the head.